W/Firebase-Installations: Error when communicating with the Firebase Installations server API. HTTP response:[400 Bad Request:{ "error":{ "code":400, "message":"API key not valid. Please pass a valid API key.", "status":"INVALID_ARGUMENT", "details":[ { "@type":"type.googleapis.com/google.rpc.Help", "links":[ { "description":"Google developers console", "url":"https://console.developers.google.com" } ] } ] } } ] 2020-04-2712:42:34.62122226-23596/in.co.androidapp.g7 E/Firebase-Installations: Firebase Installations can not communicate with Firebase server APIs due to invalid configuration. Please update your Firebase initialization process and set valid Firebase options (API key, Project ID, Application ID) when initializing Firebase.
通过单击 bin 符号删除该 API 密钥,或通过单击铅笔符号将 Application restrictions 添加到该 API 密钥。 !!警告!! 不要删除应用程序现有安装所需的 API 密钥,以用于其他 Firebase 服务,例如 Firebase Auth 或 Realtime-Database。
等待几分钟,让 Google 服务器更新。下次下载 google-service.json 配置文件应该包含一个新的 API 密钥。
GENYMOBILE assumes no liability whatsoever resulting from the download, install and use of Xposed, EdXposed, LSPosed and Magisk. Use at your own risk.
Note
Because Xposed and EdXposed are no longer maintained, we strongly recommend not using them anymore.
Android 5.0 - 7.1
Prerequisites
Xposed framework
Xposed installer
Installation
Drag’n drop the Xposed framework zip file (xposed-vXX-sdkXX-x86.zip) to your virtual device display to flash the device.
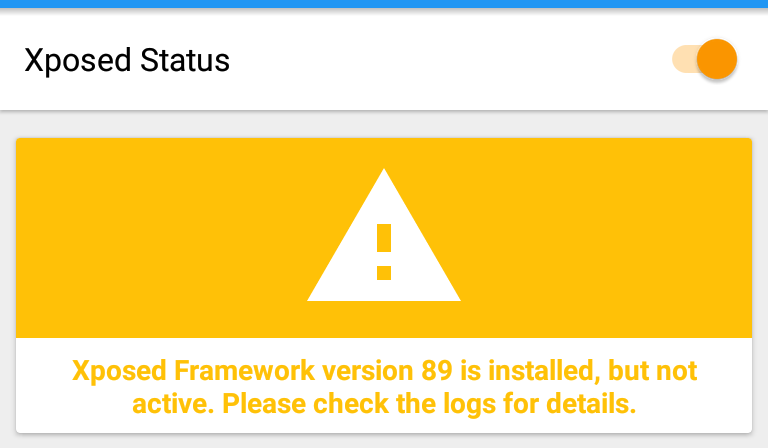
Drag’n drop Xposed Installer APK (XposedInstaller_*.apk). This should install and launch Xposed Installer application. At this stage, it will display that the Xposed framework is installed but disabled:
Reboot the device with adb reboot command. Do not reboot from *Xposed Installer* as this will freeze the device.
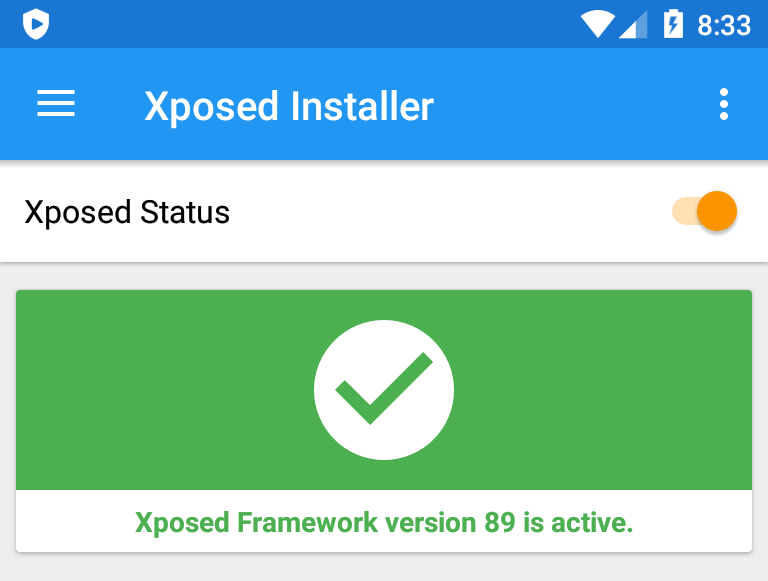
Launch Xposed installer. It should display “Xposed Framework version XX is active”:
Android 8.0
Xposed only works with Android 5.0 to 7.1. For Android 8.0, you need to use Magisk + Edxposed instead.
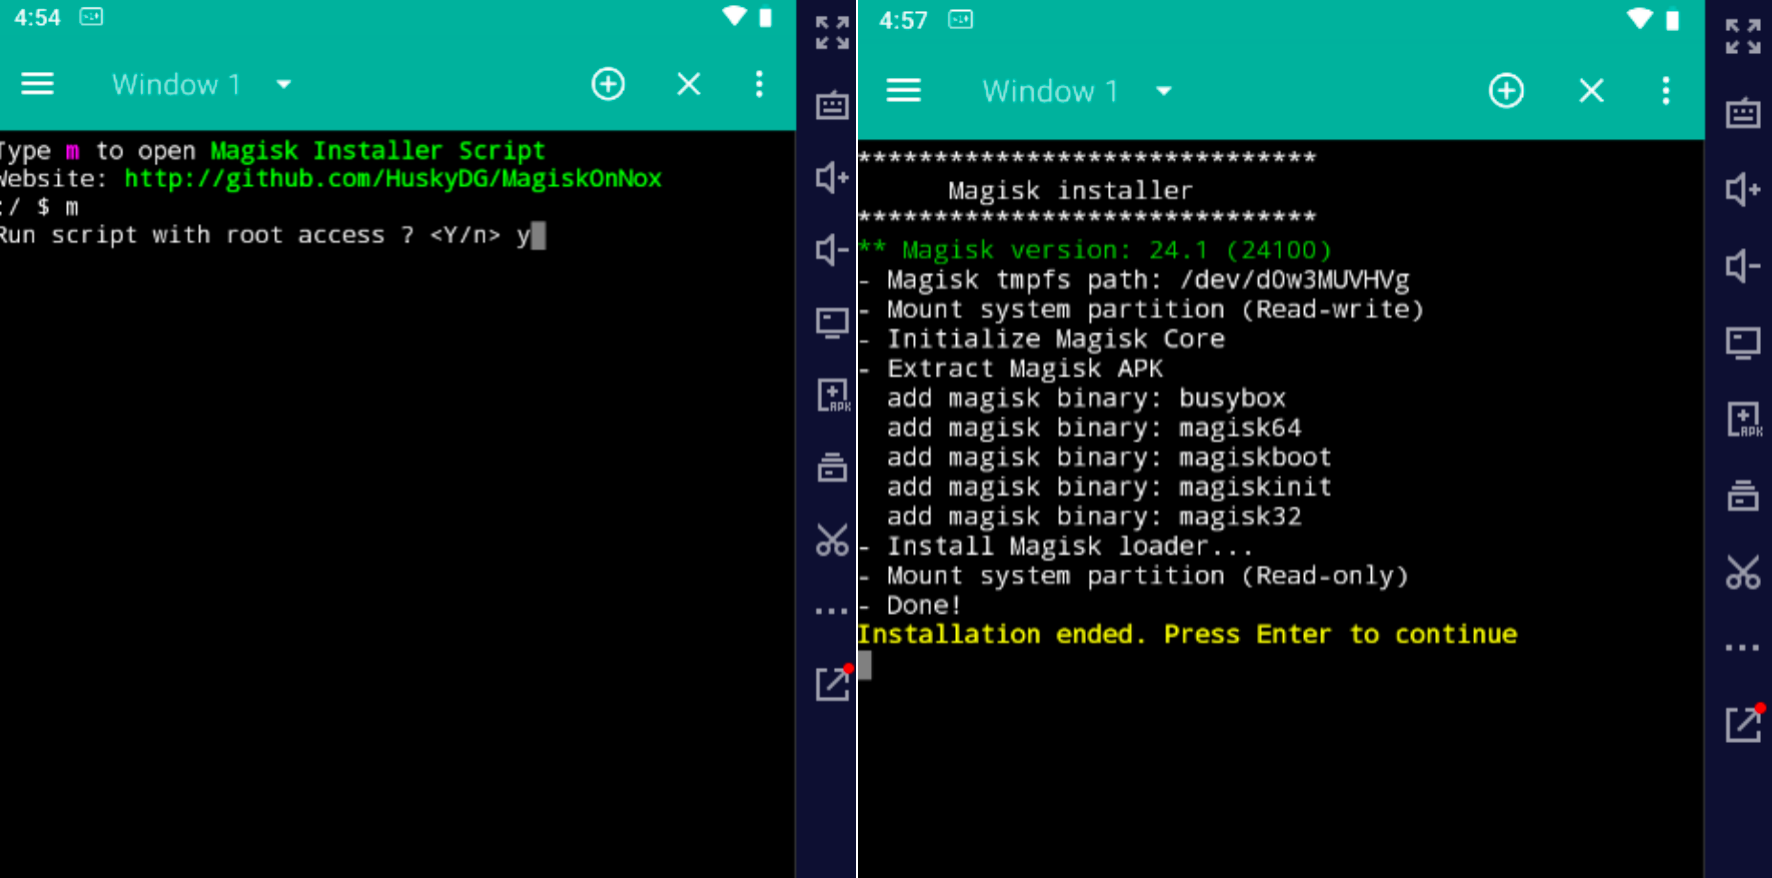
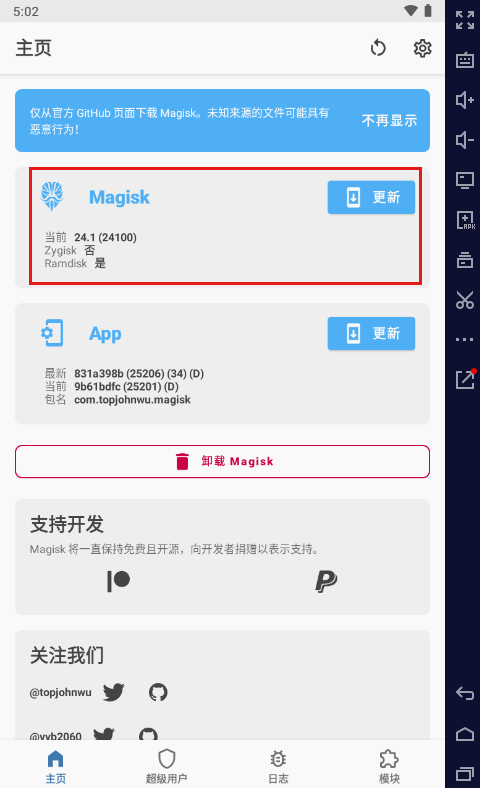
Drag’n Drop Magisk Manager apk: Magisk-v23.0.apk. Magisk Manager will install and open. Close it for now.
Drag’n Drop Magisk_rebuilt_1c8ebfac_x86.zip and flash it.
When flashing is complete, reboot the device.
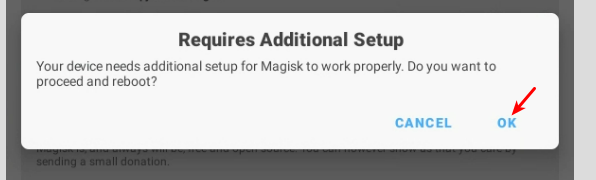
Launch Magisk Manager. It will request ROOT access, select “Remember choice forever” and click Allow:
It is possible that the popup opens in the background and is covered by Magisk Manager main window. If so press back to access the popup and allow ROOT:
You will then be prompted with an update to apply, accept it:
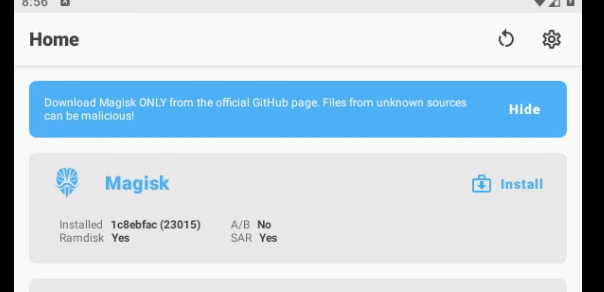
The device will reboot one more time. Launch Magisk Manager again, you should now be informed that Magisk is now installed in 1c8ebfac(23015) version:
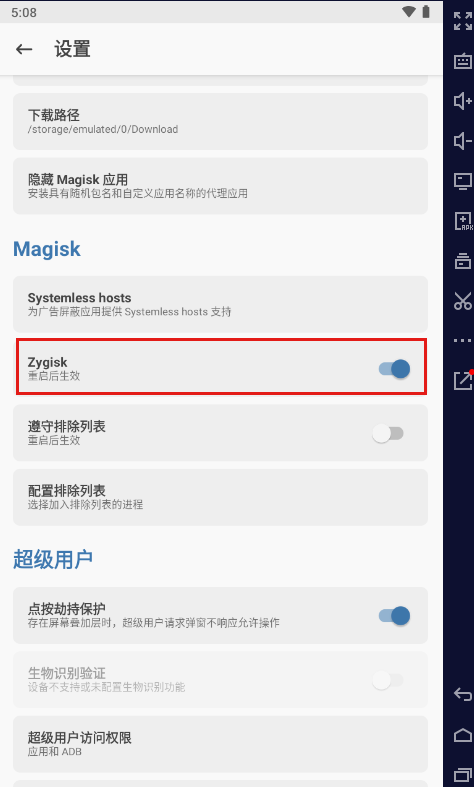
Step 2: Install Riru
Important
Do not install the Riru version available in the Magisk Manager app. Use the old Riru v25 version provided in this article (see prerequisite).
Drag’n drop the Riru archive onto the instance display: riru-v25.4.4-release.zip. Do not flash it! The archive must be installed from Magisk Manager.
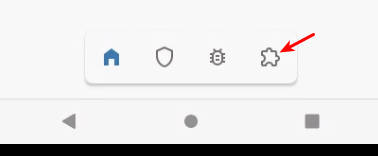
Launch Magisk Manager app and click on the last icon in the bottom toolbar to go to the module section:
Click “install from storage”:
Go to the Download folder from the menu:
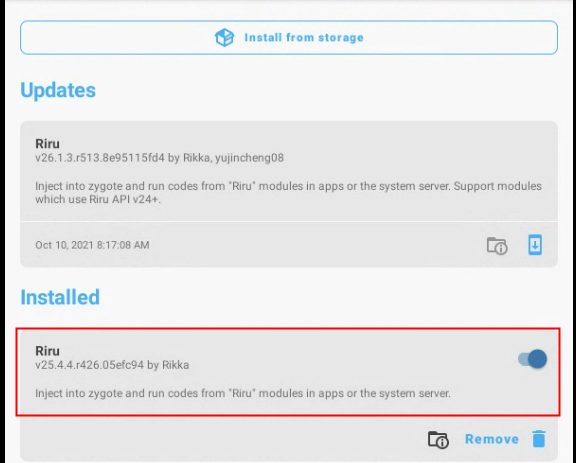
Select the Riru archive, riru-v25.4.4-release.zip
Reboot the device
Riru version 25 should now be present in the installed modules list in Magisk Manager:
Important
Make sure NOT to update to Riru v26 as it does not work with EdXposed right now.
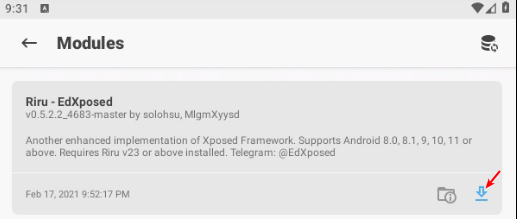
Step 3: Install EdXposed
You can install EdXposed framework from Magisk Manager. Go to Magisk Manager module manager:
Open the search widget and input “Edxposed”. Select Riru - EdXposed:
Install the module:
Reboot the device.
Drag’n drop Edxposed manager APK file (EdXposedManager-4.5.7-45700-org.meowcat.edxposed.manager-release.apk) to the device display.
Reboot the device
Edxposed manager should launch and display “Edxposed framework is active”:
Android 8.1 and above
Edxposed and Xposed are no longer maintained and there are no builds for Android 12 and above.
Instead, we will use LSPosed and Magisk for Android 8.1 and above.
Drag’n Drop Magisk Manager apk: Magisk-v23.0.apk. Magisk Manager will install and open. Close it for now.
Drag’n Drop the flashable archive:
Magisk_rebuilt_1c8ebfac_x86.zip if you use Android 8.1 - 10
Magisk_rebuilt_1c8ebfac_x86_64.zip if you use Android 11 and above on a PC or an old Mac Intel
Magisk_rebuilt_1c8ebfac_arm64.zip if you use a mac M1/M2
When flashing is complete, reboot the device.
Launch Magisk Manager. It will request ROOT access, select “Remember choice forever” and click Allow:
It is possible that the popup opens in the background and is covered by Magisk Manager main window. If so press back to access the popup and allow ROOT:
You will then be prompted with an update to apply, accept it:
The device will reboot one more time. Launch Magisk Manager again, you should now be informed that Magisk is now installed in 1c8ebfac(23015) version:
Step 2: Install Riru
Important
Do not install the Riru version available in the Magisk Manager app. Use the old Riru v25 version provided in this article (see prerequisite).
Drag’n drop the Riru archive onto the instance display: riru-v25.4.4-release.zip. The flashing process will fail, but this is normal. The archive must be installed from Magisk Manager.
Launch Magisk Manager app and click on the last icon in the bottom toolbar to go to the module section:
Click “install from storage”:
Go to the Download folder from the menu:
Select the Riru archive, riru-v25.4.4-release.zip
Reboot the device
Riru version 25 should now be present in the installed modules list in Magisk Manager:
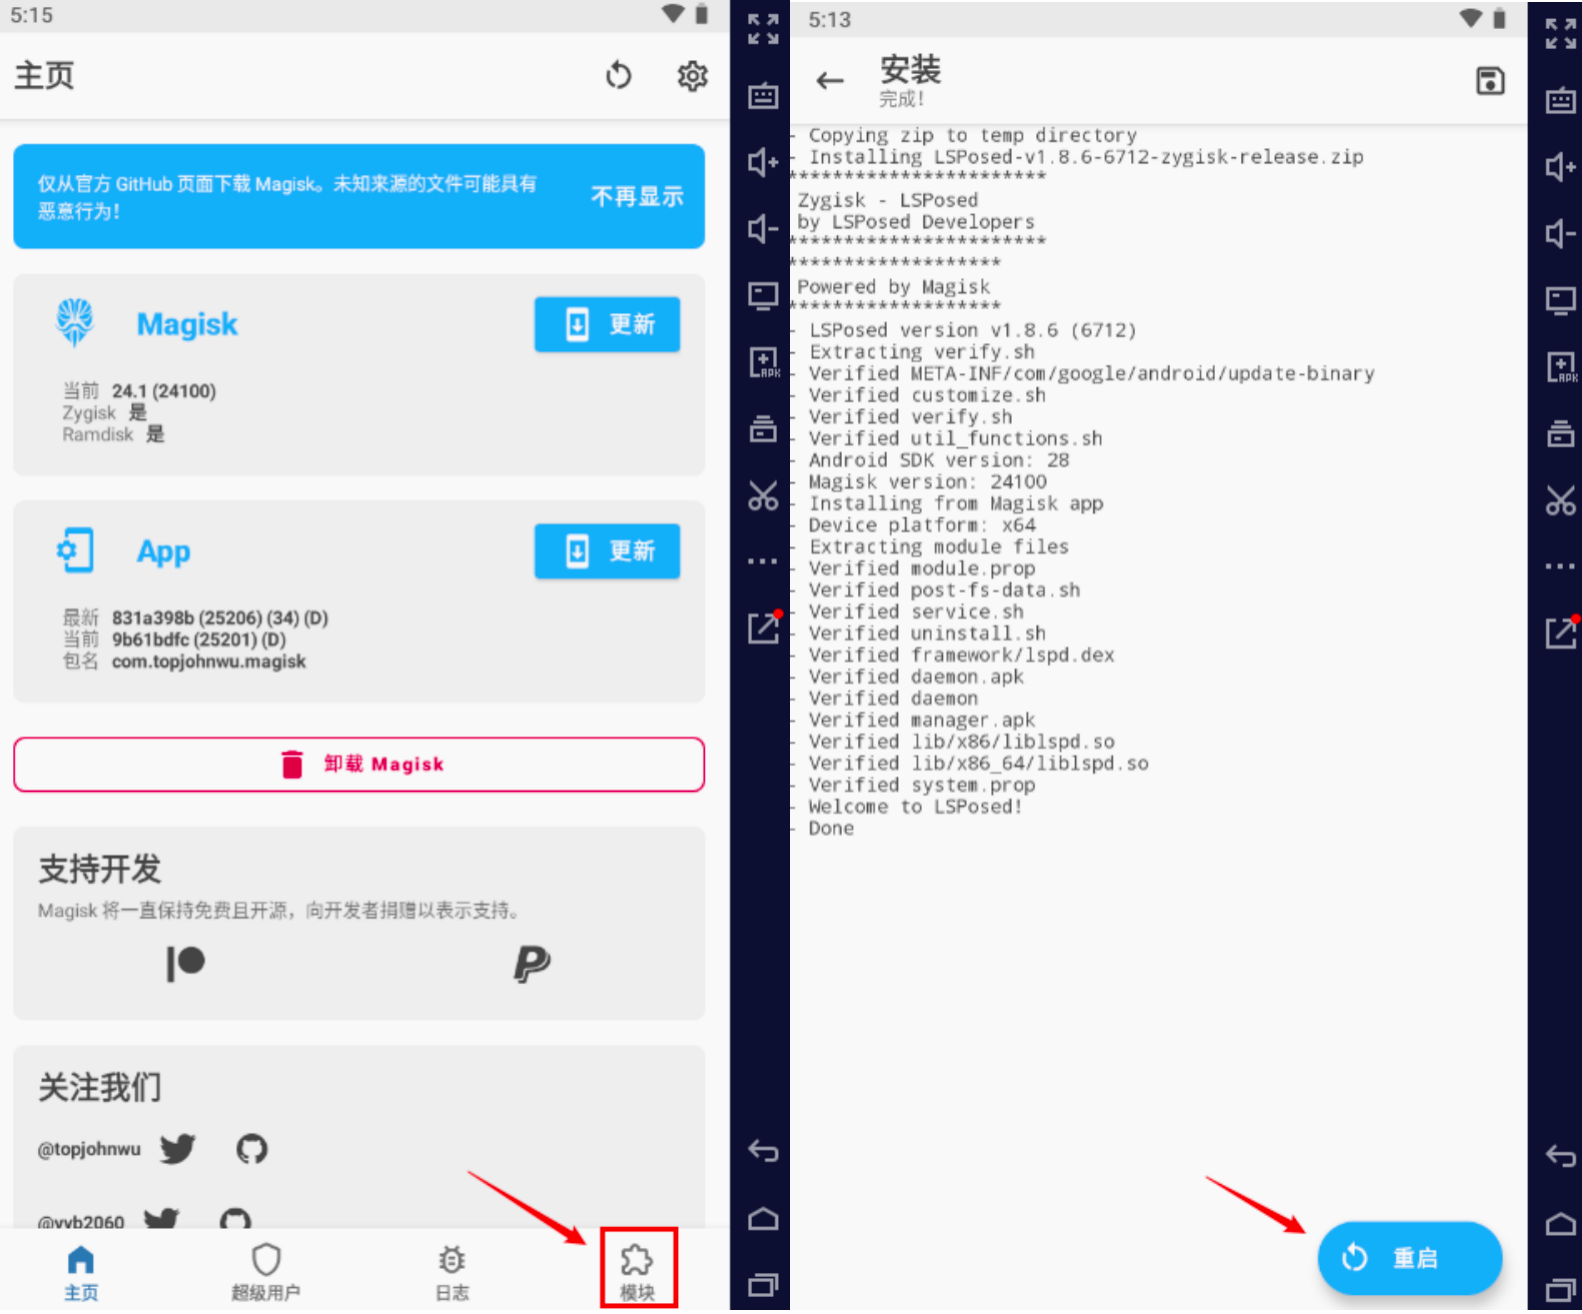
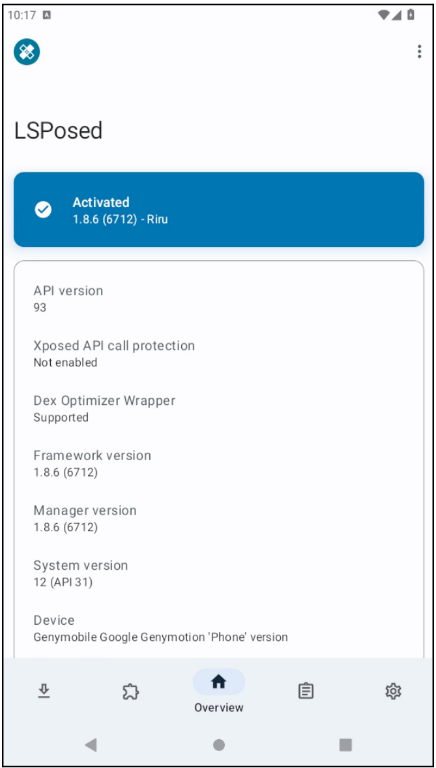
Step 3: Install Riru - LSPosed
Drag and drop the LSPosed archive to the device. Do not flash it!
Open Magisk Manager, go to the plugin manager page:
click Install from storage and select LSPosed-v1.8.6-6712-riru-release.zip:
Reboot the device when prompted
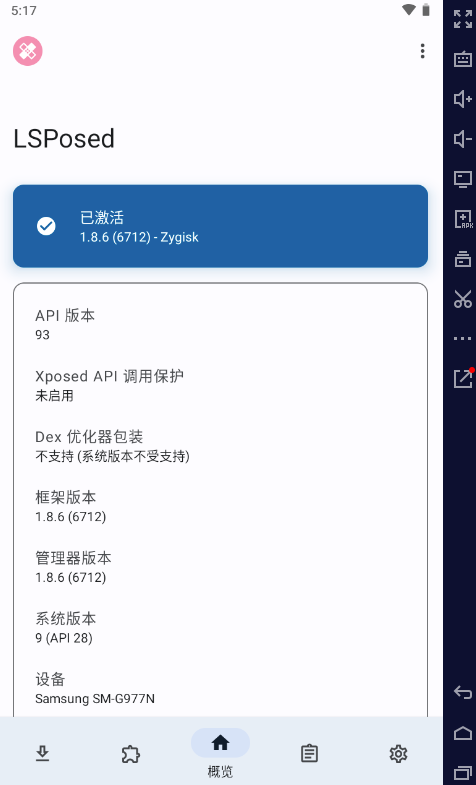
Drag’n Drop LSPosed_manager.apk, LSPosed manager should open: