点击New Profile新建一个策略,依次来填写各个字段 Name: Name 字段是为新建的发件策略进行命名,不会影响到钓鱼的实施,建议以发件邮箱为名字,例如如果使用 qq 邮箱来发送钓鱼邮件,则 Name 字段可以写xxxxxx@qq.com
Interface Type: Interface Type 是接口类型,默认为SMTP 类型且不可修改,因此需要发件邮箱开启 SMTP 服务 From: From 是发件人,即钓鱼邮件所显示的发件人。(在实际使用中,一般需要进行近似域名伪造)这里为了容易理解,就暂时以 qq 邮箱为例,所以 From 字段可以写:test<xxxxxx@qq.com>
完成钓鱼邮件的编写后,下一步则需要设计由邮件中超链接指向的钓鱼网页,点击New Page新建页面 Name: Name 是用于为当前新建的钓鱼页面命名,可以简单命名为钓鱼页面 1
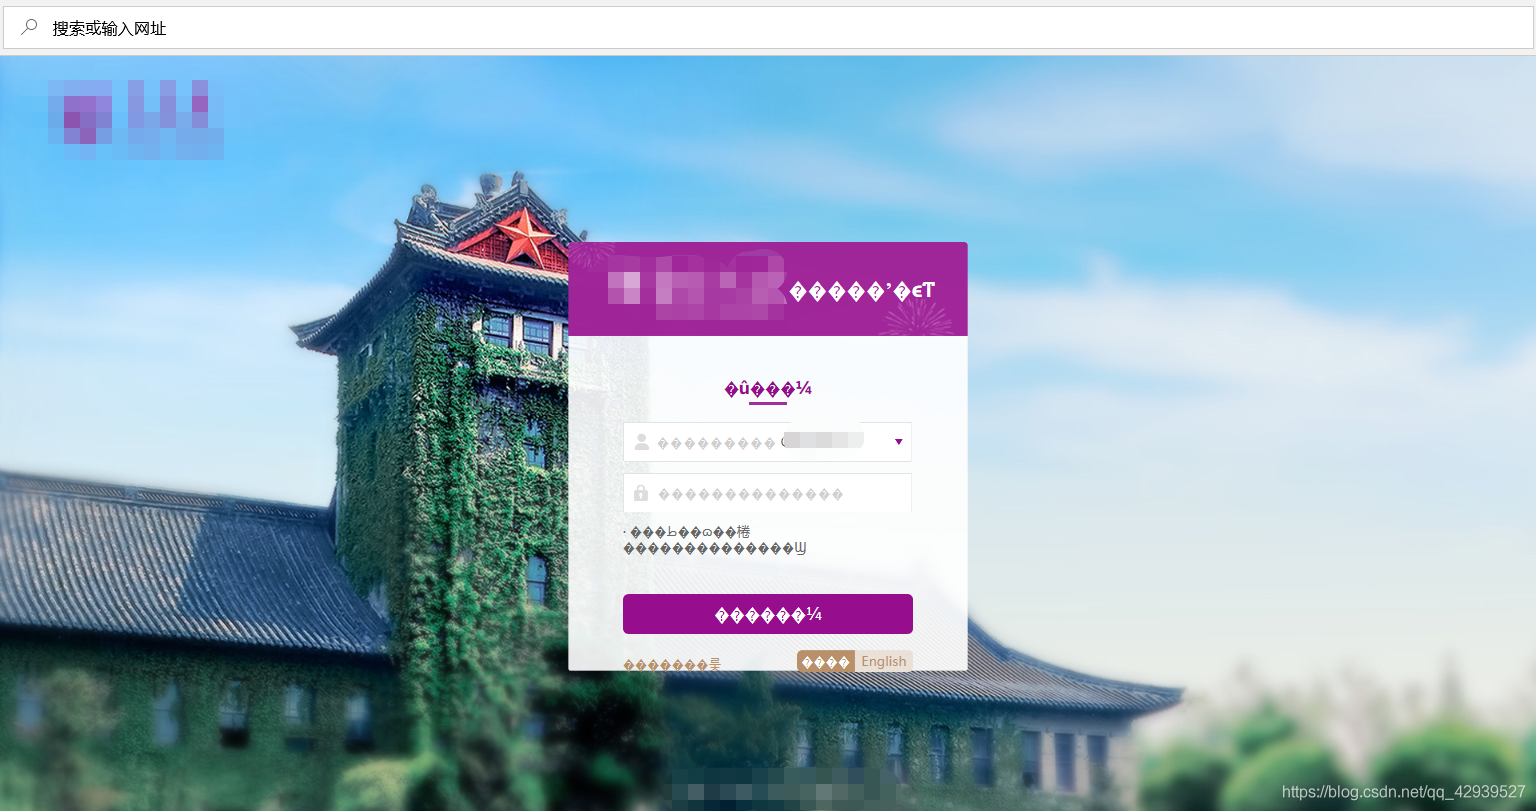
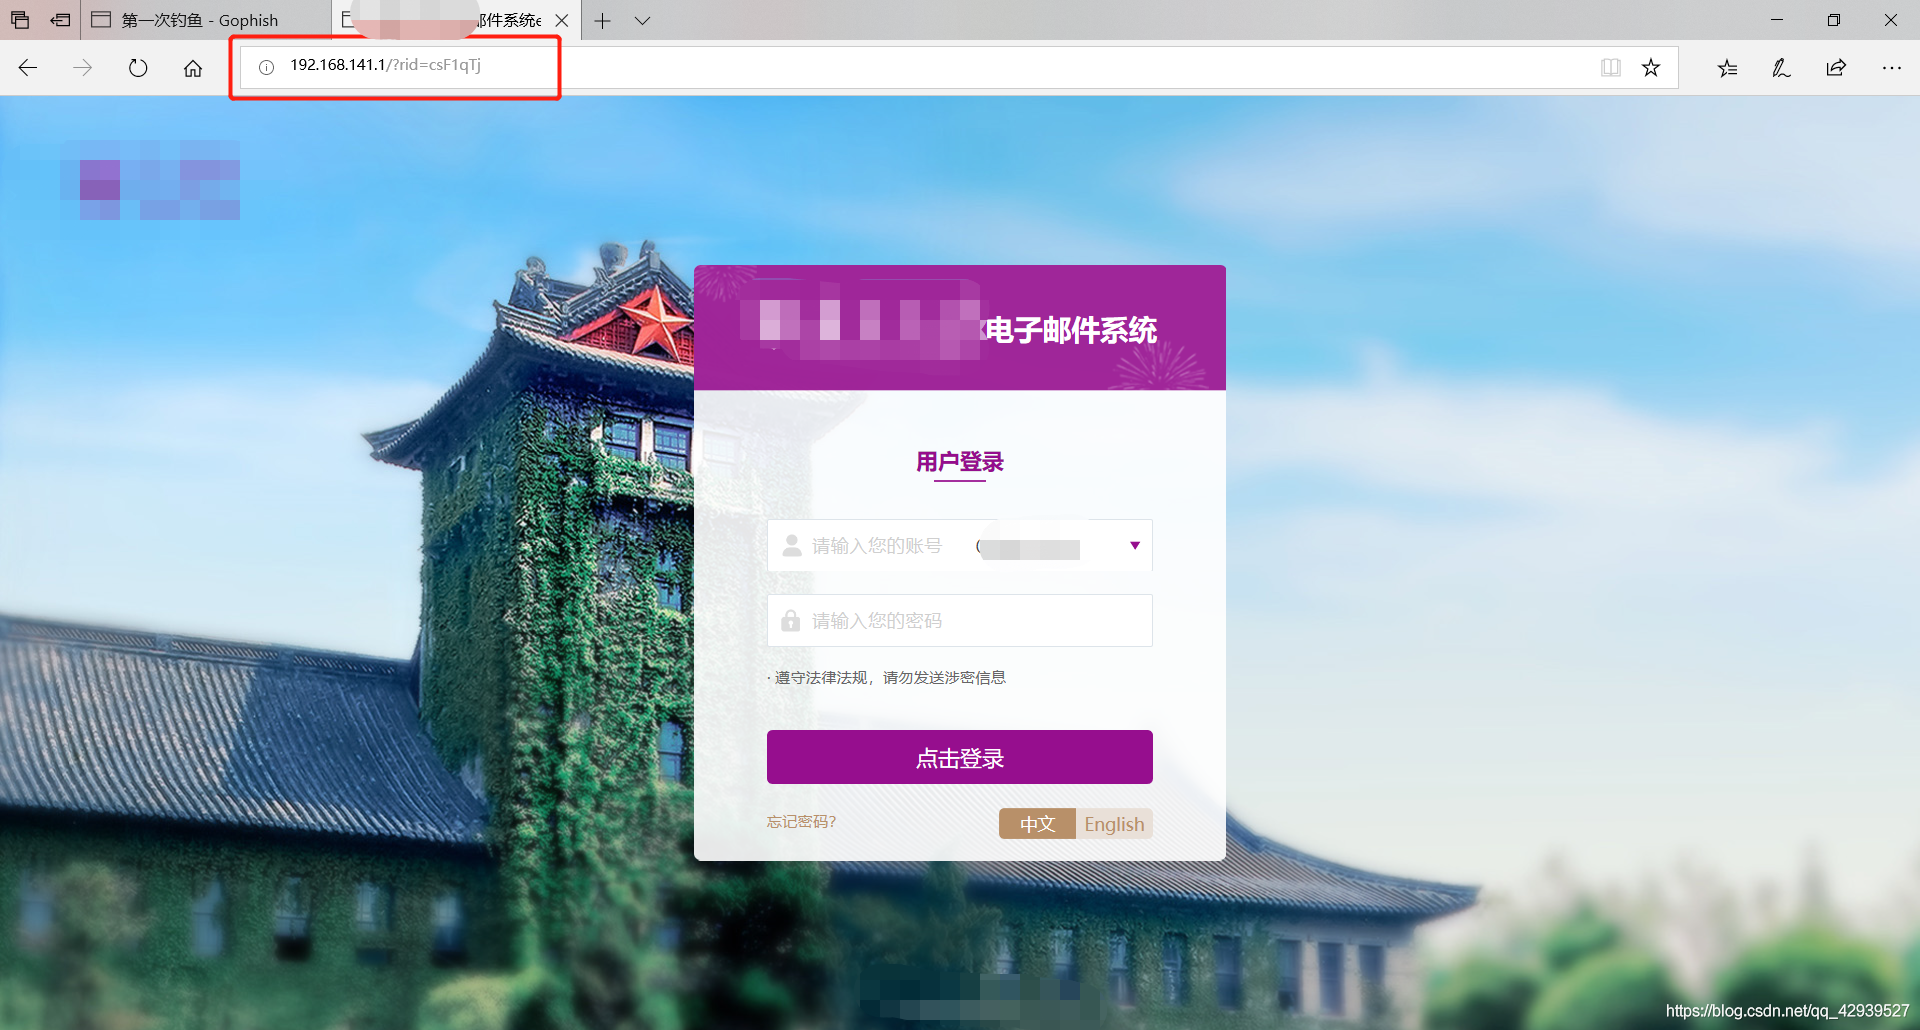
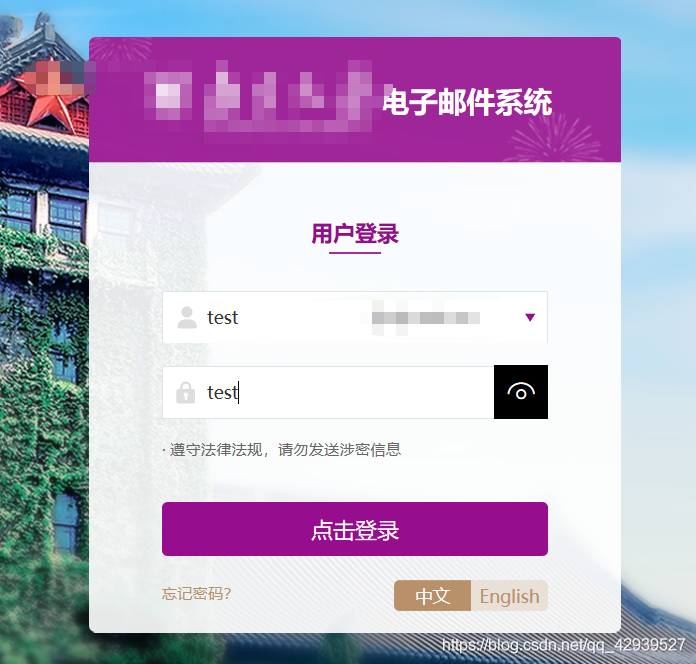
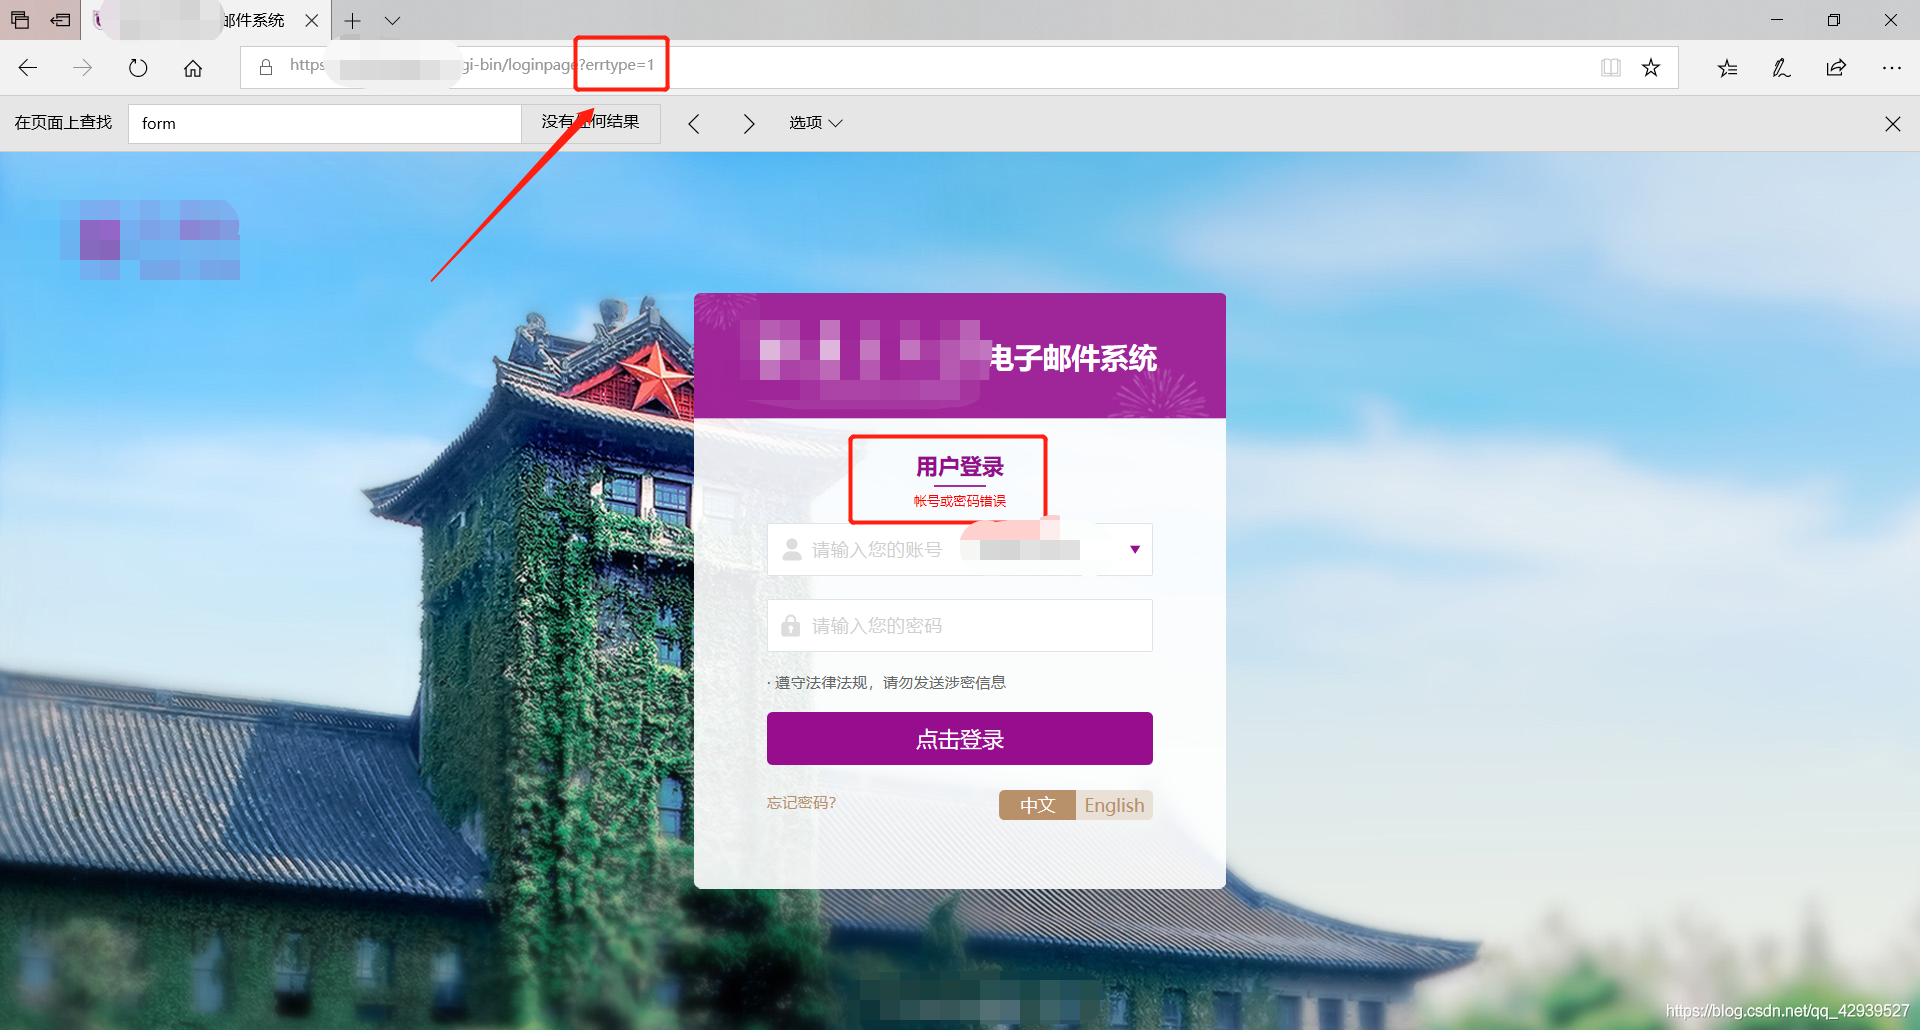
Import Site: 与钓鱼邮件模板的编辑一样,gophish 为钓鱼页面的设计也提供了两种方式,第一种则是Import Site 点击 Import Site 后,填写被伪造网站的 URL,再点击 Import,即可通过互联网自动抓取被伪造网站的前端代码 这里以伪造 XX 大学电子邮箱登录界面为例,在 Import Site 中填写https://mail.XX.edu.cn/cgi-bin/loginpage,并点击import
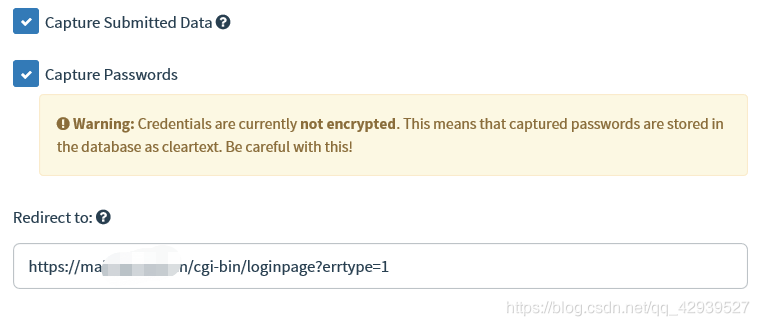
需要注意,在点击Import之前需要勾选上Change Links to Point to Landing Page,该功能实现了当创建钓鱼事件后,会将邮件中的超链接自动转变为钓鱼网站的 URL Subject: Subject 是邮件的主题,通常为了提高邮件的真实性,需要自己去编造一个吸引人的主题。这里简单填写成“第一次钓鱼测试”
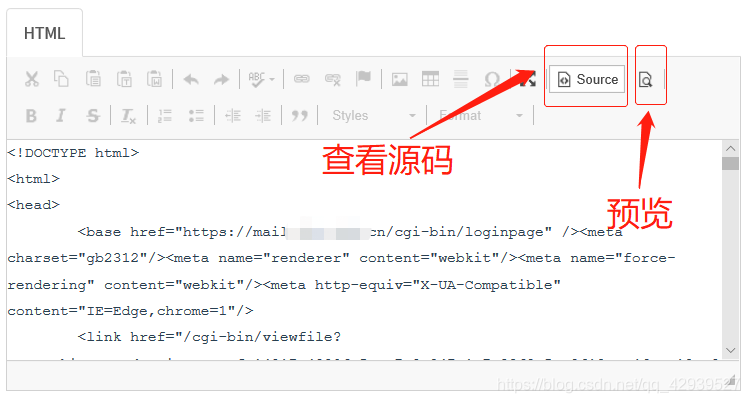
内容编辑框: 内容编辑框是编写邮件内容的第二种模式,内容编辑框提供了Text和HTML两种模式来编写邮件内容,使用方式与正常的编辑器无异。 其中 HTML 模式下的预览功能比较常用到,在编辑好内容后,点击预览,就可以清晰看到邮件呈现的具体内容以及格式
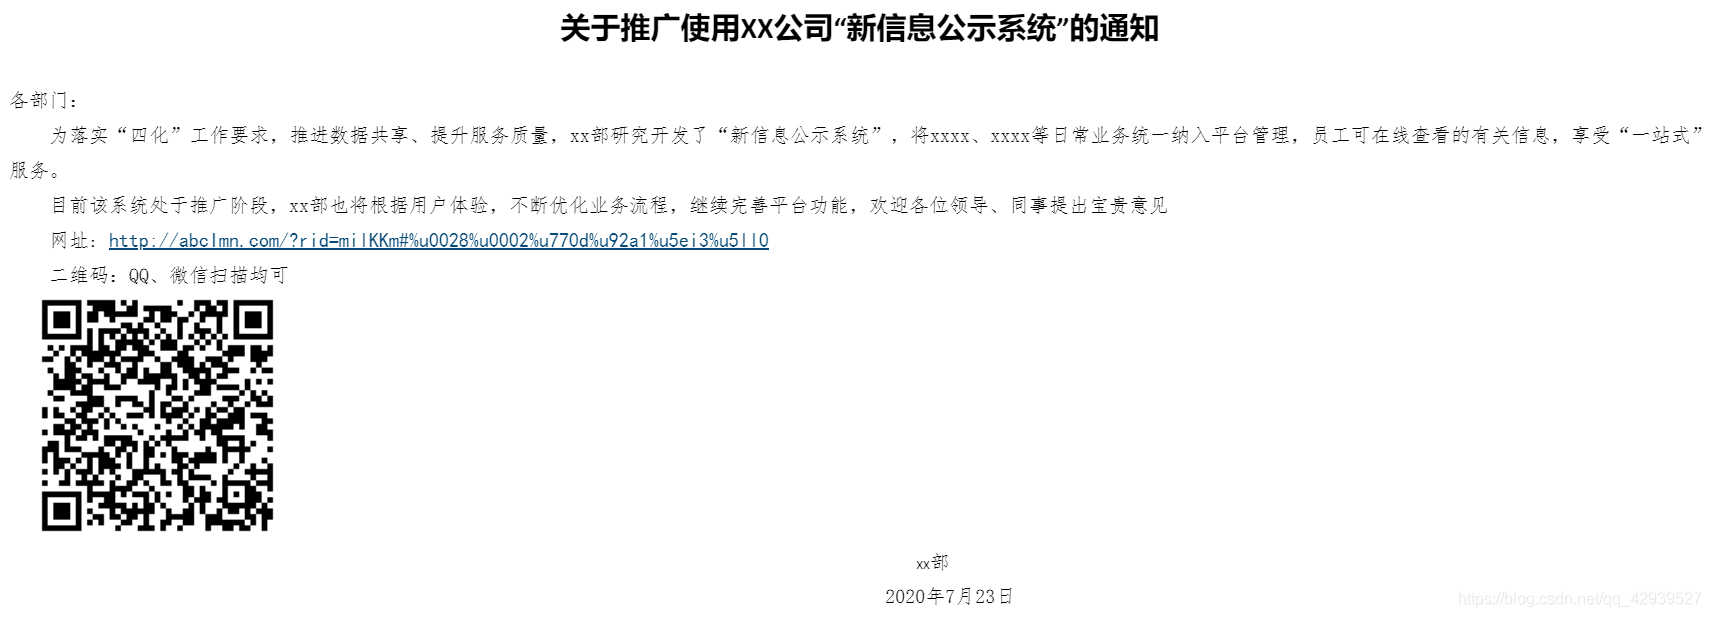
近似域名: 搜寻了一番,我们锁定了客户公司具有登录功能的门户网站,打算通过它来钓员工的 OA 门户账号密码。为了提高可信度,我们根据门户网站的域名abclmn.com申请了近似域名abcimn.com,因为 i 的大写 I,与门户网站的 l(L) 在某些字体下看起来是没有区别的,所以能够达到一定的仿真效果
选择邮件主题: 经过一番信息收集,我们找到了一则通知是关于客户公司近期正在推广新的信息公示系统,并附上了信息公示系统的 URL(无需身份认证),所以可以利用这一点编辑一封主题是关于推广新信息公示系统的钓鱼邮件,诱导公司员工先通过我们的钓鱼页面登录 OA 门户,再通过重定向,定位到新的信息公示系统。这样,既能捕获到员工的 OA 账号密码,又能够有效降低可疑度,形成一个闭环。
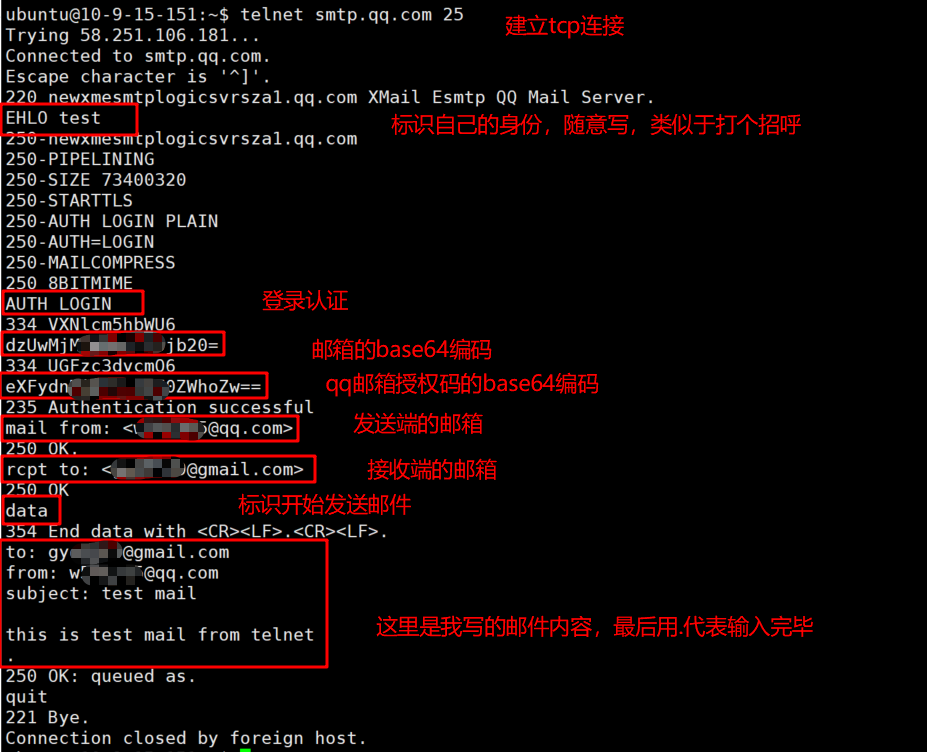
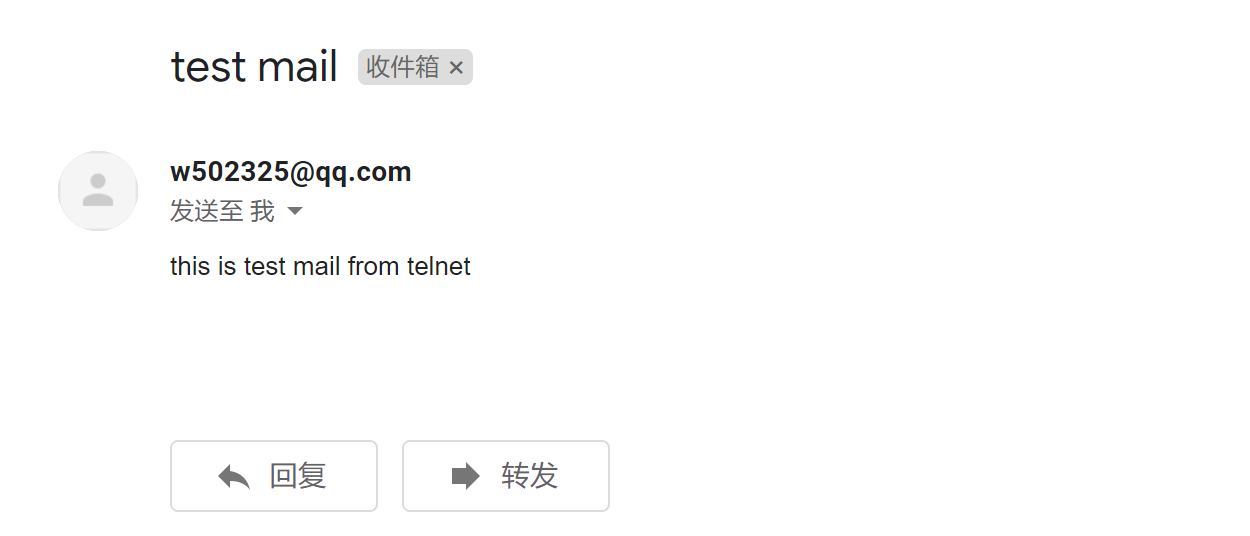
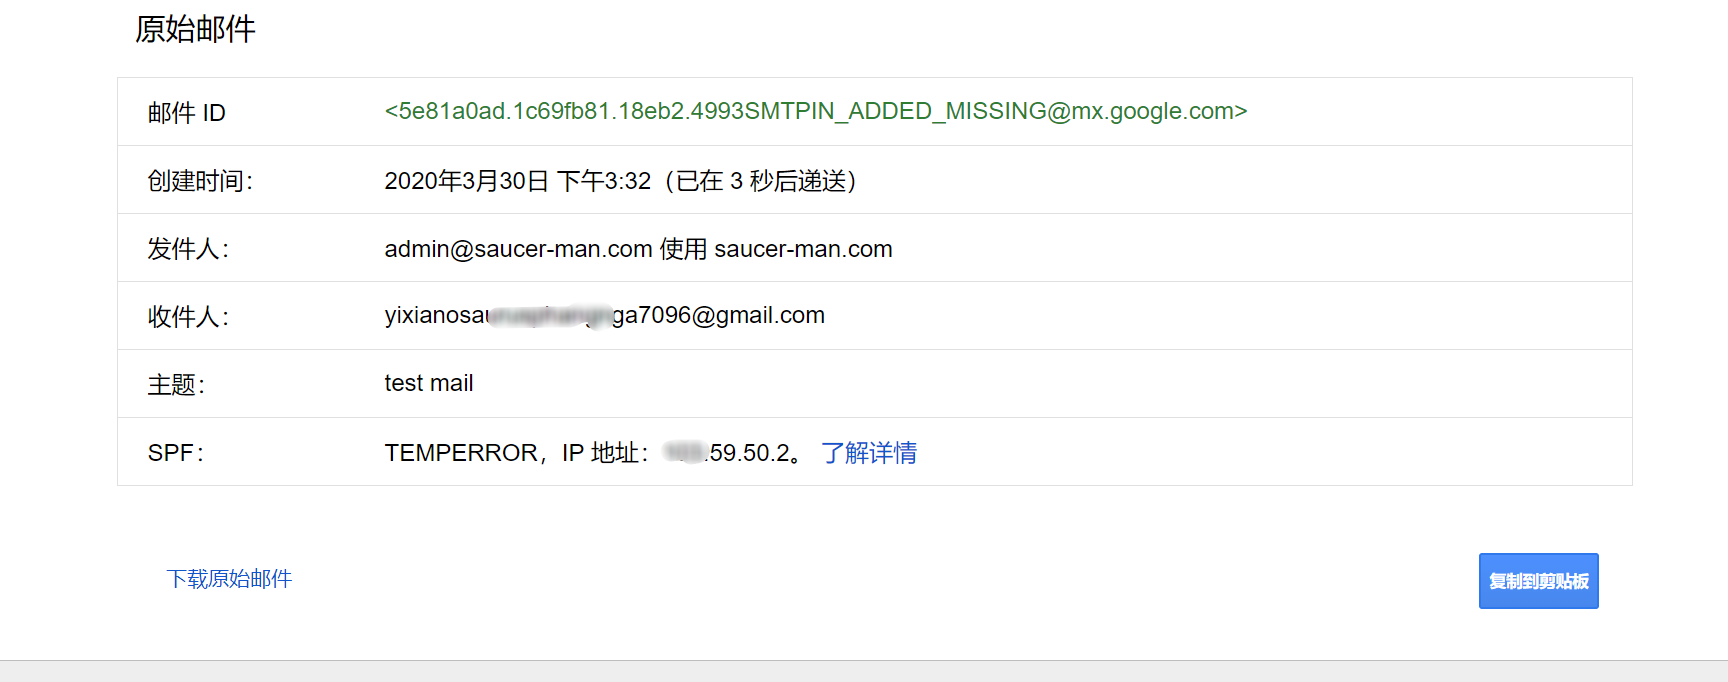
Delivered-To: yixianosaurusphangnga7096@gmail.com Received: by 2002:a4f:f31a:0:0:0:0:0 with SMTP id c26csp2268818ivo; Mon, 30 Mar 2020 00:33:01 -0700 (PDT) X-Google-Smtp-Source: APiQypJvIKWdfG+6JpupjdqrYQfiXBeg7CPCrQ/ME+6eM+jUzhd19nOOsyGO1oi2FzXc892BL1EW X-Received: by 2002:a63:6d0b:: with SMTP id i11mr2776601pgc.404.1585553581825; Mon, 30 Mar 2020 00:33:01 -0700 (PDT) ARC-Seal: i=1; a=rsa-sha256; t=1585553581; cv=none; d=google.com; s=arc-20160816; b=YbBzqga5isSYWhaqAsRdWg/lzDH0S92InVplzXxAmGXkCqxdt7C3t9mOFLwZpEkpqi QW4Y2I4+vAIpbiMi2MqUyLL7tU2Cq/jNlaO6VX+r0Gu1nx8ZxTpUR b9yqaZaq6tcg48EWzGfuOT3uBs2aVp9W8Upf0MeSxPLVbpgEnzqMRjqlIhZaXAIe9kR1xg4V4IObPilZfBb4uYY0ayLTDcDDMXTc GyjA== ARC-Message-Signature: i=1; a=rsa-sha256; c=relaxed/relaxed; d=google.com; s=arc-20160816; h=subject:from:to:date:message-id; bh=ecGWgWCJeWxJFeM0urOVWP+KOlqqvsQYKOpYUP8nk7I=; b=ZHdmyDNpyMR/DCfW1heAmecEtINi+fb5Myr8+sjj1meh6oH0VhTZzvOCTylrp/WXlu kGgDW2zzC95QeKAFF3ZbXClFoDVgEGECg2mTmQ2QUXB74qi5EDtu+X4izzxqjBZ+ m97oeNIBQoka40rvItwK8foHNSo3l6k55cpTvJ6+c1SvOz/eW5f0Im7dFpX3ELrioNMK Kuvw== ARC-Authentication-Results: i=1; mx.google.com; spf=temperror (google.com: error in processing during lookup of admin@saucer-man.com: DNS error) smtp.mailfrom=admin@saucer-man.com Return-Path: <admin@saucer-man.com> Received: from saucer-man.com ([003.11.50.2]) by mx.google.com with ESMTP id m6si9771129pld.54.2020.03.30.00.33.01 for <yixianosaurusphaaaga7096@gmail.com>; Mon, 30 Mar 2020 00:33:01 -0700 (PDT) Received-SPF: temperror (google.com: error in processing during lookup of admin@saucer-man.com: DNS error) client-ip=003.11.50.2; Authentication-Results: mx.google.com; spf=temperror (google.com: error in processing during lookup of admin@saucer-man.com: DNS error) smtp.mailfrom=admin@saucer-man.com Message-ID: <5e81a0ad.1c69fb81.18eb2.4993SMTPIN_ADDED_MISSING@mx.google.com> Date: Mon, 30 Mar 2020 15:32:58 +0800 To: yixianosaurusphaaaga7096@gmail.com From: admin@saucer-man.com Subject: test mail X-Mailer: saucer-man.com
Have you ever encountered the following error within Gobuster?
Error: the server returns a status code that matches the provided options for non existing urls. http://ipaddress/9b9353c0-3de2-4df5-abd7-0f618e4d70ab => 200. To force processing of Wildcard responses, specify the ‘–wildcard’ switch
Likely, the webserver you’re attacking is configured to always respond with a 200 response code. For example, let’s look at BART on Hack The Box.
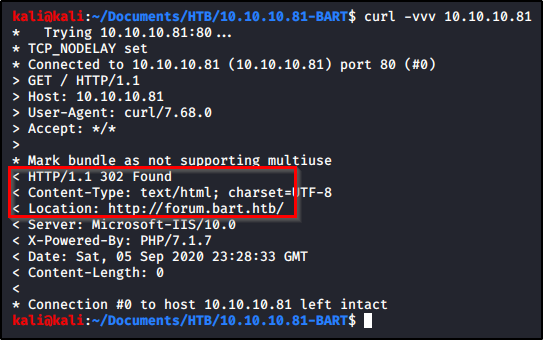
Let’s see if we can extract anything with Curl. We’ll start by sending a request out to the default page. We see that it returns a 302 redirect to forum.bart.htb.
1
curl -vvv 10.10.10.81
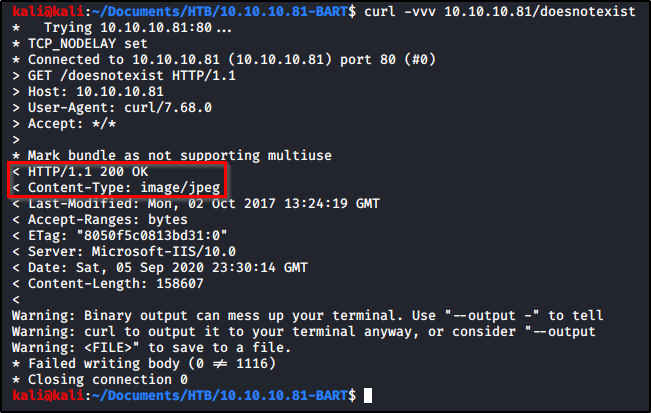
Let’s try a request to a page we know doesn’t exist, and we are returned a success 200 message that displays an image. This explains why Gobuster was returning a 200 message on each directory.
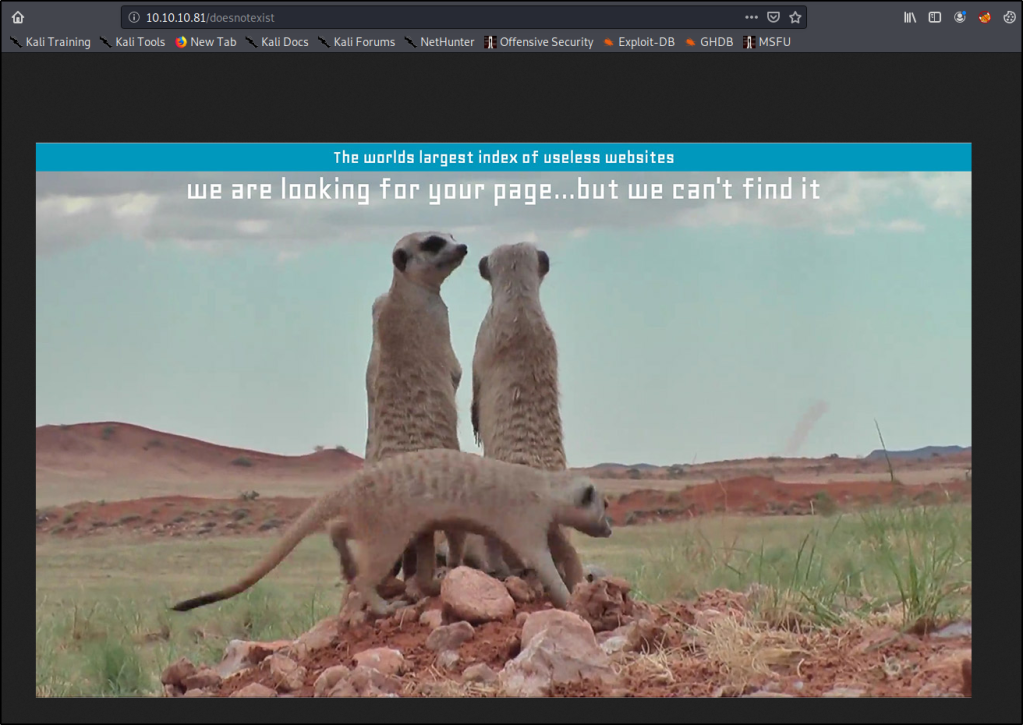
We can confirm this by browsing to the page and looking at the image.
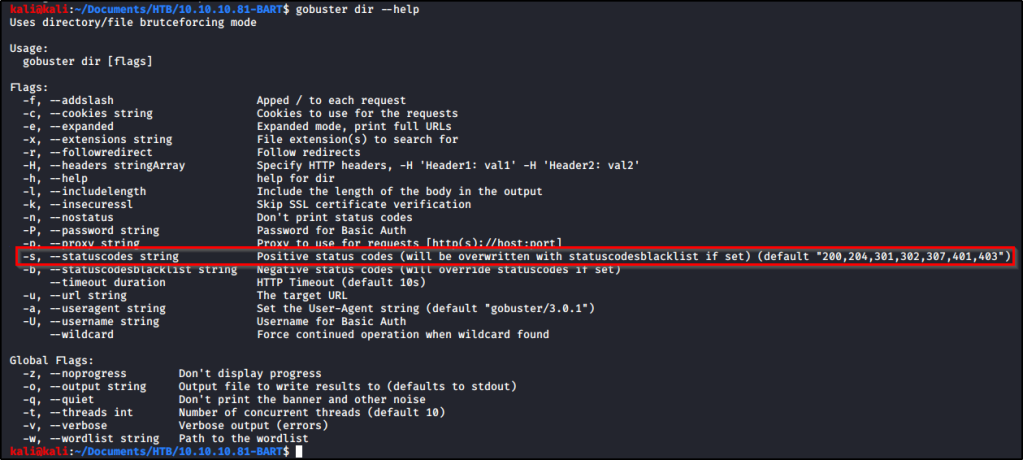
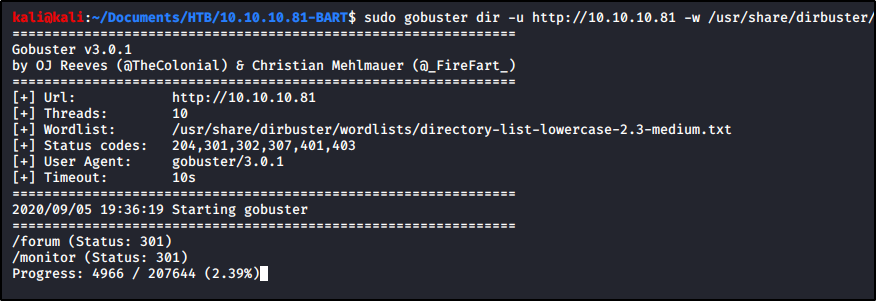
Armed with this information, we know that 200 response codes are bad, but other response codes (such as a 302) indicate a directory is present. Let’s rerun our Gobuster command, but we’ll specify which response codes we want returned.
Checking the help page, we can see that Gobuster accepts the following response codes; “200,204,301,302,307,401,403”.
So our command will look like this.
1
gobuster dir -u http://10.10.10.81 -w /usr/share/dirbuster/wordlists/directory-list-lowercase-2.3-medium.txt -s "204,301,302,307,401,403"
And with that command running, we eventually start to get some real results back.
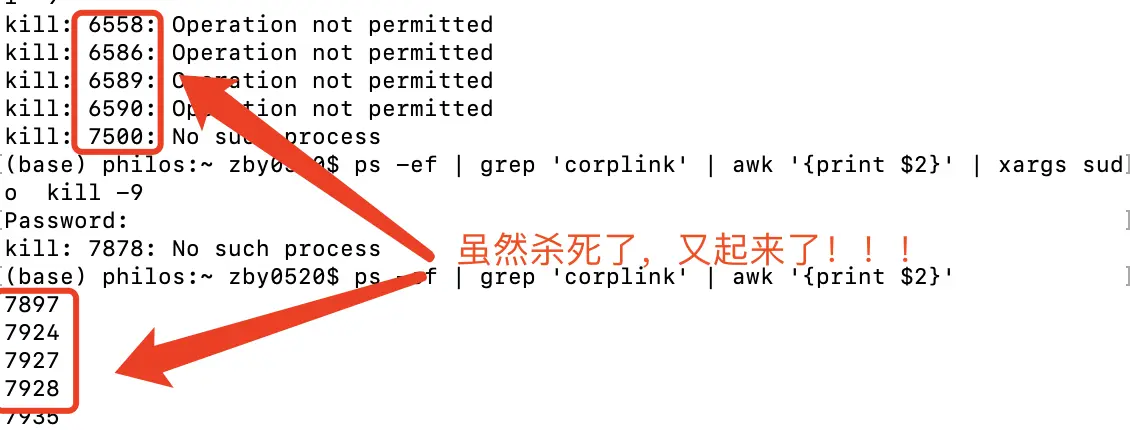
kill: 6558: Operation not permitted
kill: 6586: Operation not permitted
kill: 6589: Operation not permitted
kill: 6590: Operation not permitted
kill: 7500: No such process